Your ‘main’ product is the foundation of your entire sales funnel, and ThriveCart makes it effortless to build from the ground up.
In this ThriveCart product setup guide, you’ll learn how to create main products and offers that serve as the core of your checkout and funnel strategy, where customers enter all their details and payment information. Follow this checkout and funnel creation tutorial to design high-converting product pages, connect payment options, and launch funnels that drive consistent sales growth.
This comprehensive setup process covers three essential phases: product configuration, checkout optimization, and funnel integration. Each phase builds upon the previous to create a seamless customer purchasing experience.
How to set up your Products:
When heading to the products tab within your ThriveCart dashboard, you’ll see the ability to “Create Product” which will then ask you which product type you are creating.
A physical product would allow you to set shipping fulfillment options such as shipping rates for products that will need to be delivered to your customer, while a digital product would be delivered entirely online. Digital is the standard option for products such as services, courses, digital downloads, etc.
Below, we can see what a typical product that has just been created will look like:
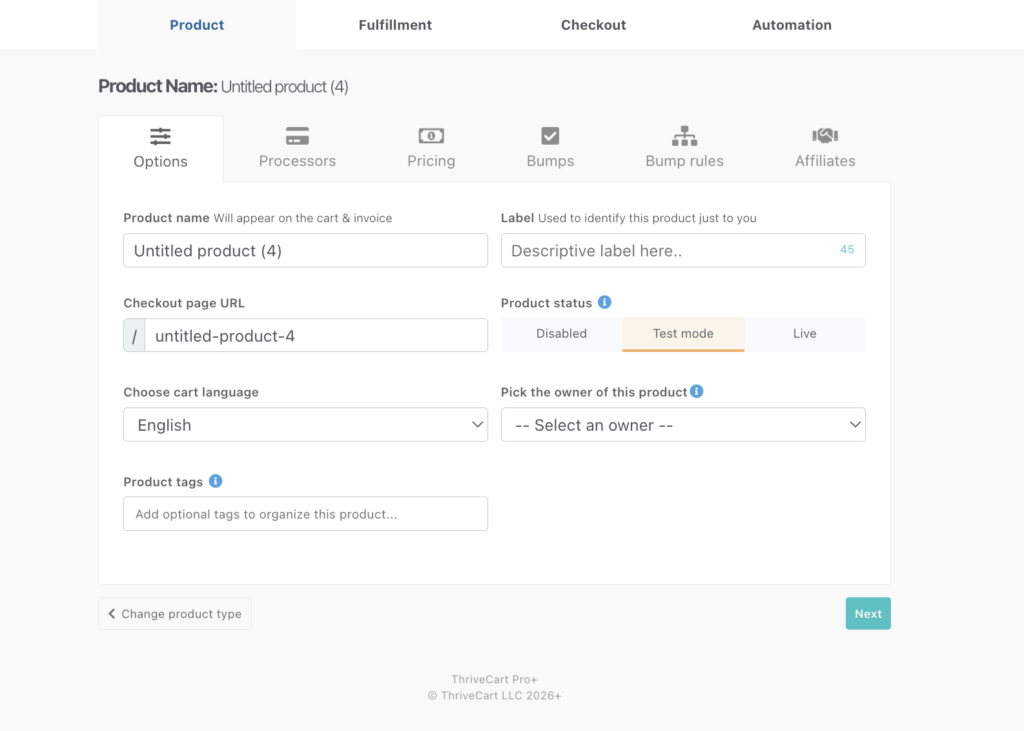
Your product settings are broken down into different tabs and sections, but the “next” button in the bottom right will cycle you through all of those options to ensure that you’re not missing anything, and walk you through the process to create main products and offers.
Product Options Tab:
The Product Name will be displayed publicly on the product page as well as on their invoice, while the URL is automatically set as the product name, and will be the web address that customers can follow to purchase your product. The URL can be edited, but can not exceed 40 characters.
Labels are used to organize your products internally, and the labels added here will not be public facing or used in SEO.
From this page you can also set your product language from our existing supported languages available in the dropdown, and if you have set up custom text and translations, those profiles would be available here.
Disabled/Live/Test statuses can be set here as well.
- Disabled hides the product from view and will prevent any sales from being placed
- Test publishes the product so that you can run test purchases while still triggering behaviour rules, webhooks, etc. See: Testing your checkout & funnel
- Live is a publicly available product
The product owner would be the account owner by default, but if you have client accounts set, you could assign them here as well. See more on the Pro+ feature for creating users and client accounts in Creating client & user logins.
Product Tags can be assigned to help organize your products. These tags are available in filters when searching your products, as well as in reporting, for easy product organization. Start early and apply tags that make sense to your products and campaigns. See more on utilizing product tags in this article.
Pricing Tab:
This tab includes everything to do with the price and receipt for your product, where you can set whether the price is a fixed-rate, split-pay, subscription, or pay-your-own-price option. You can also enable sales tax and set the logo and branding on your customers receipt (the payment notification).
- Set your products pricing options
- Enable sales tax + Setting Tax Inclusive Prices (Sales taxes are a Pro+ feature)
- Customize the payment notification
- Choose whether this purchase replaces an existing subscription
Requirements:
Required steps to set up any product includes:
- At least one price (which can be set to $0.00 if free)
- Connecting a payment processor (See: Connecting your Payment Processor)
- Setting your support email or URL within the fulfillment tab
- Choosing a design for your checkout. (See: Choosing Your Cart Template)
Relevant Links:
The additional sections for product setup are all functionality that we’ve covered in numerous help articles, which we recommend reviewing as you continue to set up those individual sections.
- Creating your Bump Product
- Setting your Product’s Fulfilment
- Introduction to the checkout editor
- The Automation tab is where you can Add your customers to your autoresponder
- The Complete Affiliate Setup Guide and Walkthrough
Frequently Asked Questions (FAQs)
- Q: What is my Product ID?
- A: Your Product List includes each product’s unique reference number (the product ID) right beside its name. This means easier referencing, better internal workflows, and faster support. Find it under Products > Product to keep your product IDs front and center. See the Product Reference Numbers article for more details.
You can also sort your product list by recently added or sales volume.
- Q: How many products can I create?
- A: You can create an unlimited number of products! We recommend using the “label” field on the product options page as an internal identifier to help make searching for a specific product easier if you have multiples of the same product.
- A: You can create an unlimited number of products! We recommend using the “label” field on the product options page as an internal identifier to help make searching for a specific product easier if you have multiples of the same product.
- Q: I don’t want to create a product from scratch, can I copy an existing product?
- A: Yes! You can clone products using the “copy” button when hovering over your existing product.

You’ll then be prompted to confirm you want to clone the product and if accepted, a copy will then appear in your account, ready for you to edit and make your adjustments. - Clone button greyed out? The clone (or ‘create new product’) button won’t be available if you’re a sub-user on an account. These features are reserved for the account owner.
- A: Yes! You can clone products using the “copy” button when hovering over your existing product.
- A: Your Product List includes each product’s unique reference number (the product ID) right beside its name. This means easier referencing, better internal workflows, and faster support. Find it under Products > Product to keep your product IDs front and center. See the Product Reference Numbers article for more details.