Boost your profits effortlessly with ThriveCart Bump Offers—a powerful way to present irresistible add-ons right on your checkout page. With a simple checkout add-on setup, you can create bump products that complement your main offer and encourage customers to say “yes” to more, turning impulse interest into instant revenue. These quick, one-click upgrades are proven to increase average order value, making them one of the easiest and most effective strategies to maximize every sale.
We’ve broken this article down into a few steps:
- Create bump products
- Setting your bump products fulfillment
- Show/Hide bumps for returning customers
- Customizing your bump offer on the checkout
1. Create bump products
Bump products are built as part of the main product/checkout page they’re being added to. Unlike other products, their product name and pricing is all set within the Bump tab of your main product settings.
When adding a bump, you’ll have the option to add a new one, or choose from an existing bump that may already exist on another product. When using an existing bump, this will copy over the bump settings (price, name) but will not copy the design from the pre-existing bump.
The first time you’re setting up a product, however, the only option will be to “Add Bump Offer”.

By default the bump type is set to Digital, but you can always click the “Edit” button if you wish to change your bump to a physical product
The primary difference is that for a physical bump, the customer address will be required in checkout if the bump is added to the order, and also you’ll have the option to set up shipping options. You’ll still have digital fulfillment options available as well.
After choosing the type of product your bump is, you’ll be able to set a name for the product and the product’s price, where you can set up a one-time payment.
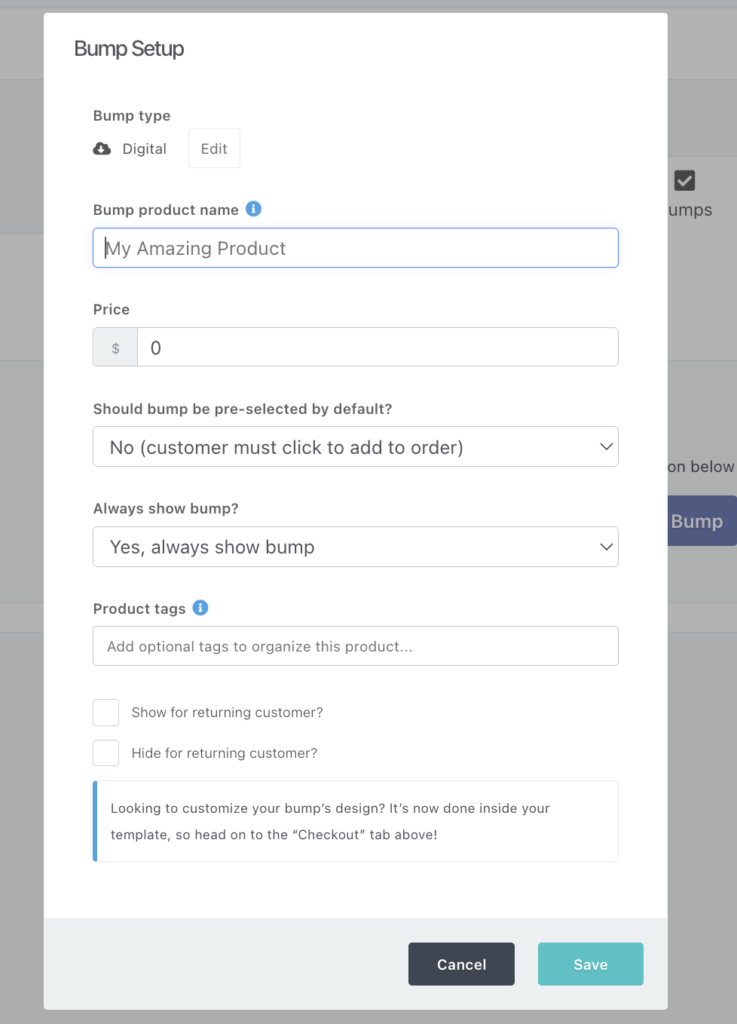
Not only that, but you can also set whether the bump product is pre-selected and so automatically added to the customer’s order. Don’t worry – they can deselect it if they don’t wish to purchase it!
Some jurisdictions may have laws or regulations about whether you can force opt-in on additional products on their order. It’s your own responsibility to ensure this option falls within your local regulations.
2. Setting your bump products fulfillment
Setting your order bump fulfillment will be done in the same place you set the fulfillment for your main product.
Under your fulfillment tab is where you can set the typical fulfillment methods like using specific URLs (these will dynamically generate on the ThriveCart success page based on what the customer decides to buy) or using a membership platform integration and allowing different levels/courses if the customer buys the bump.

If your bump is a physical product, then you’d use your shipping options to handle the fulfillment.
In addition to these, you can also use things like your autoresponder to provide fulfillment. In your product’s automation tab where you can set up rules to trigger within your autoresponder when the bump is purchased.
Bump purchases will also be sent to automators like Zapier and through our webhook system.
3. Product Tags
Product tags can be assigned to bump offers, just like they can be assigned to your main products. These tags can be used to make filtering your products and reports easier, but you can see more on using product tags in this guide.
4. Show/Hide bumps for returning customers
Showing based on customer purchase history
ThriveCart now allows you to automatically pre-select bump offers based on what a customer has purchased in the past. This gives returning customers a more personalized experience — and helps you surface the most relevant bump offer.
For example:
- If a customer previously bought Product A, you can automatically pre-select bumps for Product B and C during their next checkout.
- If they bought Product C, you could show them Product D and E instead.
This powerful rule-based logic helps you unlock smarter, behaviour-driven bump offers — with zero manual tagging or external tools.
How to Show Bumps to Only Returning Customers
This functionality within your bumps settings allows you additional customization over whether a customer has purchased another one of your products. This works by using local storage (similar to cookies without storing any personal data) to reference customer purchase history in their browser.
This happens silently — no tagging or customer login is required.
In checkout, if a returning customer has purchased any of the trigger products you set, the bump will be shown and pre-selected by default.
If they haven’t purchased any of those products, the bump will not be displayed.
How to Enable this
- Within the Bump settings, enable the checkbox: “Show for returning customers?”
- Choose one or more products from your store that should trigger this bump for returning customers.
- Selected products will appear in a list below — you can remove any by clicking the “X” icon.
Once saved, this bump will only be shown (and pre-selected) for customers who have previously purchased one or more of the selected products.
If you want all customers to be able to see this bump, leave these checkboxes unchecked.
5. Customizing your bump offer on the checkout
You have a ton of flexibility and customization with the bump element, including the ability to add/remove specific content, and set various colours and element styles.
You can choose between a ‘slider’ type field to show if the bump is added to the order or not, or the standard checkbox style. You can also set a blinking arrow next to the ‘add’ option to further draw attention to it.
Selecting sub-elements within the bump also then shows further element-specific options – such as the ability to add, replace, or hide an image. You can also always drag and drop additional elements such as text, images, or video into the bump offer box to enhance the description and make the offer more enticing.
The way the bump is formatted will depend on the template style that you’ve chosen, as well as whether you’re using an Enhanced (block-based editor) or a Classic template.
Enhanced Templates
These newer designs have a few different layouts for your bump offer, and so depending on the checkout template that you’ve chosen, the layout of your bump may appear differently.
The bump design options include:


Classic Templates
When launching the checkout editor, you’ll see your bump offer appearing in your checkout automatically.
All of our Classic Templates have the same core bump design by default, which can then be customized to your liking.
In order to edit your bump design and settings, you’ll want to click into your offer, and you’ll then have a range of options appear in the left-hand menu.
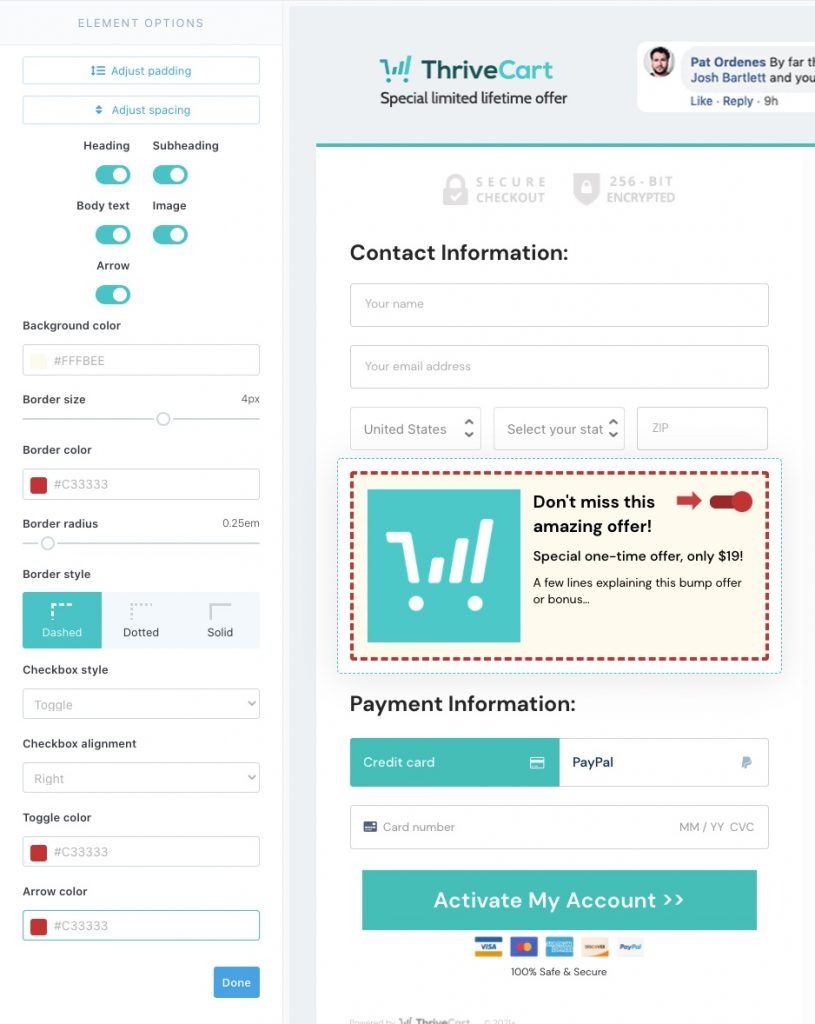
Similar to bumps in our Enhanced editor, you can click into the elements within your bump to adjust text, images, colors, and configure the checkbox style.
Customization Tips
Wanting even more customization for your bump offers?
With some creative flair in the Classic editor, you can create your own custom looking bump offers – even adding a video to pitch the bump. Doing this requires using various page elements and combining them into a new ‘bump’ element and then disabling a lot of the normal bump options leaving only the heading (and the checkbox/slider to add the bump to the order).
See this video on how to achieve this.
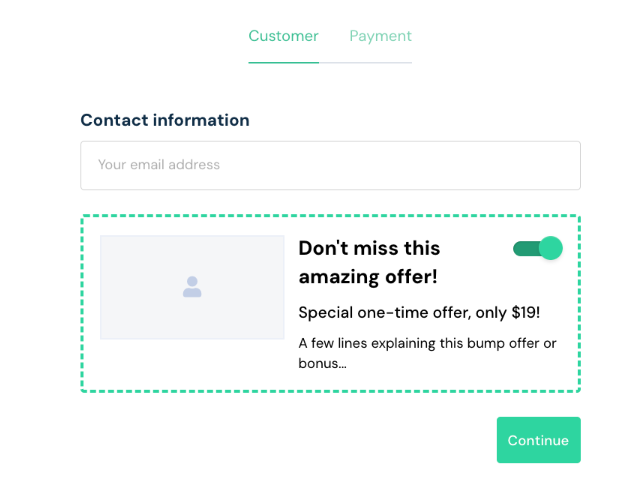
Using a multi-step checkout style and want to show the bump in the payment step?
ThriveCart offers a multi-step flow option for the checkout pages, so you may be looking to collect customer information on one step and then payment information on another. In this scenario, you may also wish to only show the bump on the payment step.
This is also really easy to set up and we’ll walk you through how to move your bump into the payment step of your cart in the video below.
Frequently Asked Questions (FAQs)
- Q: Why isn’t my bump offer showing up?
- A: Make sure your bump is first enabled within your product settings, and that there are no show/hide checkboxes enabled within your bump setup.
- A: Make sure your bump is first enabled within your product settings, and that there are no show/hide checkboxes enabled within your bump setup.
- Q: Every time I copy an existing bump, it creates a new bump. Why is this happening?
- A: Each bump is unique to the product that you’re connecting that bump to, so whether you add a new bump or add from an existing bump, a new backend bump ID will be associated with that specific bump. This is expected, but the development team is working on surfacing those bump ID’s in the dashboard to help identify them in webhooks and third party platforms.