Track every click, checkout, and conversion with precision with the ThriveCart Google Tag Manager integration – the most powerful and flexible way to connect your checkout and funnel data directly with Google Analytics. By using Tag Manager, you can easily monitor key conversion events, customer behavior, and purchase data — all from your GTM ecommerce analytics central hub.
While ThriveCart supports additional methods of connecting Google Analytics, Tag Manager remains the recommended option for accuracy, scalability, and simplified data management across your marketing channels.
Using ThriveCart’s Google Tag Manager Integration allows you to collect data into Google Analytics and also lets you easily connect other services through GTM.
While you can configure Google Tag Manager manually, we recommend using our easy container builder to download a file which can be imported, and sets up all of the required tags, triggers and variables for you to use as a starting point for your tracking.
Set up Google Tag Manager
Firstly, you will need to create a new Google Analytics 4 property. Take note of your measurement ID (example: G-XYZABC123) as we will need this later.
Next, create a new Google Tag Manager account – enter an account name, your country, a name for the container, and select ‘Web’ as the target platform.
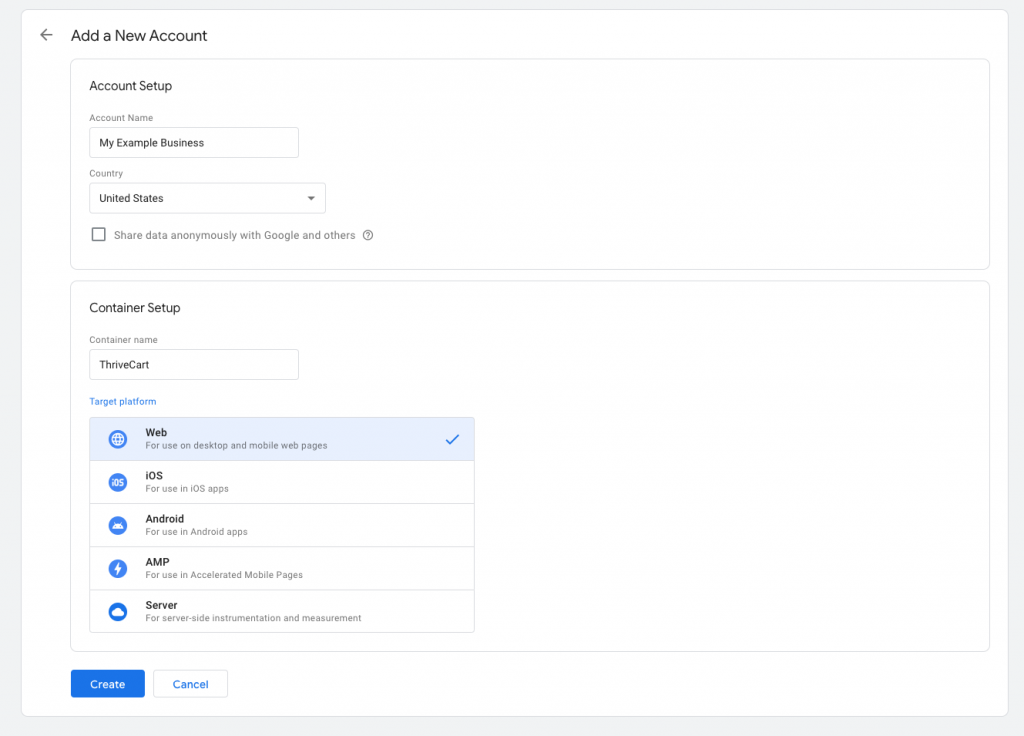
Review the terms and accept them to continue.
Close the popup window which gives you some code to place on your web pages – with ThriveCart, you do not need to do this.
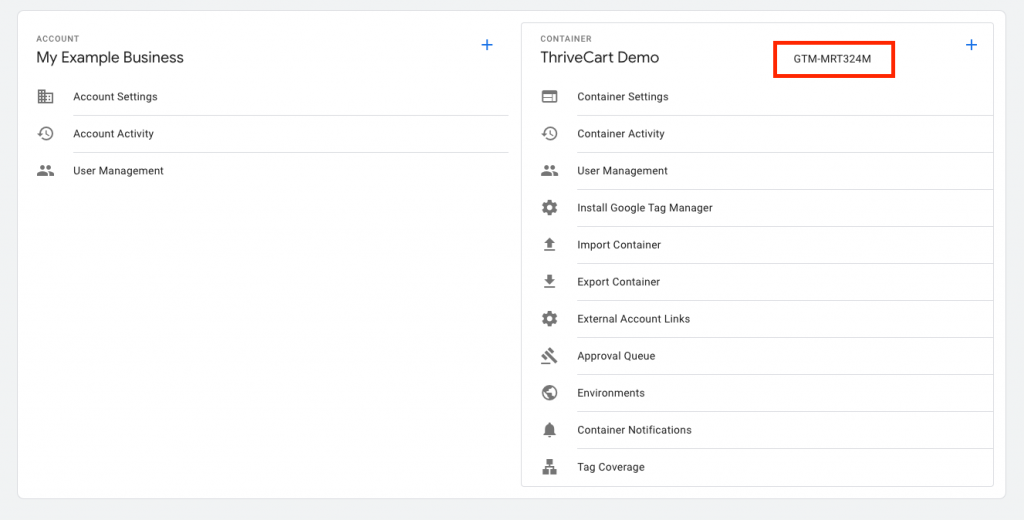
Go to the ‘Admin’ tab at the top of the screen. From here, copy the container ID (example: GTM-ABC123) displayed at the top of the screen.
Head to ThriveCart, and in your product settings, go to Checkout -> Tracking, and enable the new ‘GTM’ tracking integration. Click the button to ‘Get container file’.
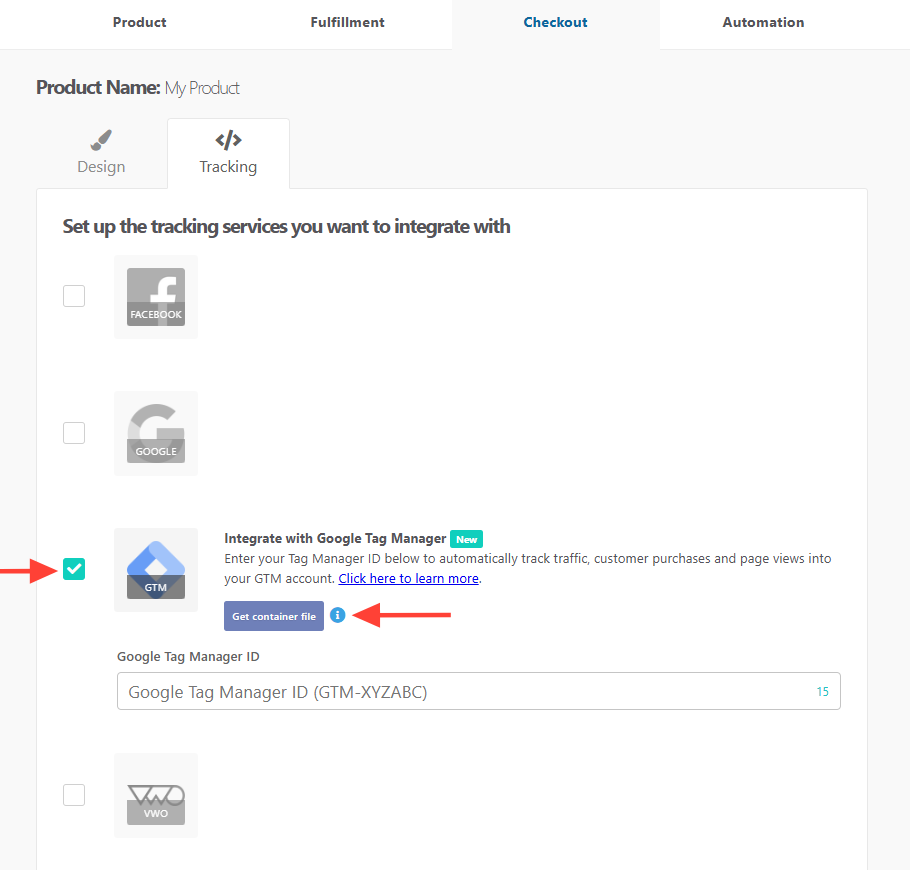
In the first field, provide your container ID which we just copied (example: GTM-ABC123).
In the second field, provide the measurement ID from Google Analytics 4 (example: G-XYZABC123) that we noted earlier, and click to continue.
On the second screen, you will see your template file. Click the button to download this as a JSON file. The field in ThriveCart will pre-fill with your provided container ID, so you can save your product’s settings.
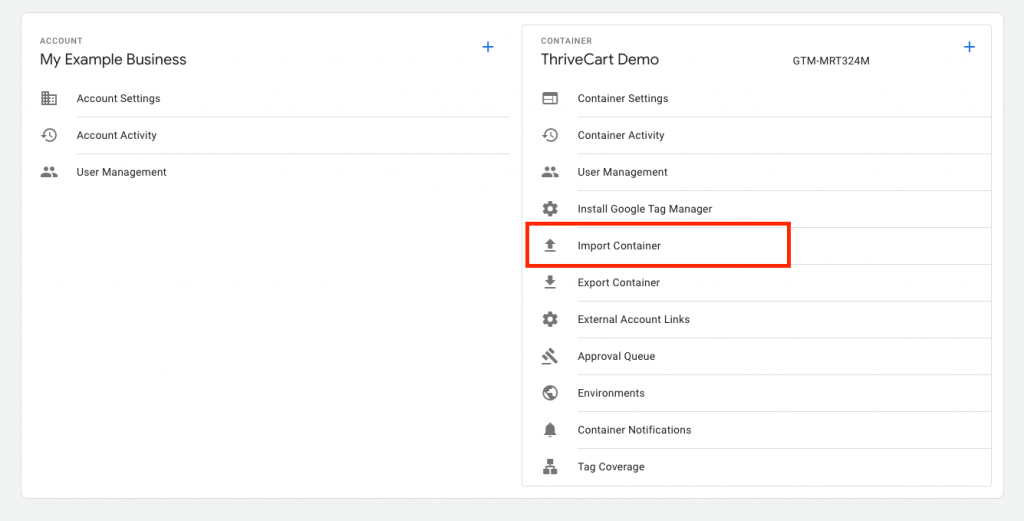
Head back over to Google Tag Manager, and from the Admin screen, click on the ‘Import container’ link.
Select the JSON file you downloaded, choose a ‘New’ workspace and give it a name, and click the blue ‘Confirm’ button.
You should see 3 new tags, 2 new triggers, and 6 new variables in the breakdown of what will be imported. Click the ‘Confirm’ button.
Important: you must publish the changes to your container or they will not become active. Click the blue ‘Submit’ button in the top-right of the screen, provide a name for the changes (e.g. ‘ThriveCart integration’), and publish the changes.
As customers land on your cart pages, your new GTM integration will pass data into your Google Analytics 4 streams.
To use the same container with other products, you do not need to click the ‘Get container file’ button in ThriveCart, and you can instead simply enter the container ID into the field and save your product’s settings.
Troubleshooting
| Problem | Solution |
|---|---|
| Tags not firing | Be sure to download and import the container file at least once and import it into Google Analytics to complete the setup. Make sure the changes are published within Google. |
| My tags are firing twice | Make sure that you have tag manager installed a single time on your checkout. So if using our container method, do not also install using the manual script-based method (either in custom script settings on your product, or in the code on your website page where your checkout is embedded or success page redirects to – if using either of those methods). |
Frequently Asked Questions (FAQs)
- Q: I already have an old Universal Analytics account, is this the best method to track data there?
- A: No, this would be the method for newer users, and while it is recommended to move to GTM for tracking – you could consider using the GA4 Setup Assistant tool instead to send data to Google Analytics and Universal Analytics (see more here).
- A: No, this would be the method for newer users, and while it is recommended to move to GTM for tracking – you could consider using the GA4 Setup Assistant tool instead to send data to Google Analytics and Universal Analytics (see more here).
- Q: I’m not sure which way to start tracking Analytics in Google, how do I get started?
- A: Getting setup with the ThriveCart Google Tag Manager container detailed in this guide is the recommended way to get setup for the first time, but our guide Tracking with Google Analytics (UA, GAv4, or GTM) goes over alternate methods.
Related Articles
- Tracking with Google Analytics – Using the GA4 Setup Assistant
- Tracking with Google Analytics – creating reports
- Tracking with Google Analytics – Using GA4 directly
- Tracking with Google Analytics – Configuring Tag Manager manually
- Tracking with Google Analytics (UA, GAv4, or GTM)
- Facebook Aggregated Event Measurement