Get deeper insights into your sales and customer behavior. ThriveCart Google Tag Manager Setup tracks every click, conversion, and checkout event – so you can make smarter, data-driven decisions that grow your business.
If you do not want to use our container as a starter, you can use this guide for manual GTM configuration. To do this, you will be adding variables, tags, and triggers manually.
Set up Google Analytics 4 account
- Create a new Google Analytics 4 property.
- Use the GA4 Setup Assistant to automatically create a new GA4 property and copy the following settings from your Universal Analytics property: property name, website URL, timezone, and currency settings.
- Uncheck the ‘Enable data collection using your existing tags’ option to disable the connected site tag feature. Alternatively, if you don’t want to copy any settings from your Universal Analytics property (or do not have a previous UA property), then create a Google Analytics 4 property without the GA4 Setup Assistant.
Set up GTM and add the GA4 and Purchase Event tags to track purchase events in ThriveCart
Connect GA4 Analytics Measurement ID to your GTM ID
- Open the Google Tag Manager container for your existing Universal Analytics implementation
- Click Tags > New
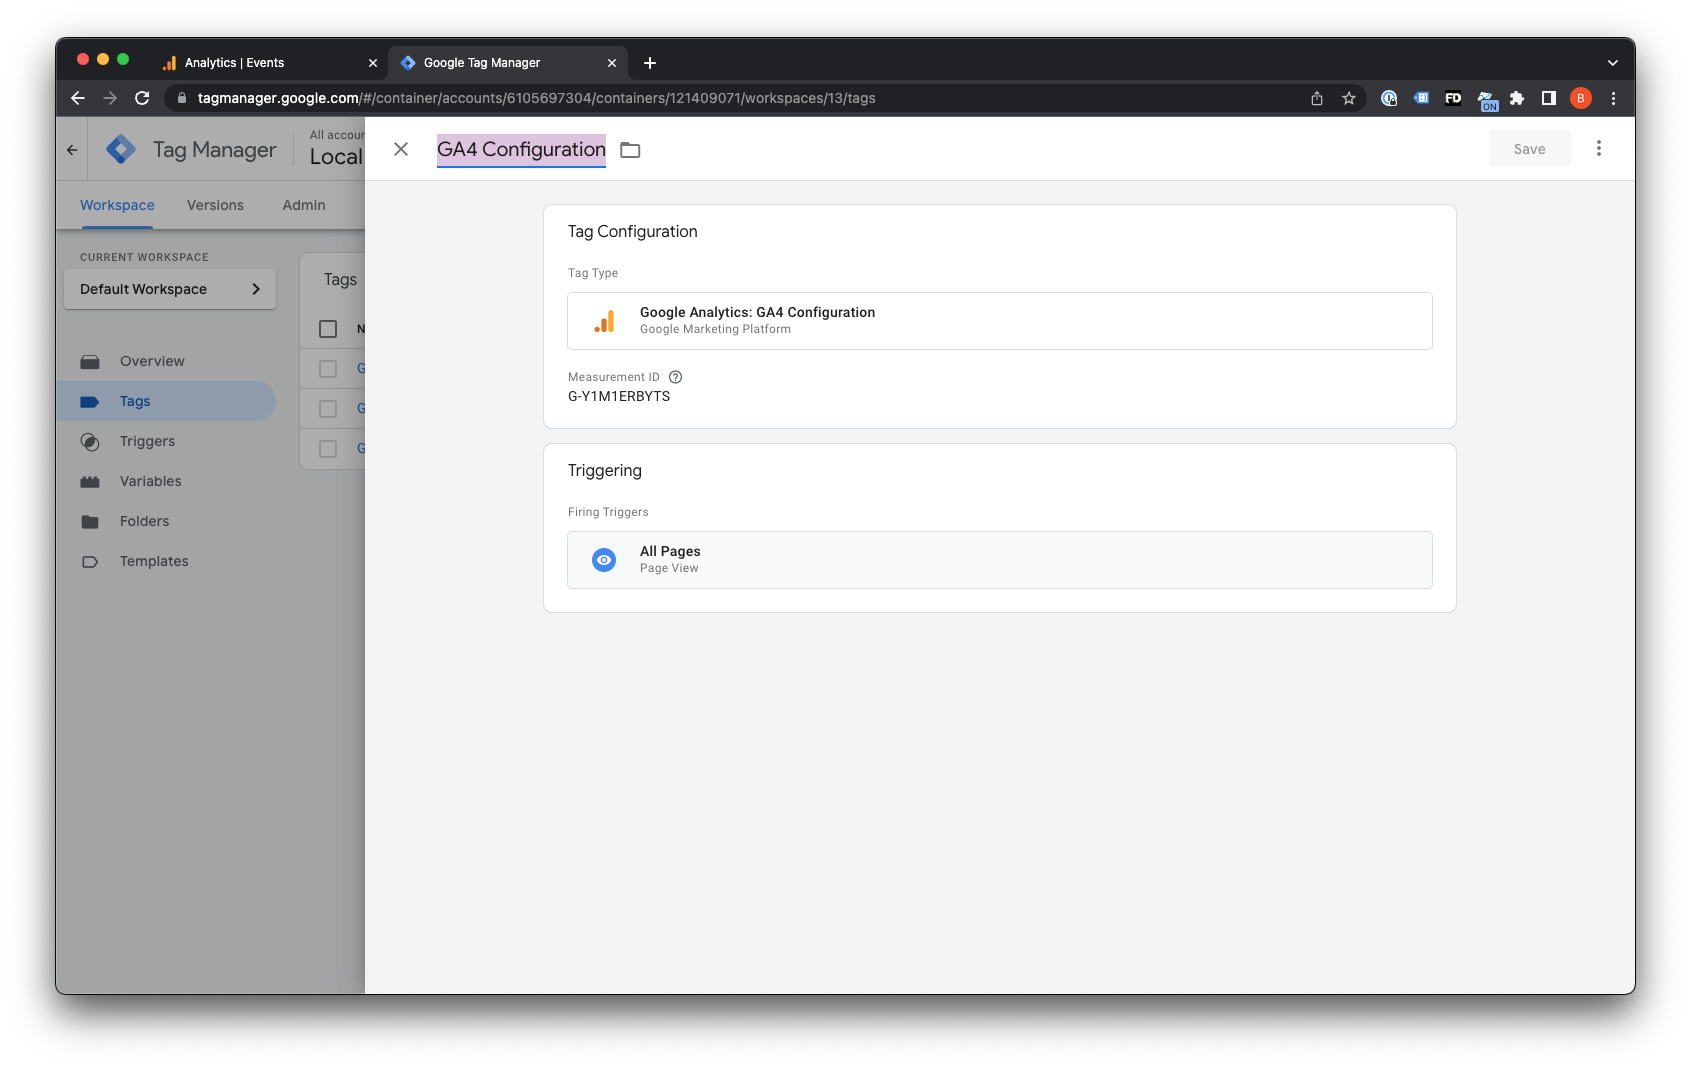
- Click Tag Configuration and select Google Analytics: GA4 Configuration
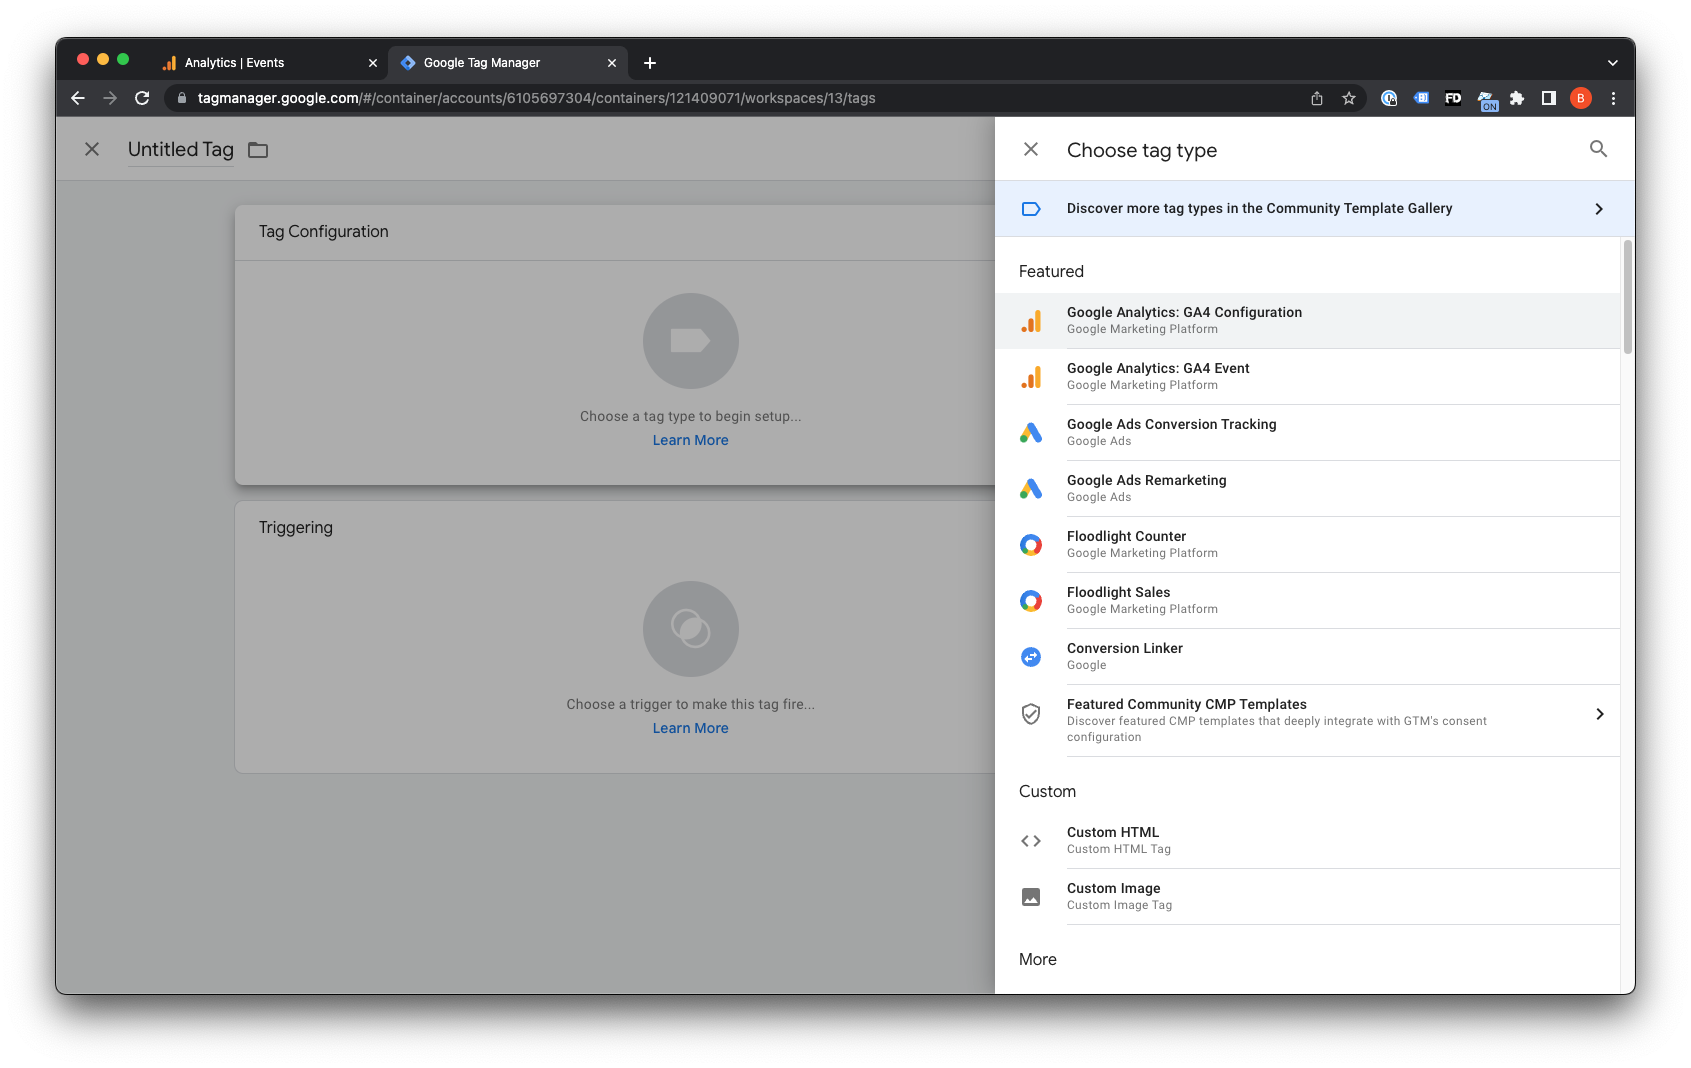
- Enter the tag ID of your Google Analytics 4 property in the Measurement ID field
- Select to trigger the tag on All Pages
- Give your Tag Configuration a Name (example: GA4 Configuration)
- Save and publish your tag configuration
Configure GA4 Ecommerce Tracking to track the E-commerce ‘purchase’ event and collect the Data Layer parameters
- Click Tags > New
- Click Tag Configuration and select Google Analytics: GA4 Event

- Set the Configuration Tag Field and select the name of your GA4 Analytics Tag name that you created in the previous setup (GA4 Configuration)
- Set the Event Name as
purchase– important: this must be lowercase - Set up each of the Event Parameters to pass to GA4 during the
purchase– the available parameters are:transaction_id,items,value,currency,tax,shipping
For example to set up thetransaction_id:- Enter in the Parameter name:
transaction_id - Enter in the Value by clicking on the plus button
- On the ‘Choose a variable’ screen, click the plus icon in the upper right hand corner
- This will open the Variable Configuration window
- Click to choose a Variable Type and choose Data Layer Variable
- Add the Data layer Variable Name:
ecommerce.transaction_id - Make sure to enter a name in the upper left (example: Ecommerce Transaction ID), and click Save
- Enter in the Parameter name:
Repeat this process by adding the rest of the purchase event parameters that you want to track. The parameters available are listed below:
items- Parameter Name:
items - Set the Data Layer Variable Name to
ecommerce.items - Name the Variable Configuration: Ecommerce Items
- Parameter Name:
value- Parameter Name:
value - Set the Data Layer Variable Name to
ecommerce.value - Name the Variable Configuration: Ecommerce Value
- Parameter Name:
currency- Parameter Name:
currency - Set the Data Layer Variable Name to
ecommerce.currency - Name the Variable Configuration: Ecommerce Currency
- Parameter Name:
tax- Parameter Name:
tax - Set the Data Layer Variable Name to
ecommerce.tax - Name the Variable Configuration: Ecommerce Tax
- Parameter Name:
shipping- Parameter Name:
shipping - Set the Data Layer Variable Name to
ecommerce.shipping - Name the Variable Configuration: Ecommerce Shipping
- Parameter Name:
- After you have entered in all of these parameters, you will see them on the ‘Choose a Variable’ screen
- Close out of this screen by clicking the X in the upper left corner and you will be returned your Tag Configuration page for GA4 Purchase
- Scroll down to the ‘More Settings’ section, click the expand arrow, check the ‘Send ecommerce data’ toggle, and select ‘Data layer’ as the data source
You should now see 2 tags configured:
1. GA4 Configuration – this references your GA4 measurement ID
2. GA4 Purchase – this references the GA4 Purchase event
Add a GTM Trigger to fire the ‘purchase’ event
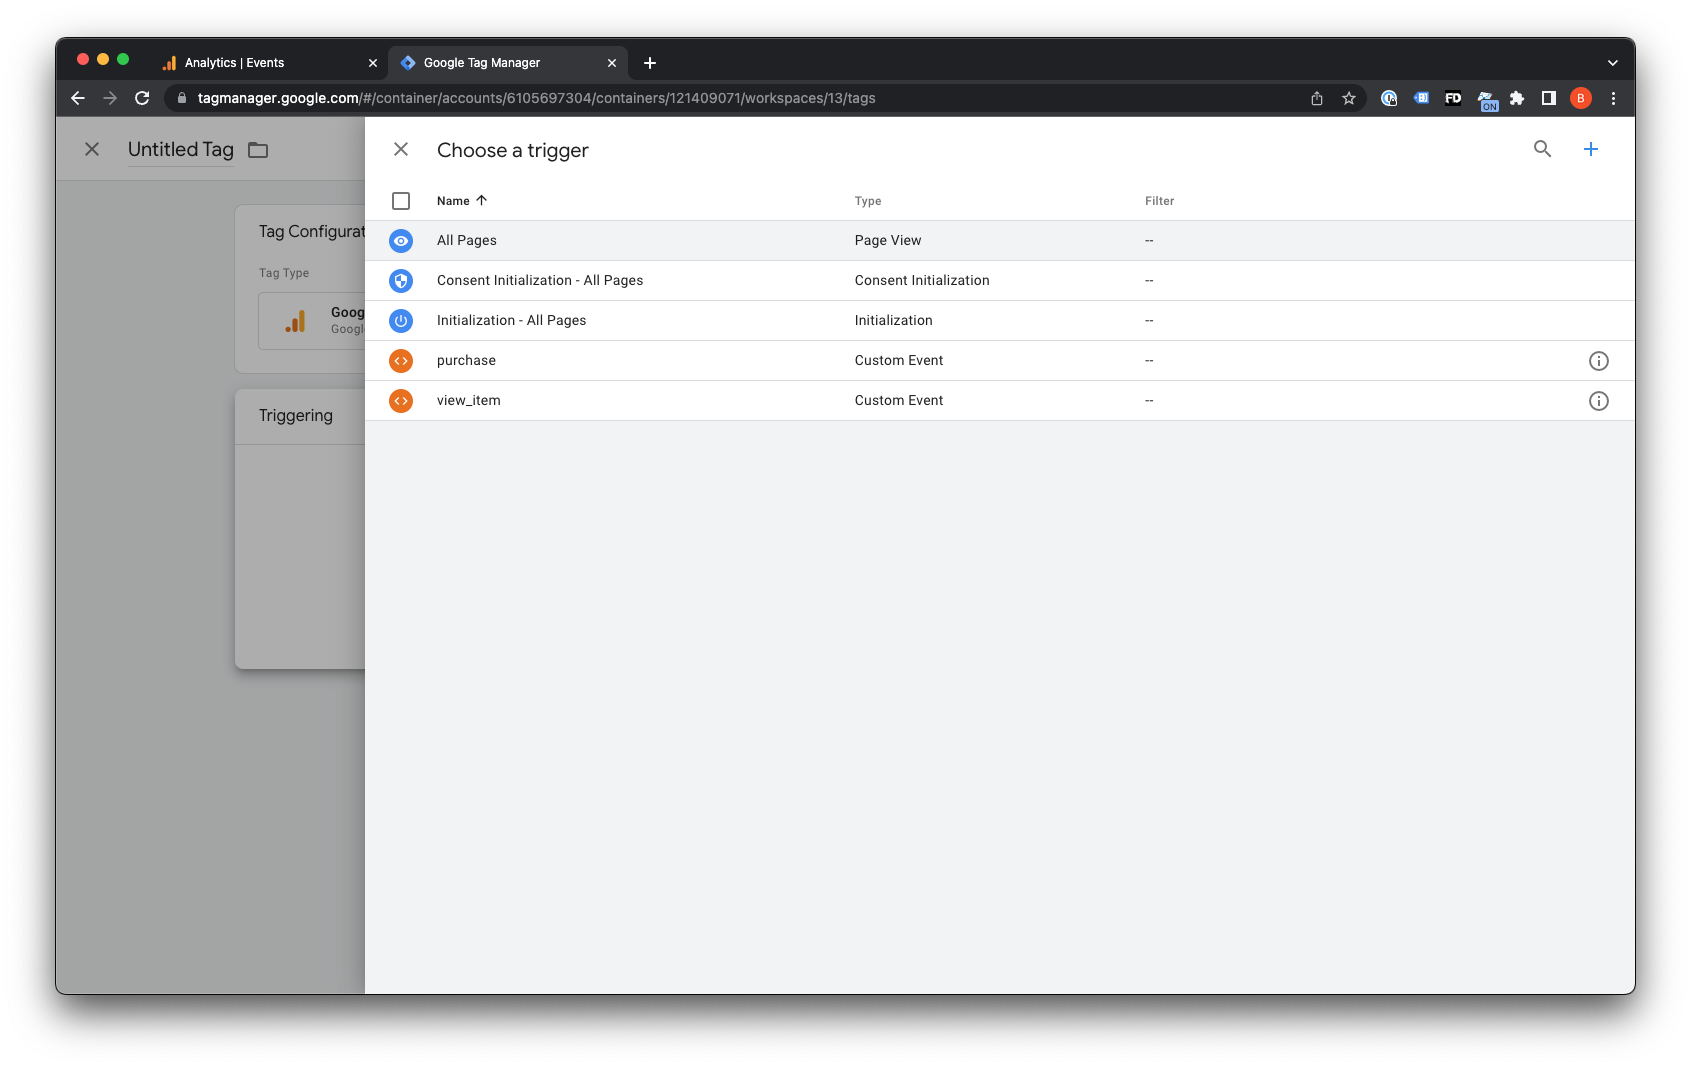
- Click on ‘Triggers’ from the left side menu
- Click on the ‘New’ button on the right hand side
- Click ‘Choose a trigger type to begin setup…’
- Choose ‘Custom Event’ in the popup window
- Set the Event name to
purchase - Set the option ‘This trigger fires on’ to ‘All Custom Events’
- In the upper left corner, rename the trigger to ‘Purchase’, and click Save
- Go back to the Tags section from the left hand menu and click on the ‘GA4 Purchase’ Tag that you created previously
- Click on the ‘Triggering’ section at the bottom to set up the Trigger just created
- In the ‘Choose a trigger’ window, select the ‘purchase’ event trigger that you just created, and click save
Configure GA4 to track the E-commerce ‘view_item’ event and collect the Data Layer Parameters for ThriveCart
- Click Tags > New
- Click Tag Configuration and select ‘Google Analytics: GA4 Event’
- Click the Configuration Tag Field and select the name of the GA4 Analytics Tag
- Set the Event Name:
view_item(important: this must be lowercase) - Setup the
itemsEvent Parameter to pass to GA4 during theview_itemevent - Add
itemsin the ‘Parameter Name’ Field - Click the add + button for the ‘Value’ field, and select the ‘Ecommerce Items’ Data Layer Variable that you created before for the
purchaseevent - Scroll down to the ‘More Settings’ section, click the expand arrow, check the ‘Send ecommerce data’ toggle, and select ‘Data layer’ as the data source
Add a GTM Trigger to fire the ‘view_item’ event tracking
- Click ‘Triggers’ on the left-hand menu
- Click the ‘New’ button on the right hand side, and click ‘Choose a trigger type’
- Choose ‘Custom Event’ in the dialogue window
- Set the event name to:
view_item - Set ‘This trigger fires on’ to ‘All Custom Events’
- Set Name the Trigger in the upper left and corner to
view_itemand click Save - Go back to the Tags section from the left hand menu and click on the ‘GA4 View Item Event’ Tag that you previously created
- Click on the ‘Triggering’ section at the bottom, and in the ‘Choose a trigger’ dialog, selec tthe ‘view_item’ event trigger you just created
You will now see your 3 Tags with their Triggers set up and ready to track your GA4 Analytics and your Purchase and View Item events.
Submit and save your new configuration
Make sure to click the ‘Submit’ button in the top right-hand side of the page to save your changes. Click this button, add a name for your Workspace, and click the ‘Publish’ button.