PayPal restricts their accounts to a single IPN URL which can be limiting for vendors who already use other platforms, that also require notifications from PayPal.
Thankfully, as this has been a problem of PayPal’s forever, over the years many solutions have come up to resolve it.
In this article, we’re going to look at several solutions on how you can set up multiple IPNs with PayPal.
Please note that we’re not affiliated with any of these solutions, but have seen them used by the community.
Remember, unlike other platforms, using ThriveCart you personally own your subscriptions in your PayPal account. ThriveCart uses notifications from PayPal to update your ThriveCart dashboard with things like your recurring payments, any refunds or cancellations that occur directly in PayPal, and some other affiliate related notifications. These will then all tie into things like your behaviour rules you’ve set in ThriveCart. If your IPN URL isn’t set up so that ThriveCart receives these notifications, not every action will be tracked.
There are several ways you set up multiple IPNs with PayPal
- Use a software tool like Zapier.
- Use a software tool like SonicIPN.
- Use a custom script (advanced).
1. Using Zapier to set up multiple IPNs
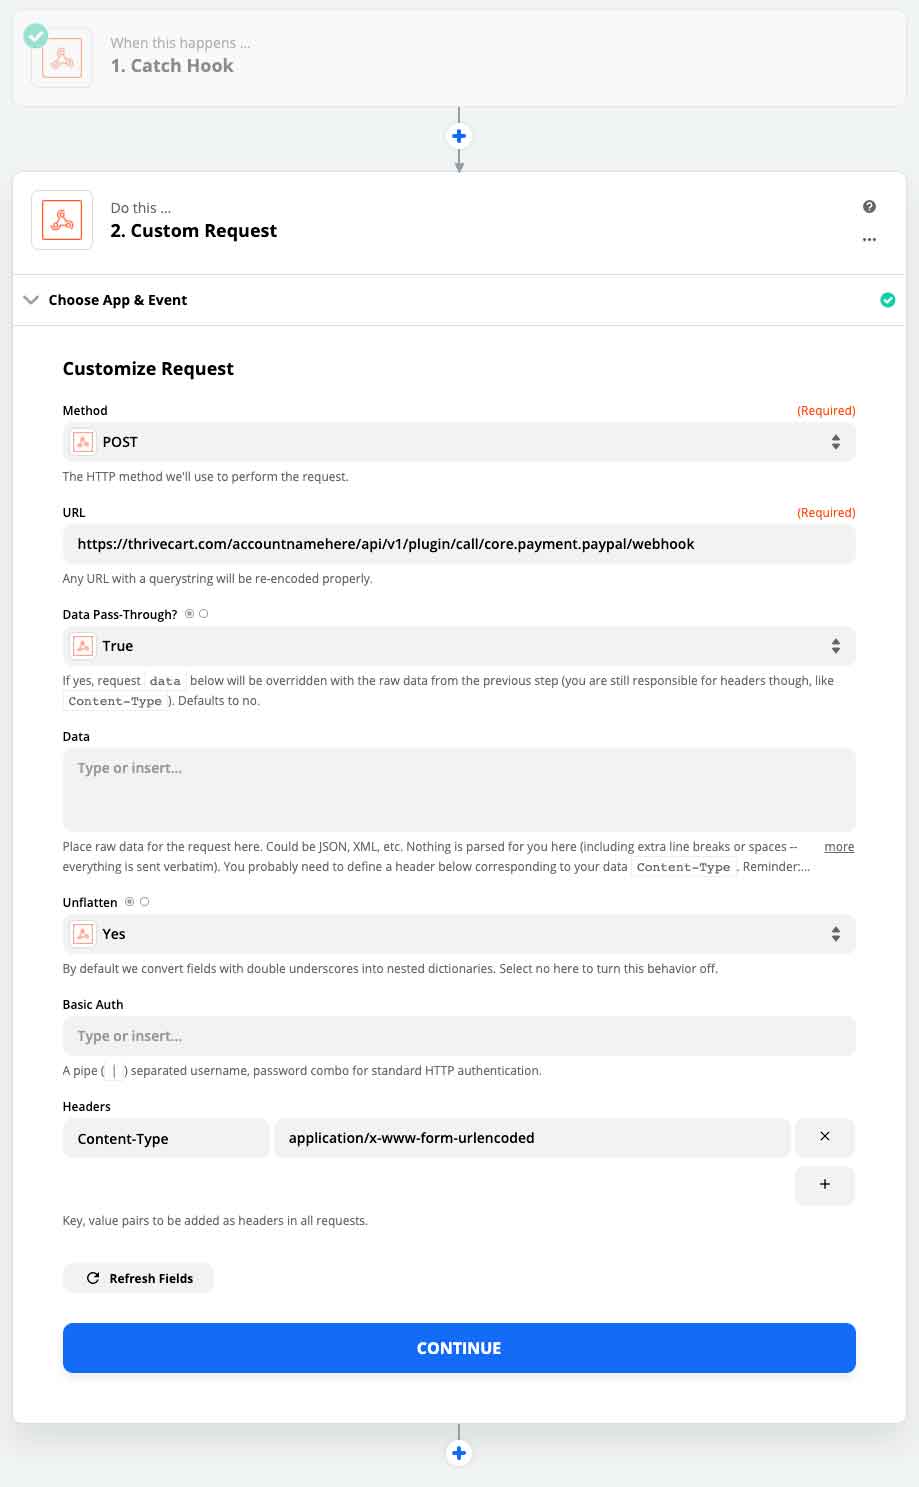
We recommend using the “Webhooks by Zapier” option.
- Trigger: Create a ‘Catch hook’ (Choose ‘Webhooks by Zapier’ -> ‘Catch hook’)
- Set the URL they give you as your PayPal IPN URL (e.g. https://hooks.zapier.com/hooks/catch/452318/od0z6gg/)
- Action: choose ‘Webhooks by Zapier’ -> ‘Custom request’
- Set ‘Method’ to ‘POST’
- Set the URL to the TC IPN URL (e.g. https://thrivecart.com/accountnamehere/api/v1/plugin/call/core.payment.paypal/webhook)
- Enable ‘Data pass-through’ (set that to ‘True’)
- Leave ‘Data’ blank
- Leave ‘Unflatten’ as the default ‘yes’
- Leave ‘Basic auth’ blank
- Under ‘Headers’, set the key to Content-Type and the value to application/x-www-form-urlencoded – this is case sensitive and must be correct
Once you have set this up, you can then add additional actions to send PayPal notifications to your other services (you may wish to reach out to them directly to see if they need things set up differently to the above, otherwise simply creating the same action but with the URL to their IPN should be suitable.

You ThriveCart IPN will be the following, you just need to replace ‘subdomain’ with your own subdomain.
https://thrivecart.com/subdomain/api/v1/plugin/call/core.payment.paypal/webhook
2. Using SonicIPN to set up multiple IPNs
There is another piece of software called SonicIPN that lets you set up multiple IPN for PayPal and other services. You can find out more about platform here
3. Using a custom script to set up multiple IPNs
This is more for the advanced users who don’t want to use Zapier or SonicIPN and understand code. There is an article here with example code that walks you through creating your own script to set up multiple IPN support with PayPal.
Reminder; we’re not affiliated with any of these options and support is best directed at their respective owners
