The ThriveCart Authorize.net integration offers a reliable payment processing solution for businesses based in the US, Canada, and Australia. While it’s not compatible with the EU’s PSD2 anti-fraud regulations, it remains a strong choice for high-risk companies that may not be supported by Stripe or PayPal. This integration provides flexibility and control over transactions, helping you maintain business continuity when traditional processors aren’t an option. However, for most users, we recommend using Stripe Connect+, which offers broader global support, enhanced security, and seamless integration with ThriveCart’s advanced payment features (Stripe Connect+ setup details here).
Connecting your Authorize.net account with ThriveCart has a few steps, as you need to provide several keys from your Auth.net account. The video above walks you through where to get this information in your Auth.net account.
What does this integration support?
- Debit/Credit card payments
Authorize.net offers vendors of higher risk products (that Stripe and PayPal may not support) the ability to take payments from customers.
They are not as modern or as efficient as Stripe or PayPal though.
When selling using Auth.net, you will be fixed to selling in the currency of your Auth.net account, unlike Stripe & PayPal, which allow you to charge customers in various currencies (see what currencies we support here).
You will need to enable ARB and CIM for subscriptions to ensure that the ThriveCart and Authorize.net integration works as expected for subscription management.
Enable ARB
When using Authorize.net as a payment processor and wanting to offer subscriptions or split-pay products/services to your customers, you may need to enable “Automatic Recurring Billing” (ARB) in your Authorize.net account.
This may or may not be already activated, but it is required to set up subscriptions in your Authorize.net account.
To sign up for the Automated Recurring Billing™ (ARB) service, follow the steps below:
- Log in to your Merchant Interface at https://account.authorize.net.
- Click Merchant Profile on the main left side menu.
- Click Sign Up next to Automated Recurring Billing. The Automated Recurring Billing Service Addendum page appears.
- Click the checkbox labelled “I have read and understand the Terms of Service.”
- Click I Agree.
You can refer to the Authorize.net help article directly here for further information.
You may need to enable Authorize.net’s “Automatic retry recurring billing” feature. This will stop Authorize.net from cancelling your subscriptions when they fail and put them into a different mode where you can retry the payments.
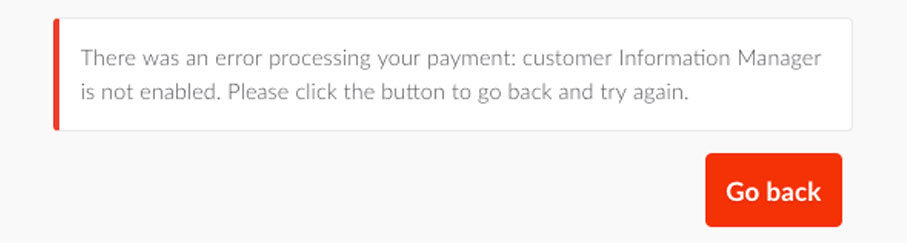
Error processing payment: Customer Information Manager is not enabled
Older users of Authorize.net may come across a message when trying to complete a live transaction through their checkout. A message will be displayed saying: “There was an error processing your payment: customer information manager is not enabled. Please click the button to go back and try again“.
It appears that newer Authorize.net accounts come with this feature automatically enabled, but older accounts will require you to enable it.
A Customer Information Manager is required so that ThriveCart can set up your payments and your customers inside your Authorize.net account. So let’s take a look at getting this set up.
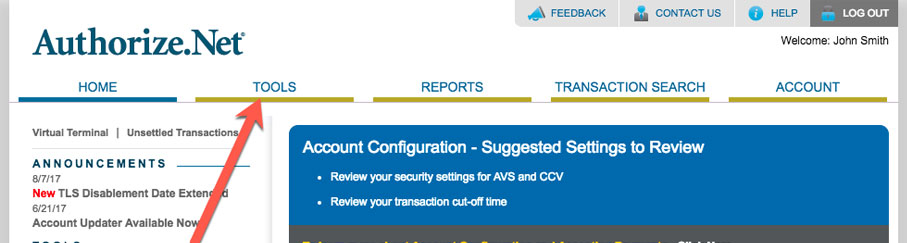
The first step is to log into your Authorize.net account and click the Tools link in the top menu.
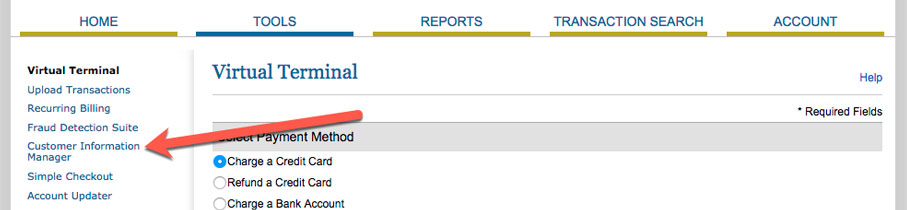
Next, we need to head over to Customer Information Manager in the left-hand menu.
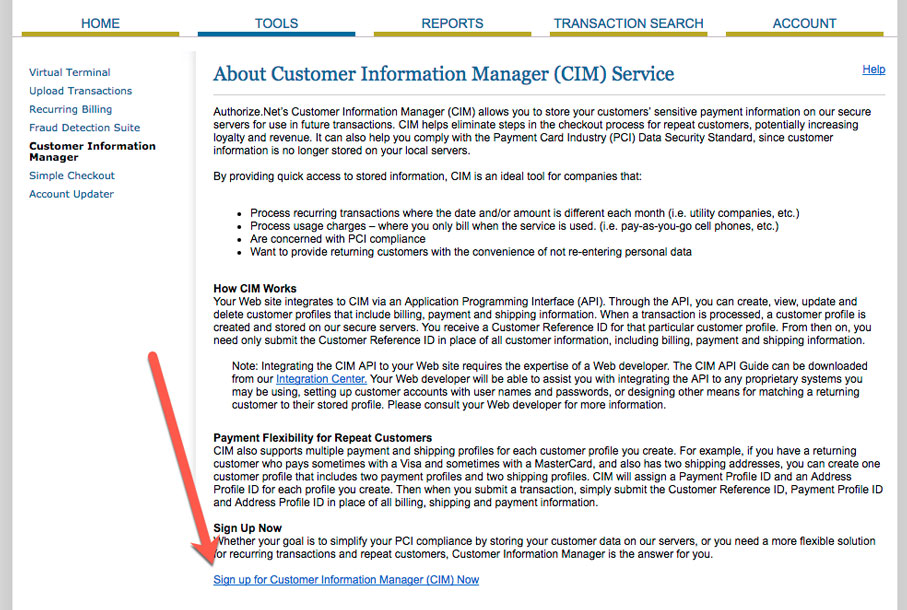
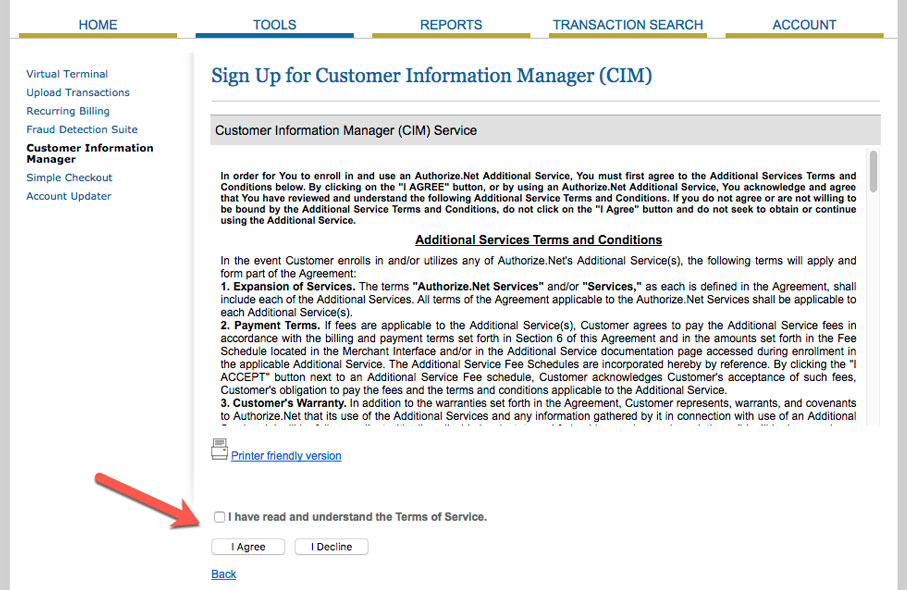
At the bottom of this page, we need to click the link that says Sign up for Customer Information Manager (CIM) Now.
Please read through the additional service terms and conditions, then tick the box confirming and click I Agree
Customer Information Manager will have now been set up and ready for you to use.

Frequently Asked Questions (FAQs)
- Q: How are subscriptions handled within Auth.net?
- A: You can find our help desk article on subscription payments and how they’re created/work with different processors here. It is worth noting a couple of limitations:
- Auth.net doesn’t allow a subscription to be set up if the card expires before the first recurring payment is due for processing
- Failed payment notifications are not effectively communicated back to ThriveCart. You may not see a failed rebill notification, and retries after a failed attempt would need to be monitored within Auth.net directly.
- A: You can find our help desk article on subscription payments and how they’re created/work with different processors here. It is worth noting a couple of limitations:
- Q: Why are my customers getting a “User authentication failed due to invalid authentication values” error?
- A: Auth.net returns this error (code E00007) when the API environment doesn’t recognize the API Login ID and Transaction Key submitted. There are three possible causes of this error:
- Posting a live account’s API Login ID and Transaction Key to the test environment at https://apitest.authorize.net/xml/v1/request.api — For live accounts, please post to https://api.authorize.net/xml/v1/request.api instead.
- Posting a test account’s API Login ID and Transaction Key to the live environment at https://api.authorize.net/xml/v1/request.api — For test accounts, please post to https://apitest.authorize.net/xml/v1/request.api instead.
- The API Login ID or Transaction Key have errors.
- A: Auth.net returns this error (code E00007) when the API environment doesn’t recognize the API Login ID and Transaction Key submitted. There are three possible causes of this error:
You will need to make sure that your API Login and Transaction Key are correct and updated within your ThriveCart account in order to properly process transactions through Authorize.net.