Expand your learning business with the ThriveCart Teachable Integration, designed to simplify how you sell and deliver online courses. With just a few clicks, you can connect Teachable with ThriveCart to automate student access and streamline your membership platform setup.
Once integrated, customers are instantly added to their courses through automatic course enrollment, ensuring a smooth, hands-free experience for both you and your students — so you can focus on creating great content while ThriveCart handles the rest.
In this Teachable Pro integration guide, we’re going to look at connecting Teachable with ThriveCart so that your customers are automatically enrolled into your courses when completing purchases through your ThriveCart checkout.
To get started you’ll first need to head over to Settings > Integrations > Membership Platforms > Teachable in your ThriveCart dashboard.
Here you will be able to add a new integration (if it’s your first time), add further integrations, or edit any existing ThriveCart Teachable integrations.w integration (if it’s your first time) or add further integrations or edit any existing integrations.
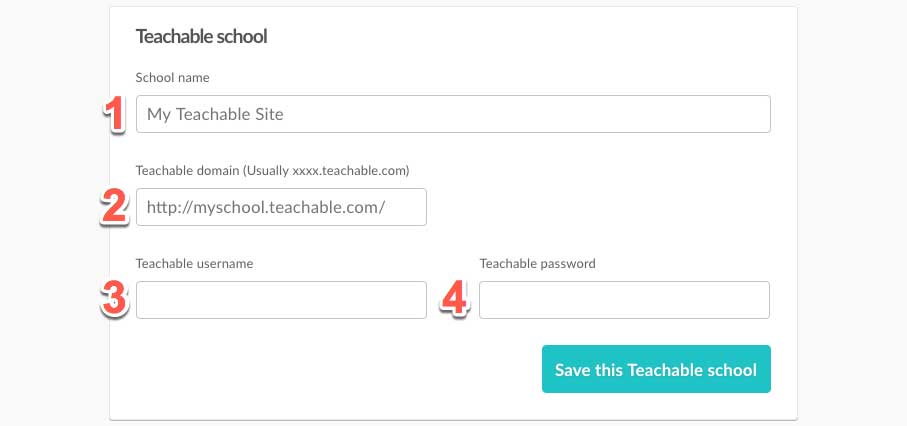
1. School name
Here you need to enter the name of your school. This is used internally in your ThriveCart account so you know which Teachable site you are selecting.
2. Teachable domain
Here you will need to enter the domain for your Teachable site. Usually, it will be https://myschool.teachable.com but you might also be using your own domain name to access it.
3. Teachable username
Your Teachable username is typically your email address. If you have sub-users on your Teachable account, make sure you’re entering the primary account email here.
4. Teachable password
In this field, you will need to enter your Teachable password. You will need to ensure this is correct.
If the password is wrong, the integration will not work. If you change your password within Teachable in the future, you will also need to make sure you update it here so that customers can continue to be added to your Teachable account.
What does this integration support?
When using ThriveCart to power your sales and sending customer information to Teachable, you will be able to
- Add a customer to a course when their orders complete
Revoking access can either be managed manually, or you could use our mutual Zapier apps to trigger revoking access from Teachable.
Add Students to Teachable via ThriveCart
For Teachable fulfillment setup, and to automatically add customers to Teachable when they buy your product, you will set this up under your products Fulfillment tab.
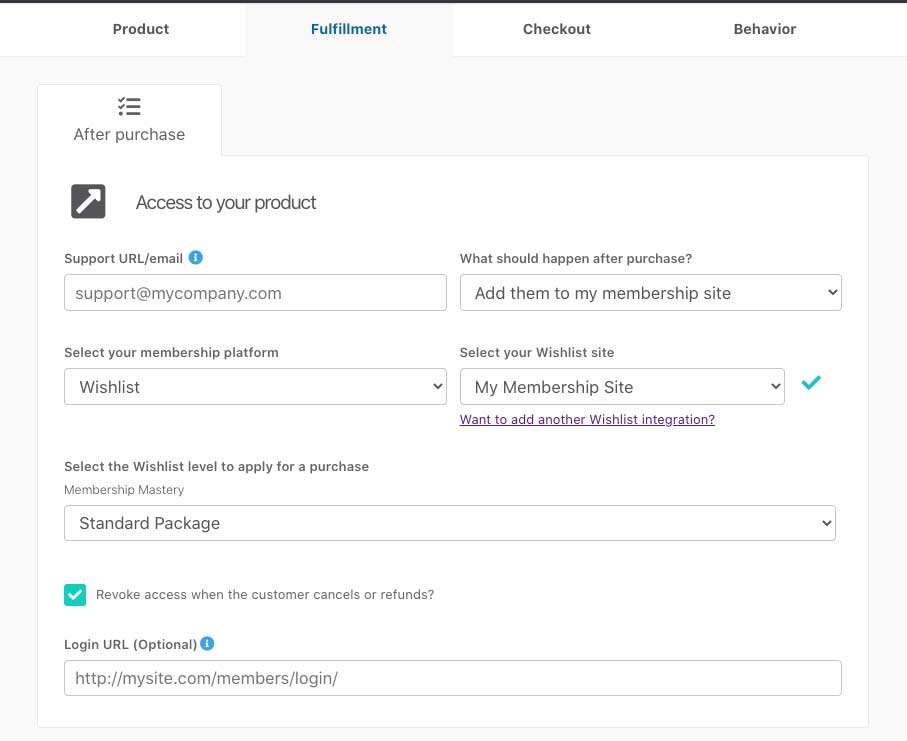
You will want to select the option to ‘Add them to my membership site’ and select what membership fulfillment you’re looking to apply for the purchase followed by what specific website for that platform.
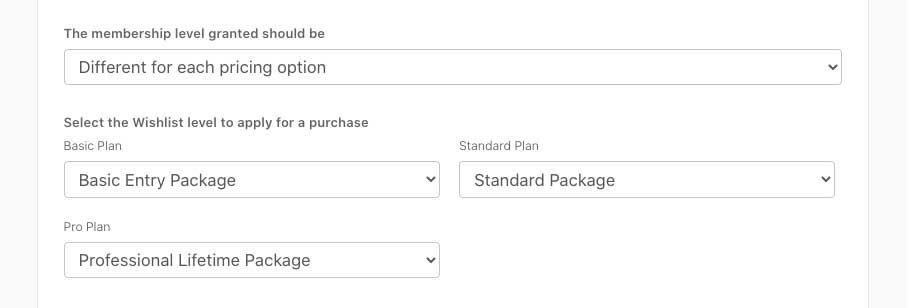
If you have multiple pricing/product options set up, then you can also choose to apply the customer to the same level for all pricing options or set different courses for different options.
If you have a bump product enabled on your checkout, then you will also have the option to set what course you wish to apply to the customer should they purchase the bump offer.
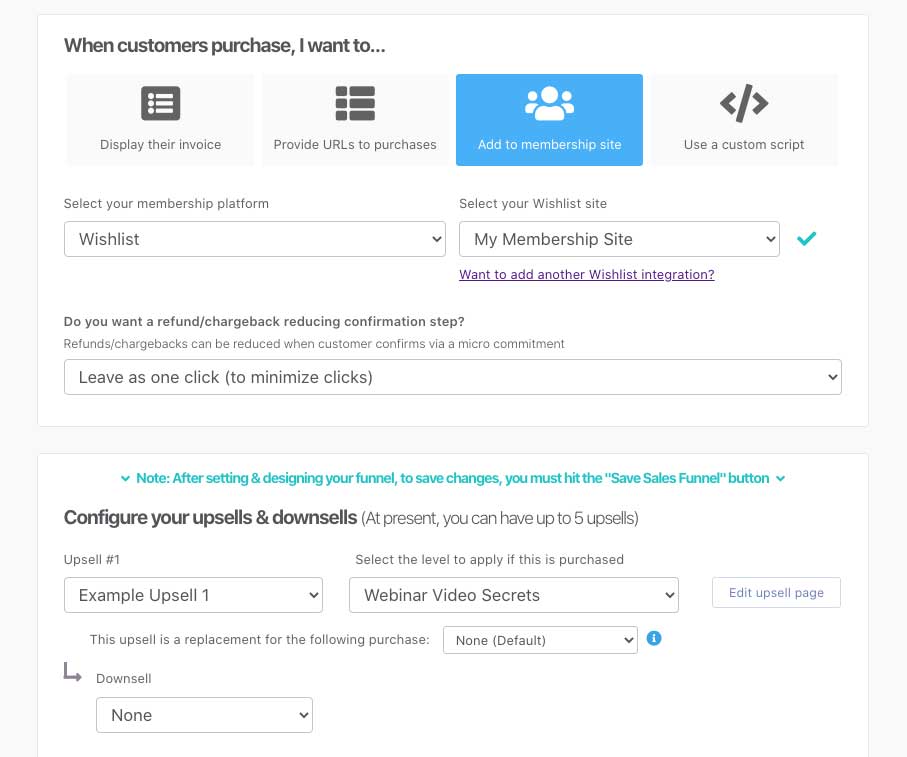
For your upsells, you will set the fulfillment under your funnel settings for the product by clicking “edit funnel” from the products page in your dashboard. This view is different depending on the template style that you have chosen.
Enhanced Template:
Fulfillment on upsells is set within the checkout editor directly. From the dropdown in the editor, you can add an upsell via the “Add funnel item” setup flow, where you will then be able to move through the upsell connect modal window to choose the course to apply that upsell to.
If an upsell has already been created, you can edit the course it’s set to fulfill via the “Edit” button.

You’ll be able to move through that modal to set the Teachable course you’re wanting to assign to that specific upsell:

Classic Template:
When clicking the “Edit Funnel” button from the product overview page, you’ll be taken to our classic funnel builder, where you can select the Teachable course for automatic course enrollment if they purchase that upsell.
How do customers get their login details?
After your customer’s order completes, ThriveCart will send your customer information to Teachable which will automatically have their account created, if they don’t already have one associated with the email address entered at checkout.
If the customer already has an account on Teachable under that email address, their new membership courses will simply be added to their existing account and Teachable will send the customer a course access email.
New users are sent a couple of emails from Teachable:
- Email verification – this has a link the user clicks to confirm their email and this then generates a password for them
- Course access email – this has a link to directly access their course (they need to have verified their email by clicking the link in the above email first so that they can login)
Troubleshoot Teachable Integration
| Problem | Solution |
|---|---|
| Customers not getting added to Teachable | Reasons for your customers not getting added to Teachable typically relate to: 1. You’re on a free or basic teachable plan. Teachable does not support 3rd-party integrations that bypass their own native payment methods on these plans. You need to have a Pro plan or higher. 2. You’ve changed your Teachable password since originally integrating with ThriveCart and need to update this to the new password within integration settings.. |
| Unable to view courses in fulfillment area | 1. You’re not using “https://” as part of your Teachable URL which will prevent us from communicating with your site. Please make sure that your integration has the full URL including “https://” 2. If you’ve not created any courses in Teachable yet, then you won’t be able to save a product using this integration as you need to select a course. 3. Your course needs to be published (not set to draft) in Teachable. 4. You will also need to ensure the course in Teachable has a payment option added. The payment details in Teachable don’t need to match your payment option in ThriveCart (as ThriveCart offers greater flexibility), but it will need to have a payment option of some kind added. |