Build stronger customer connections automatically. With ThriveCart’s GetResponse integration, you can turn every sale or signup into a perfectly timed email journey, from welcome messages to re-engagement campaigns. It’s the simplest way to keep your audience active, informed, and buying again, without lifting a finger.
This feature allows you to connect your GetResponse autoresponder directly within ThriveCart. Once connected, you can automate customer tagging, list management, and campaign enrollment based on powerful behavior rules inside your account—ensuring every subscriber gets the right message at the right time.
How to Connect GetResponse to ThriveCart
To connect your GetResponse autoresponder to ThriveCart, follow these simple steps:
- Sign in to your ThriveCart account.
- Click Settings at the top of your dashboard.
- Select Integrations.
- Choose Autoresponders.
- Select GetResponse from the list.
- Generate an API key from your GetResponse account by going to Tools > Integrations and API > API
- Copy the key in full to clipboard, then paste the generated API key into the API field in ThriveCart and click Authorise with GetResponse.
Once connected, you’ll be able to use GetResponse in your automation rules, enabling full automation for post-purchase follow-ups, lead nurturing, and re-engagement campaigns.
Click here to see how to add your customers to GetResponse after it’s been connected.
What the Integration Supports
With ThriveCart’s GetResponse integration, you can easily manage your contacts through various automation triggers, including:
- Add to Campaign – Automatically add new customers or leads to a campaign after purchase or signup.
- Remove from Campaign – Unenroll customers when they cancel, refund, or complete a specific action.
- Add Tag(s) – Apply tags to segment your audience for personalized email flows.
- Remove Tag(s) – Keep your contact database clean and accurate by removing outdated tags.
Data Passed to GetResponse
ThriveCart sends the following data to GetResponse during the integration:
- Customer name
- Customer email address
- Additional notes (when applicable)
Important Note About Double Opt-In
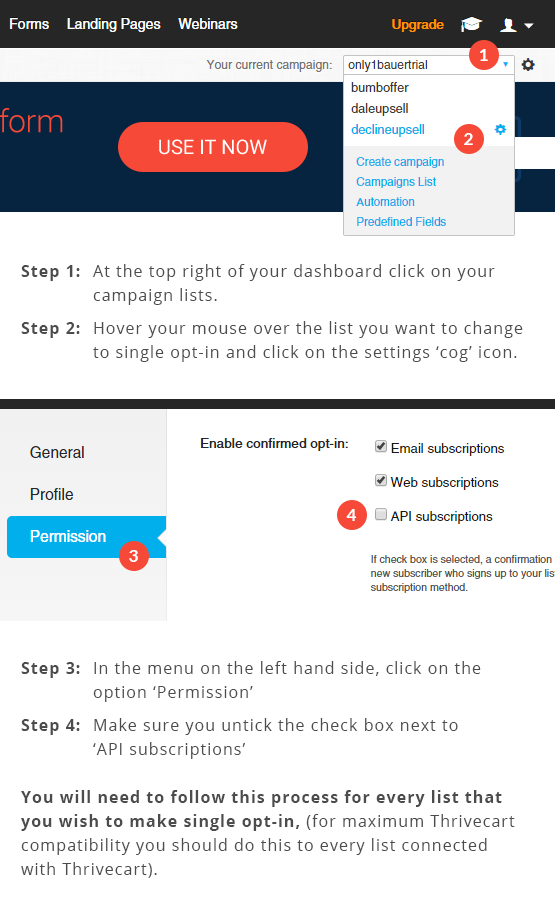
By default, GetResponse enables double opt-in for new campaigns. This means subscribers receive a confirmation email before being added to your list, potentially reducing conversions and preventing automatic list additions from ThriveCart.
To ensure a smoother automation experience, you can switch to single opt-in, allowing customers to be added immediately after their purchase or sign-up.
Follow these steps to disable double opt-in in GetResponse:
- Log in to your GetResponse account.
- Go to Lists and select the campaign you want to modify.
- Click Settings.
- Under Subscription Settings, toggle Double Opt-In off for web subscriptions and API integrations.
- Save your changes.
Once this is done, ThriveCart will automatically add customers to your GetResponse lists as they complete your checkout process—no confirmation required.
Why This Integration Matters
This connection saves time, reduces manual work, and ensures your customers never slip through the cracks. By combining ThriveCart’s powerful checkout automation with GetResponse’s advanced marketing workflows, you can:
- Instantly nurture leads from every sale.
- Create personalized email sequences based on purchase behavior.
- Improve customer retention and lifetime value with smart automations.
- Keep your campaigns clean and compliant.
Frequently Asked Questions (FAQs)
- Q: How do I connect my GetResponse account to ThriveCart?
- A: Go to your ThriveCart dashboard → Settings → Integrations, and select GetResponse. You’ll need your GetResponse API key, so follow the below steps:
- Log in to GetResponse and head to My Account > Integrations > GetResponse API > copy API key to clipboard > Paste API key in ThriveCart.
- A: Go to your ThriveCart dashboard → Settings → Integrations, and select GetResponse. You’ll need your GetResponse API key, so follow the below steps:
- Q: What kind of automations can I set up with GetResponse?
- A: You can automatically add or remove customers from campaigns, apply or remove tags, and trigger email sequences based on actions like purchases, cancellations, or refunds using ThriveCart’s automation rules.
- Q: What customer data does ThriveCart send to GetResponse?
- A: ThriveCart sends the customer’s name, email address, and any additional notes when applicable.
- Q: Why aren’t my customers being added to my GetResponse list automatically?
- A: This is likely due to GetResponse’s double opt-in being enabled by default. To allow automatic list additions, disable double opt-in under your campaign’s Subscription Settings.
- Q: Can I segment customers based on their purchases?
- A: Yes. You can use automation rules in ThriveCart to tag customers based on specific product purchases, then use those tags in GetResponse to trigger personalized email automations.