Give your courses a professional, branded presence with Learn custom domains to white label courses. While your checkout can use a single custom domain, each of your courses can be hosted on its own unique URL—giving you full control over how your content is presented.
With custom course domains like courses.yourdomain.com, you can create distinct, polished environments for every course, strengthening your brand identity and delivering a fully white-labeled experience for your students.
Checkout domains vs. custom domains for courses
By default, your course content will show on the same domain as your checkout pages, so if you’re using the standard ThriveCart domain for your checkout URLs, your courses will be available at:
youraccount.thrivecart.com/l/course-name/
youraccount and course-name would be based on your domain and course name, this is generated when getting the login-URL for a course in your dashboard.
If you have set up ThriveCart custom domains on an account level, your product checkouts would always follow the custom domain setup in your overall accounts CNAME settings and would be available at:
checkout.yourdomain.com/course-name/
Learn Custom Domains
Course domain setup allows you to separate your checkout URLs from your course URLs. For example, you could have courses.yourdomain.com for your student dashboard and then checkout.yourdomain.com for your checkout page URLs.
You can have multiple courses using the same custom domain and/or you can have different courses using different domains. This allows for white label courses, where the login page branding is consistent on your custom domain
Setting up a custom domain
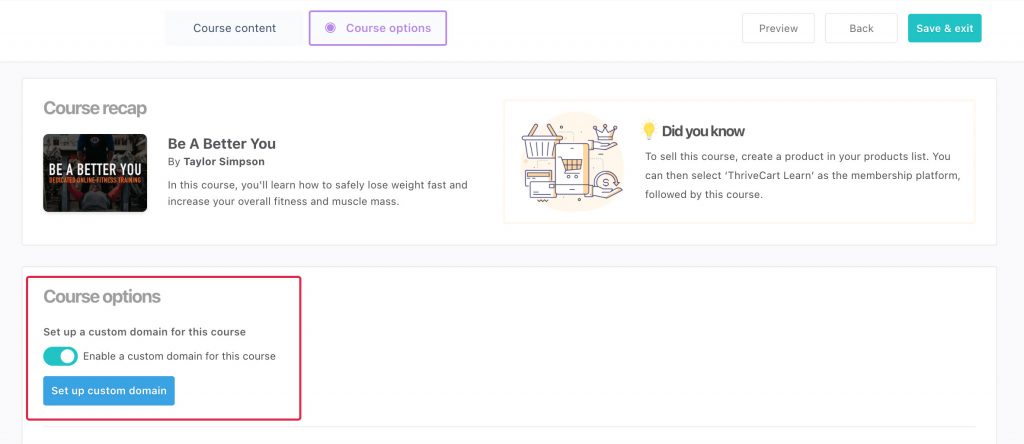
1. From your Course options tab, you’ll want to toggle on the option to enable a custom domain for the course.

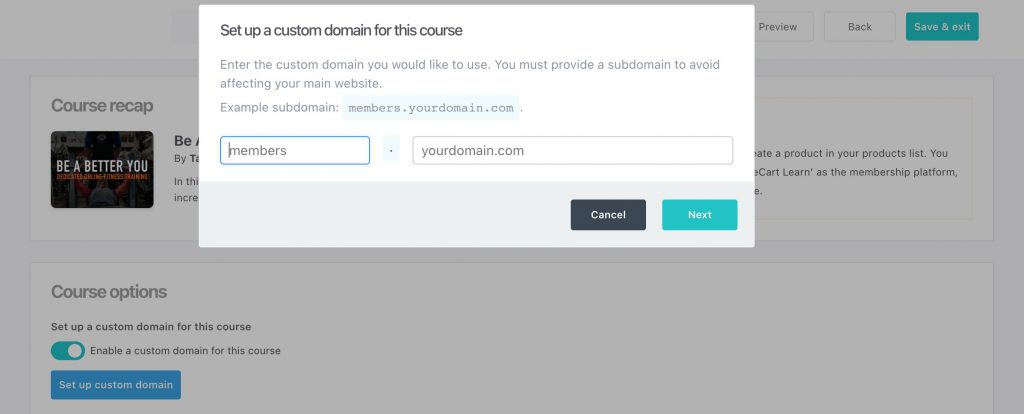
2. Clicking the Set up custom domain button will then give you the prompt to enter what subdomain and domain you want to use for your custom domain (this needs to be a domain that you own and have the option to set CNAME records for).

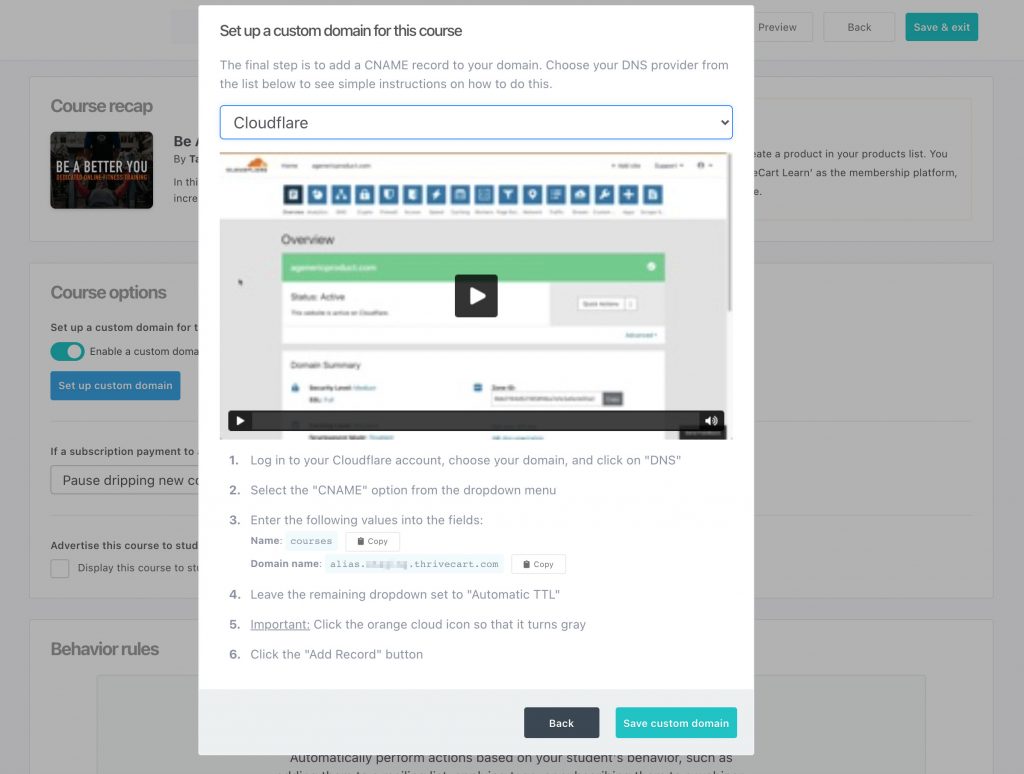
3. Once entered, we’ll then show you the details on how to set up your CNAME record with various common examples.
Follow the ThriveCart CNAME setup instructions carefully: point your CNAME to alias.thrivecart.com – NOT your ThriveCart domain.

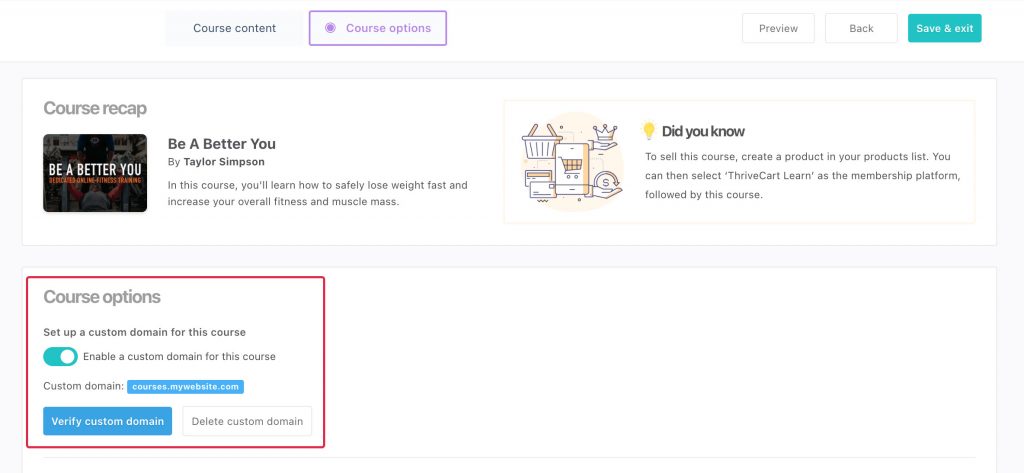
4. Once you’ve done that your domain/hosting service can take 24-48 hours to propagate your CNAME records and before you can then click the option to verify the domain.
After completing the ThriveCart CNAME Setup, you can use a service like whatsmydns.net to check whether your CNAME records have propagated publicly.

Once you’ve verified your custom domain for courses, that will then be set up for that course, and viewing that course content will now show under that domain.
When extending the course domain setup to additional courses, then you can skip the steps of setting up the CNAME records as you will have already completed that, you can continue past that step and then verify the domain.
Frequently Asked Questions (FAQs)
- Q: Can I use the same custom domain for multiple courses?
- A: Yes, multiple courses can share the same domain. Just verify the domain once per setup. However, your product checkouts will always use the same domain as set in your overall account settings.
- Q: Do I need to point the CNAME to my ThriveCart domain?
- A: No, point it to alias.thrivecart.com for correct domain setup.
- Q: Can I brand my course login page with a custom domain?
- A: Yes, the first course using the domain determines the login page branding, enabling White Label Courses, but you can always design each course’s login page individually as well.
- Q: Will this separate my student dashboard into schools based on the domain of those courses?
- A: No, students will always see all courses that they have purchased from you, or that you are promoting in their student dashboard – regardless of the domain of that course.
Related Articles
- How To Promote Your Courses Inside your Student Dashboard
- How can Learn students manage their subscriptions and update billing information?
- Managing subscription access to courses
- Add student comments on lessons (3rd-party solutions)
- Course contents not live – warning accessing a course
- Content Dripping with Learn
