Your checkout design plays a crucial role in converting visitors into customers. Design a checkout that sells.
With our Cart design gallery guide, you can explore the full range of ThriveCart checkout templates to find a layout that fits your brand and maximizes sales. A well-designed checkout not only looks professional but also builds trust and reduces friction at the most important stage of the buying journey.
ThriveCart’s Enhanced and Classic template editors give you complete creative control to match your brand and boost conversions. Explore layouts, preview designs, and build a checkout experience that looks great, and performs even better.
Enhanced vs. Classic Templates
When accessing your product’s checkout settings, you’ll find the option to browse our template gallery from the Design tab. In our gallery, we have two types of checkout editors: Enhanced and Classic.
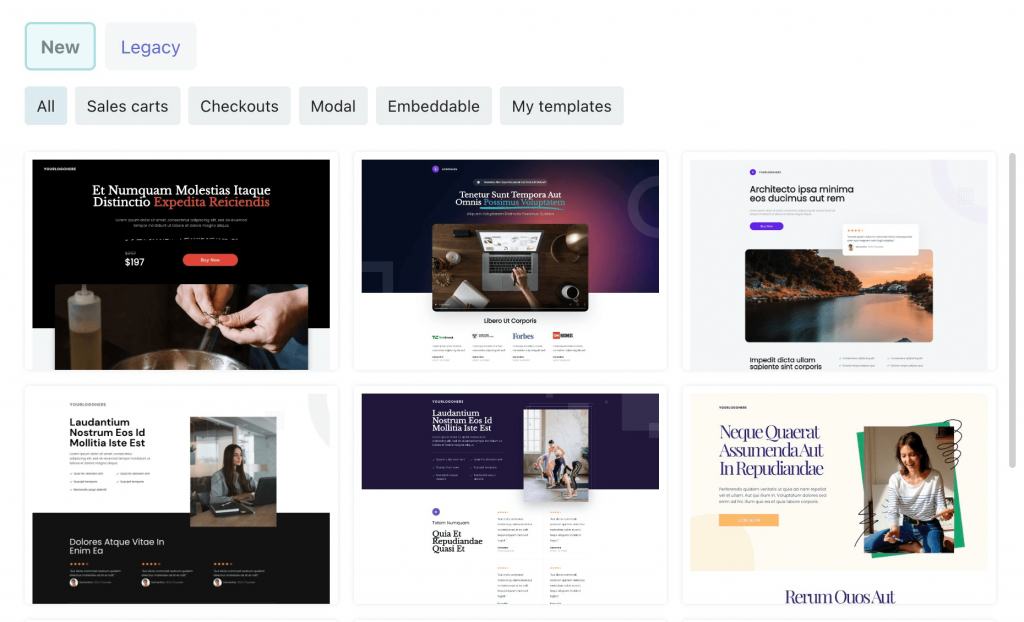
The Enhanced editor features the “New templates,” which are designed to provide a more advanced, visually appealing, and interactive checkout experience. These templates offer a wide array of customization options and design features, making them ideal for businesses that want to create engaging and modern checkout pages.
In contrast to Enhanced, the Classic editor offers the “Legacy templates”, they are designed for users seeking a traditional and straightforward checkout experience. They are simple, clean, and optimized for quick sales without too many distractions.
Enhanced (block-based) Templates
In the above video we go over how to preview and select an Enhanced template from the available ThriveCart checkout templates, design your full funnel from within the same editor, and how to work with our new Blocks feature to add additional designs onto your sales page with ease.
When creating a product and heading to Products > Checkout, you can click “Browse Gallery” to see the full gallery of designs available to you.
If you have already created a product, you will instead see a preview of your current design and when you hover over this design, you can then click “Browse Gallery”.

From this modal window, you can opt to Preview a design, or Select the design to add it to your product’s checkout and start customizing it.
If you do not want to assign a new design, or have already designed your products checkout, you can click on “Launch Editor” to access the editor.
If you have previously saved templates that you’re wanting to access, or are looking to import a design, this can be done from within the “My Templates” section on this page.
Template Design Examples
We have a number of pre-designed sales pages that have expanded the capabilities of our enhanced and classic template editor making it more customizable;
- Sales carts – Fully designed sales pages with fully customizable designs and checkouts embedded within the page. A one-page sales checkout page. A building block for your own pages and you can add/remove blocks and elements to these pages.
- Checkouts – Designed for users wanting a clean simple checkout page. Pre-made layouts and designs for these, but these too can be customized and have blocks or elements added to them to build the checkout for your needs.
- Modal – Previously known as our “popup” cart, these Modal designs can be embedded into your current website using a customizable buy button that when clicked will open a checkout modal over the website page that it is embedded on.
- Embeddable – embeddable checkouts are designed for users who are building their sales pages on their own website using their existing page builder and want to embed the core checkout area directly into their own page.
- My templates – When saving your own designs or importing designs created by other users, you’ll be able to find these designs under this section.
Classic Templates
To access a Classic template, you can navigate to “Browse Gallery” and head to the “Legacy” tab. Here you’ll see four straightforward ThriveCart checkout templates:
- Standard – This sidebar checkout design separates your content into a main section with content such as the product name and pricing overview built into the sidebar. By default this sidebar is on the right-hand side, but you can change that position within the editor itself.
- Sales Cart – This full page design would be where you can set your checkout width to be full-width, without any distractions.
- Embeddable – Made to be placed directly into your external website page, where you can then design a full sales page around the checkout. This checkout will be a very simple checkout design, and when saving your product, you will be given embed code to place into your website.
- Popup – This popup is also a simple checkout design that can be embeddable into your external site, giving you a button (or image) that customers can click to open a popup (or modal) where they can enter their checkout information.
In each of these templates, you can always add content boxes above and/or below the checkout block, where you can drag & drop additional elements such as text, images, video, etc.
When using Classic templates, your upsells and downsells will not be designed within the editor – but via the “Edit Funnel” button from the product overview page. This will then give you access to the classic funnel builder editor.
Legacy Designs
If your account was created before 2023, you may still see the older set of Legacy designs. These designs existed until we rolled out our Enhanced payment processors in July 2023, but are not built within an editor at all.
The legacy builder has been sunset, and only accounts created before this date will see the below Legacy options:

It’s worth a reminder that these Legacy design types are not supported when used with Stripe Enhanced or Stripe Connect+.
When choosing a legacy design, you would then be editing the different sections available for that design within the products settings pages directly:

If you’re looking for information on navigating this Legacy builder, you can find our set of guide here: Legacy Cart Builder Articles.
Frequently Asked Questions (FAQs) + Transitioning to the New Galleries
- Q: How do I change between different types of designs?
- A: If you’ve already selected a template, but are wanting to switch to a different template you can always exit out of the editor without saving and then “browse gallery” to choose another. Remember that you can also always “preview” a template within the gallery browser to see the full design before committing to it.
- Q: Do I lose my existing content if I change designs?
- A: Content created in one template will not be imported into another pre-set template. Selecting a template from the gallery browser will always override the existing content in the editor.
- A: Content created in one template will not be imported into another pre-set template. Selecting a template from the gallery browser will always override the existing content in the editor.
- Q:Can I revert back to my Legacy Designs after selecting a template?
- A: You can revert from Gallery to Classic by clicking on the restore previous design button that will present itself on the Legacy page when browsing the gallery.
- A: You can revert from Gallery to Classic by clicking on the restore previous design button that will present itself on the Legacy page when browsing the gallery.
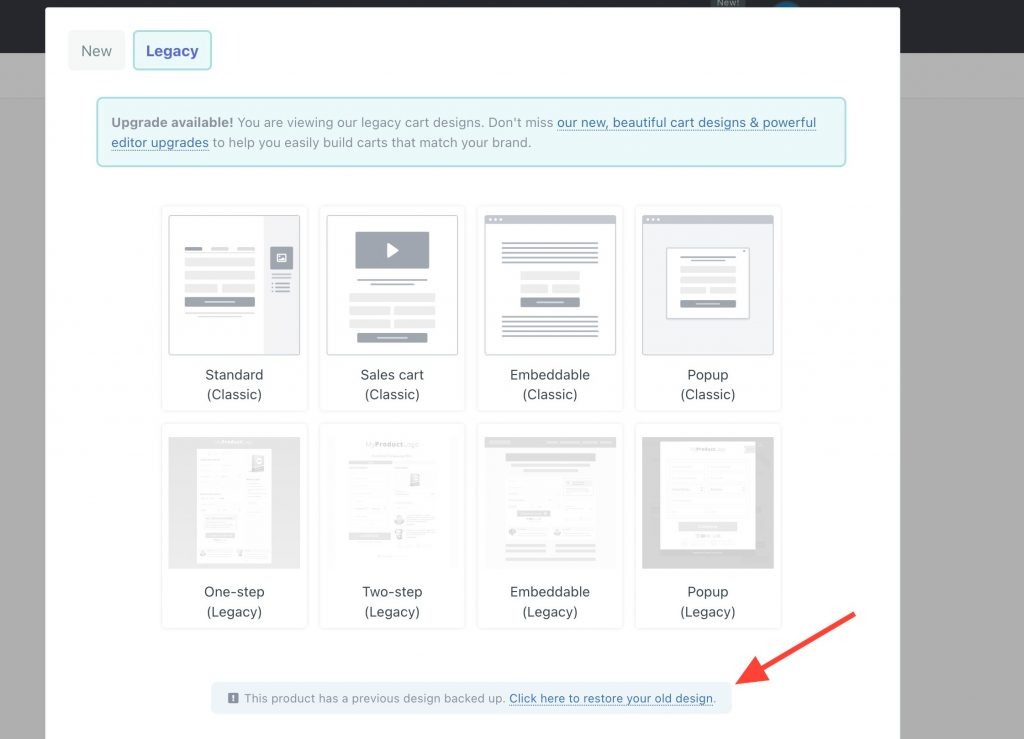
Note that this option will only be available if you previously had a design saved in the classic editor before switching to the new enhanced editor and design gallery.
If you’re editing via the classic editor, this will not let you restore a previous version of a classic design.
- Q: Can I stick with the Legacy designs or do I have to choose a template?
- A: Within the Browse Gallery section, you are still able to choose the Legacy designs by clicking into the “Legacy” section at the very top of that window.
You’ll instead access the Classic Editor and will not have access to all the elements (such as blocks) available within the Enhanced Editor. We have included some simple designs in the Enhanced Editor instead so that you can start with a basic checkout and add (or remove) elements from it.
- A: Within the Browse Gallery section, you are still able to choose the Legacy designs by clicking into the “Legacy” section at the very top of that window.
- Q: Do I have to redo my upsell pages if I change to the new designs
- A: Yes. Upsell page designs are connected directly to the checkout editor template chosen. When selecting the new designs, you’ll be able to edit your upsell pages directly within the Enhanced editor based on your chosen template, and your previous funnel designs will be overridden when selecting the template.
Remember, you can save blocks and elements as presets, so if you want the same sections in a different funnel, you can easily reuse blocks this way.
You can also copy the design of an upsell page from another funnel into the upsell page you’re currently working on.
- A: Yes. Upsell page designs are connected directly to the checkout editor template chosen. When selecting the new designs, you’ll be able to edit your upsell pages directly within the Enhanced editor based on your chosen template, and your previous funnel designs will be overridden when selecting the template.
- Q: Can we have multiple accept or decline options on the upsell pages?
- A: Yes, you can find these under the block option of ‘Offer Boxes’. You can add multiple sections to your upsell page that gives your customer the ability to accept or decline the presented upsell.
- A: Yes, you can find these under the block option of ‘Offer Boxes’. You can add multiple sections to your upsell page that gives your customer the ability to accept or decline the presented upsell.
- Q: Can I use custom upsell pages?
- A: Yes, you can still use custom upsell pages on your website. When using a custom upsell page remember that typically you’d be building the page out using your website’s page editor then simply embedding the accept or decline section into your page.
- A: Yes, you can still use custom upsell pages on your website. When using a custom upsell page remember that typically you’d be building the page out using your website’s page editor then simply embedding the accept or decline section into your page.
- Q: Will the new designs work with my current product settings?
- A: Yes. Your products prices, fulfillment methods, automation rules, and any other settings configured outside of the editor will not be changed or adjusted when using the new designs.
- Q: Where do I set my checkout language now?
- A: You can change this by navigating to the ‘Options’ tab of your product. From there, you’d want to click the “Choose cart language” to change the language of your checkout page.
- A: You can change this by navigating to the ‘Options’ tab of your product. From there, you’d want to click the “Choose cart language” to change the language of your checkout page.
- Q: Are SEO settings still available in the new enhanced editor?
- A: Yes, SEO settings such as setting the favicon, social sharing image, title, and description can still be accessed from within the editor using the settings button in the bottom left in the sidebar. You can find more details on this in our support article here.
- Q: Can I change the checkout type on my design?
- A: It’s not currently possible to switch out the checkout types (i.e. sidebar vs. full width) within the cart editor as these are tied directly to the overall template type itself. We recommend previewing the template before deciding on it to choose the checkout type that you are looking for. All other design blocks are interchangeable. Remember, you can save your blocks as ‘custom blocks’ so you could easily populate those elements into a different checkout design.