
If you already have products on Classic or Enhanced templates, the ThrivePages (Editor 2.0) importer lets you modernize an existing checkout page safely. You can create a ThrivePages draft from a page built in the Legacy Editor or Enhanced Editor, review the imported content, and make changes before replacing the live page.
Your existing checkout remains live throughout the import and review process. ThrivePages only becomes live after you select Set as default and confirm the replacement in the warning modal.
What Is the ThrivePages (Editor 2.0) Importer?
The ThrivePages importer converts an existing Classic or Enhanced Editor checkout page into a draft ThrivePages design.
This does not automatically publish the new design. The original page remains live while you review the draft. The importer preserves the existing page as the active version and creates a separate ThrivePages (Editor 2.0) version for you to inspect and edit.
The conversion flow includes three stages:
- Start the import from the checkout page settings.
- Review and edit the ThrivePages draft.
- Confirm that ThrivePages should replace the current live page.
You can easily switch between the live Legacy Editor page and the ThrivePages draft to compare versions during this import, before changing which version your customers see.
1. Start the import
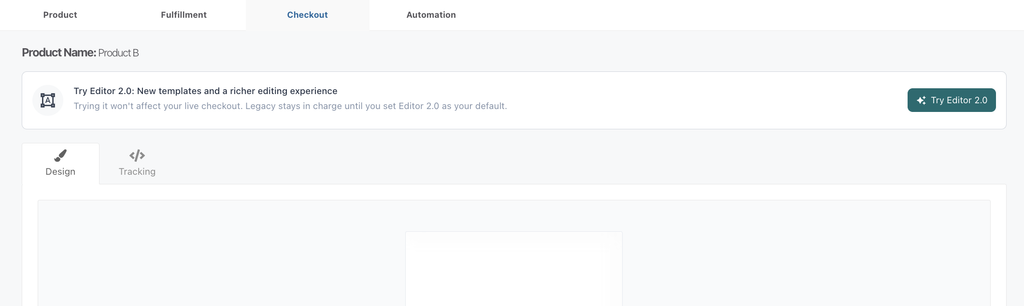
- Select the product that contains the checkout page you want to convert.
- Open Checkout.
- Locate the ThrivePages banner and Select Try Editor 2.0.
Your live checkout remains unchanged while the draft is created.
2. Review the ThrivePages draft
After the import finishes, two editor options appear:
- Legacy Editor, labeled Live
- ThrivePages (Editor 2.0), labeled Draft
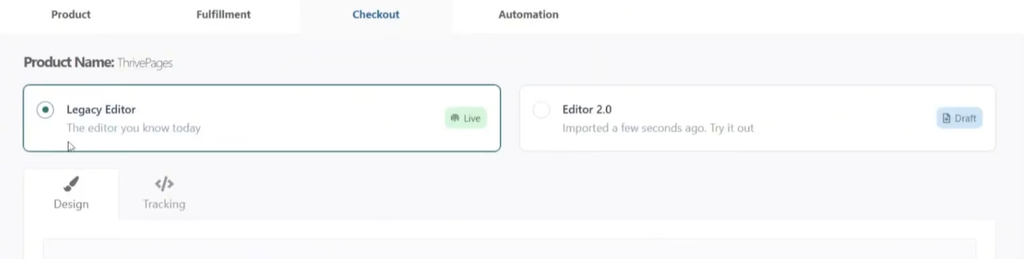
The Legacy Editor is selected by default because it is still serving your live checkout. The ThrivePages (Editor 2.0) card displays an import timestamp, such as Imported 2 mins ago. This timestamp updates over time to show how long ago the draft was created.
Select the Editor 2.0 card to review the imported ThrivePages draft. Depending on your page configuration, you can review and edit the available ThrivePages sections, including:
- Checkout
- Upsells
- Downsells
- Success page
- Tracking
Review the flagged elements
When the editor opens, you’ll see a warning that some elements may need a manual check. Accept it to start a short walkthrough, which highlights each element you should review.
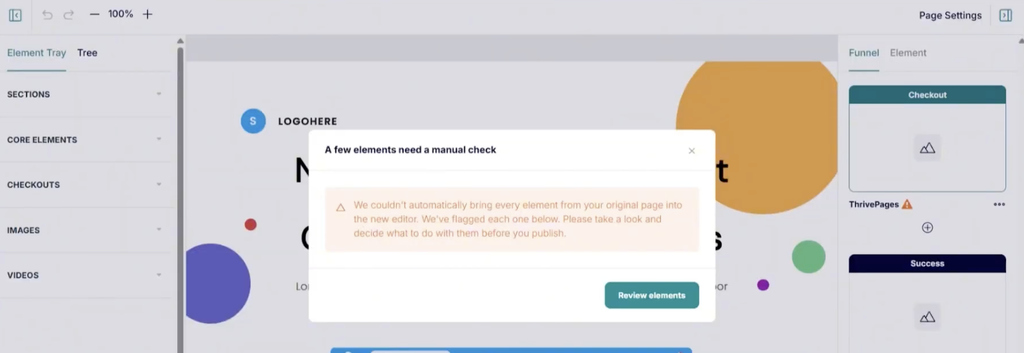
- Checkout. Your checkout’s functionality, such as a two-step checkout, is carried over, but some items may need reordering. Drag and drop individual checkout components to reorder them, then click Next.
- Footer. Check the footer looks right, then click Next to mark it as reviewed.
- Next page in your funnel. Click Next page to load the next converted page (for example, your upsell and/or success page) and review its highlighted elements in the same way.
- When you’ve reviewed everything, click Done.
Configuring the Imported Page
The importer provides a draft copy of your existing page in ThrivePages. After selecting the ThrivePages card, review the imported content in each available tab.
Use Customize to review the page design and content. Check that the imported sections, copy, buttons, images, and layout match your expectations, and consider adding some additional sections to your checkout using the sections and elements available in ThrivePages.
See more on Working with Sections, Elements & Properties in ThrivePages here, or start at the beginning with our Getting Started with ThrivePages: ThrivePages guide.
Open the Success page to review the customer experience after checkout completion. Confirm that the content and next steps are appropriate for your offer.
Use Tracking to review the tracking configuration associated with the page. Verify that the required tracking settings are present before making the draft live.
Because the imported page is a draft, review the complete customer journey before selecting Set as default. Pay particular attention to:
- Checkout content and offer details
- Page layout and sections
- Buttons and calls to action
- Success page content
- Tracking settings
- Any custom behavior such as HTML or video elements that may require adjustment in ThrivePages
The importer does not automatically make the draft live. The final replacement requires an explicit confirmation because it changes the page currently serving customers.
Make ThrivePages live
Once you’re satisfied with your ThrivePages sales page versions, you can then go ahead and convert from a draft to make it the live version that your customers see when they land on your checkout.
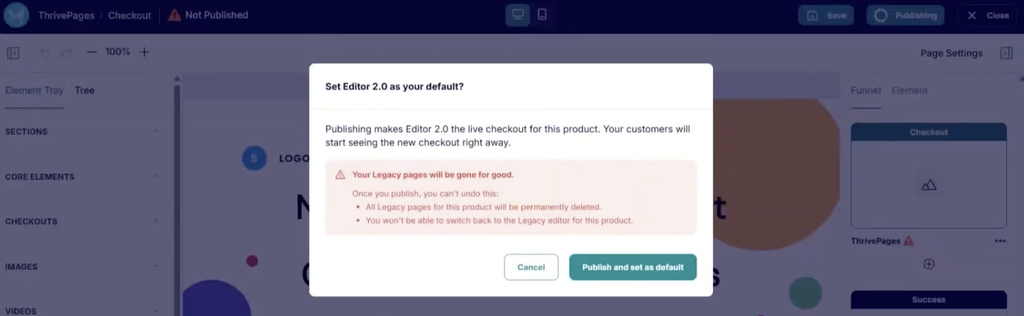
- Click Publish in the top-right corner.
- A message will confirm that publishing sets Editor 2.0 as your default.
Important: Once you publish, your old Legacy Editor pages are permanently deleted and cannot be restored. Make sure you’re happy with your pages before continuing. - Click Publish and set as default.
A green tick appears in the top bar when your pages are published. Click View checkout to see your live page.
ThrivePages becomes the live checkout after confirmation. If you are not ready to replace the live page, select Cancel. Your draft remains available for further review and editing later on.
Customer Experience
Customers continue to see the existing Legacy or Enhanced Editor checkout while you are importing and reviewing the ThrivePages draft.
Selecting the Legacy Editor or ThrivePages card only changes which version you are viewing or editing in the ThriveCart dashboard. It does not change the live checkout.
After you confirm the conversion, ThrivePages becomes the default live checkout. The Legacy version no longer serves traffic for that page, and will no longer be accessed from your product settings, so complete your review before selecting Convert.
FAQs
- Q: Does importing a page change my live checkout?
- A: No. Importing creates an ThrivePages draft and leaves the existing checkout page live. The ThrivePages version only overrides your legacy checkout design after you select Set as default and confirm the warning modal.
- A: No. Importing creates an ThrivePages draft and leaves the existing checkout page live. The ThrivePages version only overrides your legacy checkout design after you select Set as default and confirm the warning modal.
- Q: Can I convert multiple pages at once?
- A: No. The importer is designed for individual page conversion. It does not provide an account-wide or bulk conversion flow.
- A: No. The importer is designed for individual page conversion. It does not provide an account-wide or bulk conversion flow.
- Q: Why do I not see the Try ThrivePages (Editor 2.0) banner?
- The banner appears for pages using the Legacy Editor or Enhanced Editor. It does not appear when the page already uses ThrivePages, or a ThrivePages conversion draft already exists.
- If your page uses a legacy editor and the banner is still missing, verify that you are viewing the correct product’s Checkout settings. Check that ThrivePages is available on a newly created product, and if the issue continues on your existing products, contact ThriveCart Support.
- Q: What happens if I select Cancel in the warning modal?
- A: The modal closes and no live page changes are made. Your ThrivePages draft remains available so you can continue reviewing or editing it.
- Q: Can I use this tool to import a template or design from a different product?
- No. Currently the import tool will convert your legacy checkouts to ThrivePages, but the importer cannot be used to import designs from external accounts or other products within your account.
Related Articles
- Getting Started with ThrivePages (Editor 2.0): ThrivePages
- Working with Sections, Elements & Properties
- Configure Funnel Pages – Checkout, Upsells, Success
- ThrivePages Design Tips & Tricks: Build Better Pages Faster
- Mobile Editing in ThrivePages
- ThrivePages Page Settings: SEO, Custom Scripts & Fonts
- ThrivePages Asset Library and ThriveStudio Image Editor