
Every page you build in ThrivePages has a set of Page Settings that control how the page behaves behind the scenes — from how it appears in search results and social media previews, to what tracking scripts fire when visitors land on your page. Getting these settings right means your pages do more work for you: showing up in search, loading your analytics and pixel tracking reliably, and looking exactly the way you intended across every device and browser.
This guide covers everything available in ThrivePages Page Settings, including SEO, Social Settings, custom scripts, and custom fonts.
Accessing Page Settings

Page Settings are configured per page and apply to the page you are currently editing. To access them:
- Open your product in ThrivePages
- In the Second Level Toolbar, click Page Settings
- The Page Settings panel will open, where you can use the tabs across the top to navigate between setting categories
🔥 Tip: Each page in your funnel has its own Page Settings. If you want custom SEO titles or scripts on your upsell page, switch to that page before opening Page Settings. Changes made in Page Settings only apply to the page you are currently editing.
SEO & Metadata
SEO (Search Engine Optimisation) settings control how your page is described and displayed when it appears in search engine results like Google. Even if your checkout page isn’t publicly indexed, setting accurate metadata is important for sales pages, opt-in pages, and any page you are actively driving traffic to.
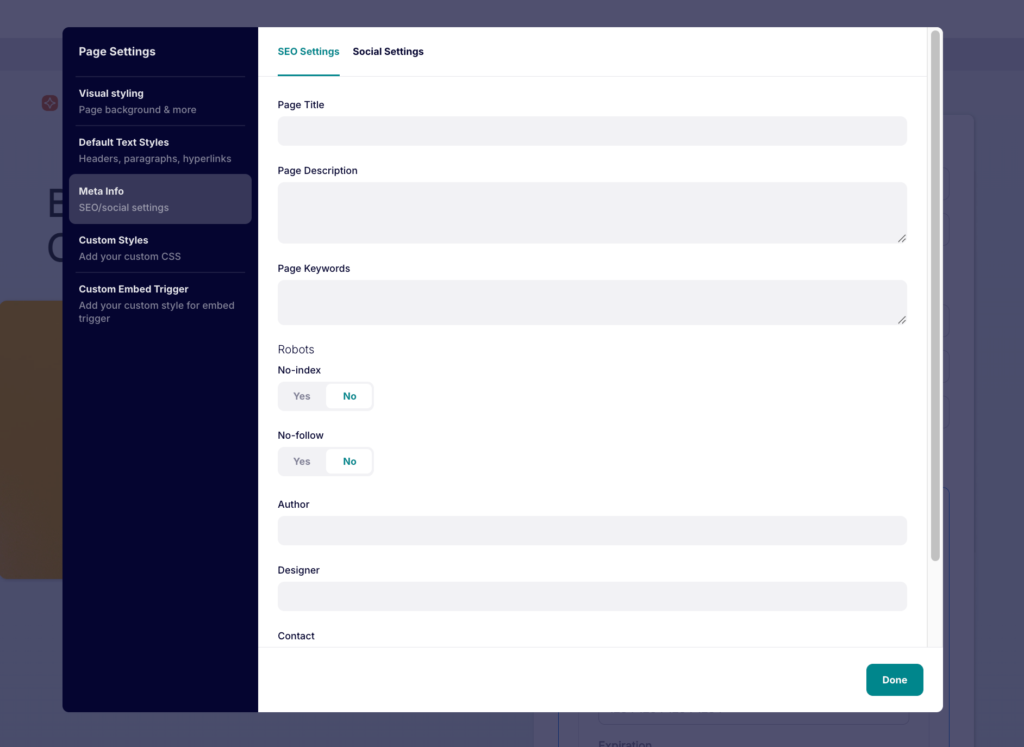
Page Title
The Page Title is the headline that appears in browser tabs and as the blue linked text in Google search results. It is also used by social platforms when your page is shared if no Social Settings title has been set (see below).
Best practices:
- Keep it under 60 characters so it doesn’t get cut off in search results
- Lead with your most important keyword or offer
- Include your brand name at the end if space allows
Example: “Sales Mastery Course — Start Today | YourBrand”
Page Description
The Page Description, AKA a Meta Description, is the short summary text that appears beneath your page title in search results. It does not directly affect your search ranking, but a well-written description increases the number of people who click through.
Best practices:
- Keep it under 155 characters
- Lead with a benefit or call to action and describe what the visitor will get
- Avoid generic copy like “Welcome to our checkout page”
Example: “Join 3,400+ students in Sales Mastery, the step-by-step course that teaches you to close deals confidently. Enroll today and get instant access.”
Keywords
The Keywords field allows you to add a comma-separated list of search terms relevant to your page. Note that major search engines like Google no longer weight meta keywords in their ranking algorithms, but they can be useful for internal site search systems or for third-party SEO tools that audit your pages.
Additional information that can be added as part of your SEO settings includes:
- No-Index: Enabling this tells search engine crawlers not to index this page in search results
- No Follow: Enabling this tells search engines to not count it as a vote of confidence for the domain, as it’s a private page not meant for ranking in search engines
- Author: Set the author or business name
- Designer: Attribute your designer
- Contact: An email or business address that can be used as a point of contact for your checkout page
- Copyright: Set your copyright date and business name
Social Settings
Social Settings control how your page appears when it is shared on social media platforms including Facebook, LinkedIn, X (Twitter), and messaging apps like WhatsApp and iMessage. Without these settings, social platforms will attempt to auto-generate a preview — often pulling the wrong image or a generic description.
Setting these properly ensures every share of your page looks intentional and compelling.
Image (Social Preview Image)
The Social Settings Image is the thumbnail image shown in social preview cards. This is one of the highest-impact settings on this entire panel — a strong image significantly increases click-through rates when your page is shared.
Requirements and best practices:
- Recommended size: 1200 x 630 pixels (16:9 aspect ratio)
- Use an image that clearly represents your offer — a product mockup, a course cover image, or a branded graphic
- Avoid images with small text — it won’t be readable at preview size
- Upload directly from your ThriveCart media gallery
🔥 Tip: Test how your page looks when shared using Facebook’s Sharing Debugger (developers.facebook.com/tools/debug) or any social sharing preview tool. Paste your page URL to see exactly what card will appear. If you’ve updated your social media image and the old one still shows, use the “Scrape Again” button in Facebook’s debugger to force a refresh.
From the Social Settings tab, you can also enter your social media platform links such as your Facebook URL, Twitter ID, Google Search Console ID, and Bing Webmaster Tools ID. Adding these ID’s and URL’s will ensure that search engines can link your social media platforms back to your checkout page for optimal SEO coverage.
Custom Styles (AKA Scripts)
To inject third-party code directly into your ThrivePages page, you can add CSS in page settings. This is how you add tracking pixels (for platforms outside of native ThriveCart integrations with Facebook and Google), analytics tools, retargeting code, chat widgets, heatmap tools, and other integrations that aren’t natively built into ThriveCart.
You can add your custom scripts in the Custom Styles tab.
Common use cases:
| Script type | Recommended placement | Example |
| Facebook / Meta Pixel | Within Product Settings | Added via Pixel ID |
| Google Analytics (GA4) | Within Product Settings | Measurement ID |
| Google Tag Manager | Within Product Settings | GTM container method |
| TikTok Pixel | Custom Styles | Base pixel code |
| Hotjar / heatmaps | Custom Styles | Tracking snippet |
| Live chat widget | Custom Styles | Chat provider widget code |
| Custom conversion event | Custom Styles | On Success Page for post-checkout thank you pixel fire |
Adding a script
- Go to Page Settings > Custom Styles
- Paste your script code, including the opening <script> and closing </script> tags if they are part of the provided code
- Click Save
- Publish the page for your script to go live
🔥 Tip: Scripts added to your checkout page will fire for all visitors who load the page — including people who do not complete a purchase. If you want a script to fire only for buyers (e.g., a conversion pixel), add it to your Success Page instead, not your Checkout page.
Important: ThrivePages does not validate or sandbox custom scripts. Only add code from trusted, reputable sources. Malicious or broken scripts can affect your page’s performance or user experience. If your page stops loading correctly after adding a script, remove the script first to rule it out as the cause.
Script best practices
- Test in a fresh incognito window after adding any script, before sending traffic to your page
- Add scripts one at a time rather than pasting multiple scripts together — this makes troubleshooting much easier if something breaks
- Keep checkout-specific scripts on checkout pages only — do not copy scripts intended for your success page onto your checkout page, as conversion events may fire prematurely
- Google Tag Manager users: Instead of pasting GTM code into your checkout directly, utilize our built-in integration with Google to easily install the container in Tag Manager. See more on that here.
By default, ThrivePages includes a large library of Google Fonts available across all text elements. If your brand uses a custom typeface that isn’t in the Google Fonts library, you can upload it directly and use it throughout your pages.
Troubleshooting
My tracking pixel is not firing
Check that:
- The script was saved and the page was published after adding it — scripts only go live on publish
- You placed the script in the correct location — pixels typically need to be in the Head tab
- The script code is complete — some providers give partial code snippets; make sure you have the full base code including opening and closing <script> tags where required
- Test using your pixel provider’s browser extension (Meta Pixel Helper, Google Tag Assistant, etc.)
My page loads slowly after adding a script
Scripts injected into the Head load before the page renders. A slow or unresponsive third-party script can block your page from loading. To diagnose:
- Temporarily remove the script from Page Settings
- Publish and test load speed again
- If speed improves, the script is likely the cause — contact the script provider for an async-safe version
My social image isn’t appearing when I share the link on Facebook
Facebook caches page metadata aggressively. After updating your image:
- Go to developers.facebook.com/tools/debug
- Paste your checkout URL and click Debug, then Scrape Again
- This forces Facebook to fetch the updated metadata
Frequently Asked Questions
- Q: Can I use the same script on multiple products?
- A: Scripts are set per page within each product. If you use the same pixel or analytics code across multiple products, you will need to add it to each product individually, and we recommend doing this via the product’s Tracking settings section instead of via custom CSS. Google Tag Manager is particularly useful here — add the single GTM snippet to each product within settings instead and you can then control all tags from one place.
- A: Scripts are set per page within each product. If you use the same pixel or analytics code across multiple products, you will need to add it to each product individually, and we recommend doing this via the product’s Tracking settings section instead of via custom CSS. Google Tag Manager is particularly useful here — add the single GTM snippet to each product within settings instead and you can then control all tags from one place.
- Q: My script worked on my other website — why doesn’t it load on ThrivePages?
- A: Some scripts rely on specific page structures or DOM conditions that may differ in ThrivePages. Check the browser developer console (F12 > Console) for any JavaScript errors after the page loads — these often point to the specific issue. If the script provider offers an async or deferred loading option, use that version.
- A: Some scripts rely on specific page structures or DOM conditions that may differ in ThrivePages. Check the browser developer console (F12 > Console) for any JavaScript errors after the page loads — these often point to the specific issue. If the script provider offers an async or deferred loading option, use that version.
- Q: Can I add custom CSS as well as custom scripts?
- A: Custom CSS can be added via Page Settings > Custom Styles. This is useful for advanced styling beyond what the Properties Panel controls. Reference elements using the auto-generated IDs visible in each element’s General properties.
- A: Custom CSS can be added via Page Settings > Custom Styles. This is useful for advanced styling beyond what the Properties Panel controls. Reference elements using the auto-generated IDs visible in each element’s General properties.
- Q: Does adding a script affect my page’s published status?
- A: Adding or changing a script requires you to republish the page for the change to go live. Auto-save backs up your settings, but publishing is always a deliberate action. Check the Publish button in the top toolbar after any script change.