Stay compliant while capturing valuable leads effortlessly with the ThriveCart GDPR Consent Checkbox, a simple, powerful way to manage customer permissions directly from your checkout page. This marketing email opt-in feature lets you add a customizable checkbox that connects seamlessly with your automations, allowing you to tag contacts, trigger workflows, or add subscribers to your email lists based on their consent. With flexible options to link your privacy policy or display a popup, ThriveCart helps you maintain transparency, meet GDPR requirements, and grow your marketing list responsibly.
While this checkbox can be customized with your own wording, the majority of users typically use it to ask for consent if customers will be happy to receive marketing emails. Currently, this checkbox is optional and cannot be made mandatory at this time.
You can then trigger automation rules based on whether the customer ticks this checkbox.
How to set up the ThriveCart GDPR Consent Checkbox
You’ll need to go into your product’s settings and head over to the cart editor under your Checkout > Design tab.
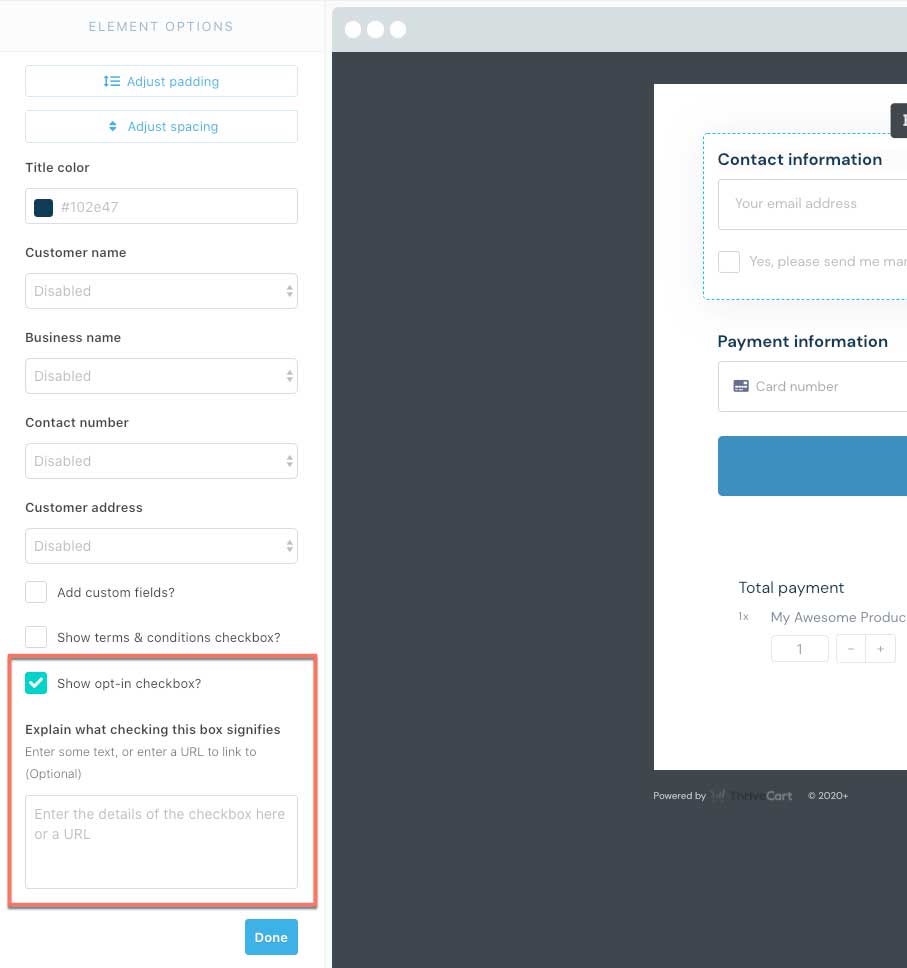
In the editor, you’ll need to select the contact information element (this is where you set the information you collect from your customer).

You can then check the box to show the optional checkbox for your product.
In the field shown you can either enter your own information which will be shown in a popup, or you can enter a URL to a page on your website (which will then open that page in a new tab when the user clicks the link on the checkout).

When clicking the section in the editor itself, you can edit and rename the wording shown to your own needs (it might not be used for opt-in consent OR you may wish to translate for your own language.
Setting an action when this is selected
The next step is actually triggering an action when the user checks this box. Typically, you’re going to want to tag your contact in your autoresponder or add them to a specific list which identifies them as being marketable.
This is easily done using an autoresponder integration set in automation rules. If you haven’t checked it out yet, visit our helpdesk article here on adding your customers to your autoresponder.
To trigger actions when customers place an order and this box is checked, you’re going to want to select the behavior “your custom checkbox is ticked”.
Then, depending on what your autoresponder supports, you’ll be able to add/remove tags to the contact, or add/remove from lists in your autoresponder.
Remember this is in addition to any other rules you’ve set for your product.
So you can have your contact added to tags/lists for the purchase of the product they’ve agreed to buy (and receive emails related to that product). You can then add the customer to new tags/lists which you can then use to identify customers who are happy to be marketed about other products/services.
Your checkout
Finally, once you’ve saved your product settings, when going to your cart page you’ll now have this checkbox displaying with the label you’ve entered. If you entered a description or a URL, you’ll also have a more button showing.

Frequently Asked Questions (FAQs)
- Q: What is the GDPR marketing consent checkbox in ThriveCart?
- A: It’s an optional email marketing opt-in checkbox you can add to your checkout to ask for customer consent to receive marketing emails.
- Q: Where do I enable the checkbox in ThriveCart?
- A: In your product’s cart editor, select the contact information element and simply tick the “show the opt-in box?” option in the left-hand sidebar. Don’t forget to save your changes.
- Q: Can I customize the checkbox text or link it to my privacy policy?
- A: Absolutely! You can customize the checkbox wording, and also link it to your privacy policy by adding the URL in the opt-in checkbox field in the left-hand panel within the cart editor. This will open the policy in a new tab so customers can easily view the details.
- Q: Can I trigger marketing actions based on the checkbox?
- A: Yes. You can use the automation rules to tag contacts or add them to specific lists in your autoresponder if they tick the box.
- Q: Is the checkbox data included in exports or integrations?
- A: Yes, consent status appears in your CSV exports and Google Sheets (if integrated).


