Unlock seamless print on demand fulfillment with the ThriveCart Lulu integration, giving you an effortless way to sell books, workbooks, and other printed materials without managing inventory or shipping. With automated book orders, ThriveCart sends customer purchases directly to Lulu for printing and delivery—saving you time, reducing manual work, and ensuring a smooth experience for your buyers.
Whether you’re selling journals, planners, guides, or full-length publications, this integration makes it simple to scale your print-based offers while ThriveCart handles the checkout and Lulu handles the rest.
Setup the ThriveCart Lulu Integration
In the video above, we look at how you can connect your Lulu account to ThriveCart so that you can automatically add customers to membership levels when their orders complete.
The information you will need to input to connect your Lulu account includes:
- Account name – an internal descriptor in case you choose to connect multiple Lulu accounts
- Client Key
- Client Secret
To access your Client key & Secret you will need to log into your Lulu dashboard and follow the below steps:
- Click on your profile in the top right corner > API Keys
- Click the button to “Generate Client”
- Copy the keys into ThriveCart by heading to Settings > Integrations > Fulfillment services > Lulu
- Click “Save this Lulu account” to complete the integration setup.
Getting your content ready
Before setting up your products to use Lulu for fulfilment, you’ll want to get a couple of things sorted:
- Generate a POD SKU using their calculator here
- The ‘public’ URL to your cover
- The ‘public’ URL to your interior
By ‘public’, we’re referring to a URL that can be publicly accessed without any login/protection.
These URLs are passed to Lulu via their API, and their system will look to read the PDF files you have uploaded. If Lulu is unable to read those files, they will not be able to generate the order.
Your ThriveCart checkout set up
When using Lulu as a fulfillment service for your product, there are a number of fields that are required to be set on your checkout in order for the order to be successfully accepted by Lulu.
- Customer name
- Customer address
- Customer phone number
If you are not collecting the above information, orders will not be accepted by Lulu.
Sending orders to Lulu
Passing customer and order information to Lulu or any fulfillment service is handled via the Shipping options you can create in your product settings.
This allows you to have different shipping options that fulfill different products or even use different fulfillment services.
When you have created a physical product, your fulfillment tab will have a Shipping section. Here you can set shipping options for your product.

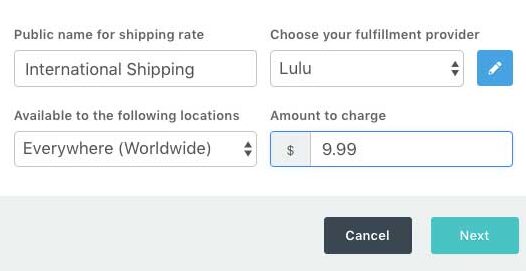
When creating or editing a shipping option you want to choose Lulu as your fulfillment provider in the drop-down selection.

You’ll immediately be shown a new section that has you select which connected Lulu account you want to integrate with, and also what shipping rate you want to use for this shipping method.

You can then set the general shipping option details like the name (which is shown on the checkout page), any shipping restrictions – like what countries are valid for this option (if a customer visits from a country the shipping option isn’t valid for, it won’t show to them), and finally how much you want to charge for the shipping option (you can have shipping free by simply entering zero here).
The next step will then be selected when this shipping option is available, such as for specific pricing options, specific quantities, if the customer accepts/declines the bump.
These options will be based on your product settings at this time and will be greyed out if you do not have multiple pricing options or a bump enabled.

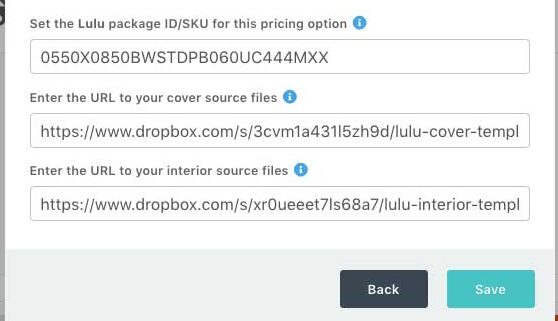
Finally, we get to the Lulu-specific options.
You’ll need to enter the Lulu package ID/SKU for that pricing option, which you can generate from their price calculator as discussed above.
You’ll also need to enter the URLs for your cover and interior content.
These URLs need to be publicly readable. The URLs are not shared with anyone or displayed anywhere – they are simply passed to Lulu so they can read your content files to generate the order.
Once saved, you’ll have a shipping option set up for your product that when selected by the customer at checkout, will now fulfill this order via Lulu.

Orders will appear in your Lulu account shortly after they complete through your ThriveCart checkout. They will be marked as unpaid and will get paid when you send Lulu the funds to print it or set up an auto-payment in your Lulu account. If your linked content does not match the settings of the SKU provided by Lulu (number of pages, for example) then the order may also be rejected, and you’ll see the status of the order in your developer account at Lulu.
Frequently Asked Questions (FAQs)
- Q: Why are my orders are not being created in Lulu?
- A: This can be caused by a few issues, and so you will want to confirm:
- You’ll want to verify your Client Key & Secret and update them in your integration settings if they have changed
- You Package ID or SKU entered in your ThriveCart shipping setup does not match your Lulu IDs
- If you’re attempting to test your Lulu integration, a live order will need to be placed as orders in test mode
- Make sure that in addition to the customer name and address, you are also collecting their phone number, as this is a Lulu requirement
- A: This can be caused by a few issues, and so you will want to confirm:
- Q: Why did I receive an email from ThriveCart detailing “There was an error shipping this purchase via Lulu. Here is the error that they returned to us…”?
- A: We will send this email to you if we received an error message from Lulu when we attempted to send order details through to them. The email will include the specific error message that we received from Lulu so that you can troubleshoot your integration and settings. Common issues are detailed above, but if you’re not sure you can always reach out to us in support and the team will review your product setup.