Effortlessly manage how your physical products reach your customers with flexible ThriveCart shipping options. Whether you’re delivering items manually, or looking to integrate with various automatic fulfillment methods, ThriveCart makes physical product fulfillment simple and customizable.
Set up custom shipping rules based on location, product type, or order value, and offer multiple shipping options to give customers the flexibility they expect at checkout. With clear, streamlined settings, you can ensure every order is fulfilled accurately—and every customer enjoys a smooth post-purchase experience.
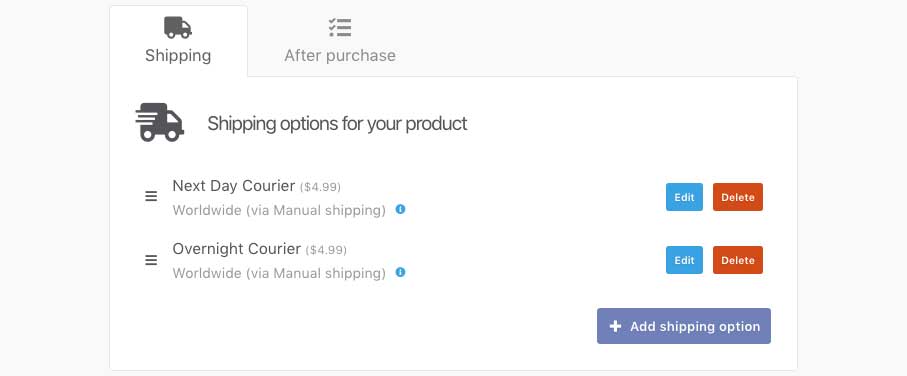
Creating shipping options
Under your Fulfillment tab for a physical product, you’ll have a Shipping tab which will let you create shipping options to show your customers.

Clicking the Add shipping option button will then launch a modal window where we can complete some details about the shipping option for our customers.

- Public name for shipping rate. This is the descriptive name that will be shown at checkout and on your customer’s invoice. So you typically want this to be simple and clear. “Overnight courier”, or “Standard Shipping” are a couple of examples, but you can name this whatever you like.
- Choose your fulfillment provider: From this drop-down you’ll always have the option “Manual” if you’re shipping items yourself. If you’ve integrated with any other fulfillment services, you’ll be able to select this from the drop-down menu. In some cases, you’ll have some additional options shown to you immediately (typically around selecting a product in that fulfillment service).
You can then optionally set weight and dimensions, these will be passed through to shipping providers along with order details.
- Available to the following locations: Only customers in those locations will see the shipping option. If you set a shipping specific to customers in the USA, then a customer in the UK won’t see that option on the checkout page. If there are no UK shipping rates, UK customers will not be able to complete checkout.
This lets you create specific shipping and fulfillment options easily based on the customers shipping location and only provide those options to them. - Amount to charge: This is how much customer’s will be paying for this specific shipping option. Throughout the modal you can choose to apply your rule to different quantities and specific pricing options, so you will be able to set multiple shipping options and prices depending on volume and product purchased.
Once the above fields have been filled out, click “Next” where you can set additional options about when this shipping option will be available.

Your product settings will affect what options you have at this stage:
- For specific quantities let’s you set different rates if a customer purchases 1 of your product vs. 2. When setting rates based on specific quantities you can enter a number and choose “or more”, “or fewer”, “exactly” to determine when the rule is applied.
For example, if you set the rule to apply when 2 or more is purchased, every customer who purchases more than 2 of your product will see that shipping option. - If you have multiple payment options on your product you will be able to select one or more pricing options this shipping option is available for. Letting you set different fulfillment/shipping options for different product/payment options on your checkout.
- If you have a bump offer enabled on your checkout you may also want to set different shipping rates based on the customer selecting the bump or not. So you can create different shipping rates in these scenarios too.
The next step will depend on your payment option.
- If it’s a subscription or payment plan you will have the ability to charge shipping on each rebill period (perfect if you’re shipping product on each payment) and if you say yes to this, you’ll even be able to set different fulfilment for up to 12 different rebills.
For example, if you’re looking at sending out different training materials to customers over their 6-month training program, you can send out a different ‘pack’ each month after their payment is processed.
You can also set an internal Shipping Label ID, if required by your shipping provider, to identify and track orders with this specific shipping rate applied (but the shipping option name will also be included in data we send).

Once you’ve created your shipping options you’ll have the ability to edit/remove them or set the order in which they appear to your customers.
Remember, customers will only see shipping options that are available to them (based on their location and/or payment option selected at checkout), so when setting regional rules, make sure that all of your bases are covered!
Example Shipping Rule Scenario: Clothing Sizes/Colors
If you’re offering clothing or apparel and want to make sure that the customer can choose their correct size (or color) in checkout, you’ll want to make sure to set this up using different pricing options under your products Pricing settings tab.
You can add up to 6 different pricing options, and so you could have pricing options all set to the same price, but labelled based on the desired size/color. In the example of clothing, you would have pricing options created for sizes such as Small, Medium, Large, etc.
Then, if you’re integrating with a Print on Demand service such as Printful, you can create shipping rates that will only show when those pricing options are selected, and link those shipping rules to your Printful products directly.

Dynamic Shipping Rates
If you’re using Shippo or ShipStation, you can now offer dynamically calculated shipping rates in your checkout. This means that rates are calculated based on your product weight and size, and distance to ship the box. So you never lose out on shipping fees from manually set rates.
See more on setting those rates in our Shippo or ShipStation setup guides.