ThriveCart’s funnel architecture enables systematic revenue optimization through sequential upsell presentation and integrated conversion tracking.
Boost your sales potential with funnel optimization with ThriveCart by strategically guiding customers through upsell and downsell offers. Learn how to create upsell and downsell pages that increase your average order value and deliver a seamless buying experience.
With our easy upsell fulfillment setup, you can automatically deliver add-on products or upgrades to guide customers naturally toward higher-value offers and maximize every transaction. Build smarter funnels, boost conversions, and make every checkout count.
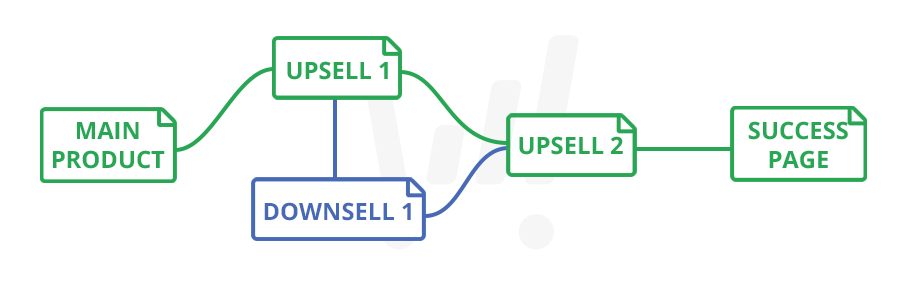
How do funnels work?
When you add any upsells or related downsells in your funnel, they’re shown to your customers sequentially one after the other.
Customers are automatically taken from your checkout page to the first upsell in your funnel, then
- If the customer agrees to buy the upsell – the customer will be taken to the next step in the funnel, either the next upsell, or the success page.
- If the customer declines to buy the upsell – the customer will be taken to either the associated downsell, or the next step in the funnel. Again, this could be the next upsell or the success page. After the customer makes their decision on the downsell, they’re taken to the next step in the funnel.
Step #1: Create an Upsell
After creating your products within ThriveCart, you’re often going to want to create a funnel to present upsells to your customer after securing the purchase of the initial product.
You’ll want to make sure you’ve created an upsell and/or downsell in your account before continuing, and you can create these under your products area.

If you’ve not already, you can watch our getting started video here. This walks through creating your first product, upsell, and setting up a funnel for the first time.
Within your Upsell/Downsell setup, the settings are similar to creating a main product. You’ll want to make sure to name your upsell, add a price (a single pricing option per funnel item is currently supported), choose whether to enable customer cancellation options (more details here) and/or whether the upsell purchase should automatically cancel any other product purchases (details here).
You’ll also have the option to enable upsell-specific tracking, set the name on the fulfillment links (fulfillment methods are added later, once the upsell is connected to a product), and enable any upsell-specific automations you may wish to run when the upsell is purchased.
Note: You’ll follow the same steps as above to create a separate downsell as well, within the “Downsell” products tab.
Creating a funnel
To create upsell and downsell pages linked to your product, the ThriveCart sales funnel builder version will depend on the cart template that you have chosen (you can see more about choosing a cart template here).
Enhanced Template Funnel Builder
To add an upsell, you’ll want to click the dropdown in the top of the checkout editor where you’ll see all the steps for your funnel, and click the ‘add funnel item‘ button at the bottom.
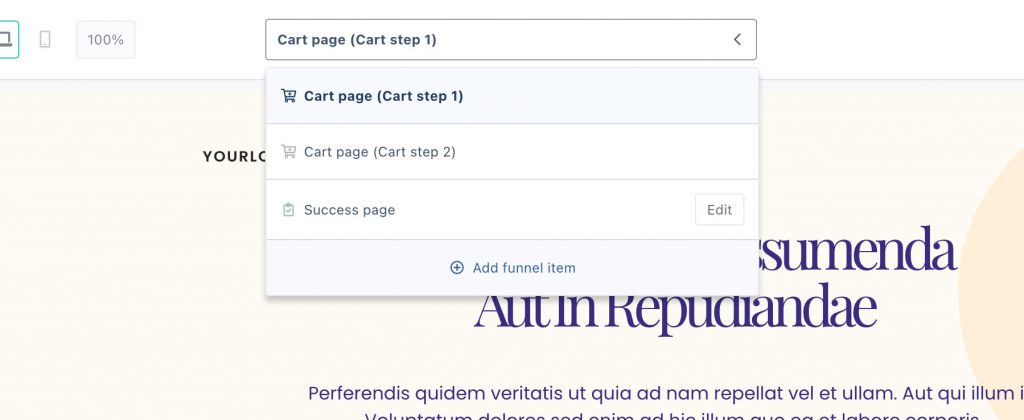
You’ll then be prompted to choose an upsell (and/or downsell if you have an upsell already added).
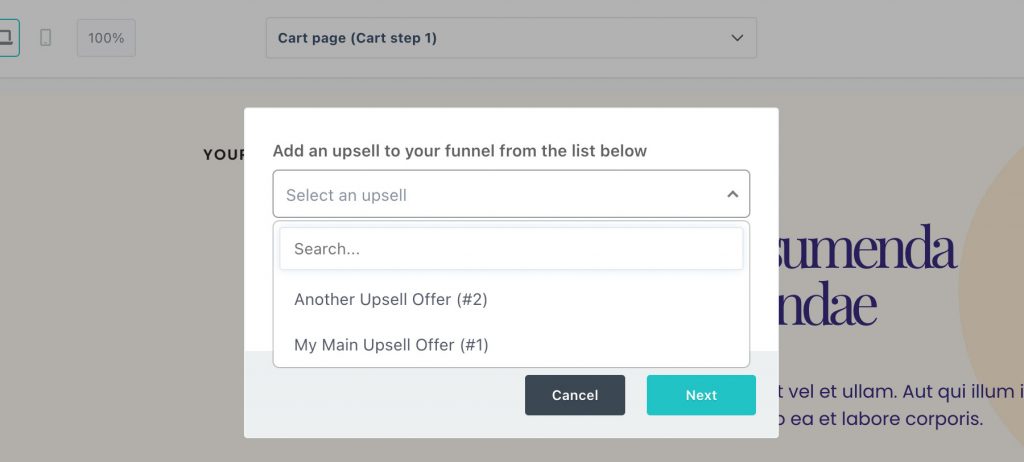
On the next step, you’ll choose if you want to use a hosted page within ThriveCart using our powerful block-based editor (recommended) or if you want to use a custom upsell page.
On the next tab, there will be options for your upsell fulfillment. Note that if you’ve selected ‘show total/invoice’ for your main product’s fulfillment, this step won’t show. If you’ve selected membership fulfillment, then you’ll see the option to select a membership platform, and if you’ve got URL fulfillment set (via the “Send them to a URL” method), then you’ll see the option to enter a URL (like below).

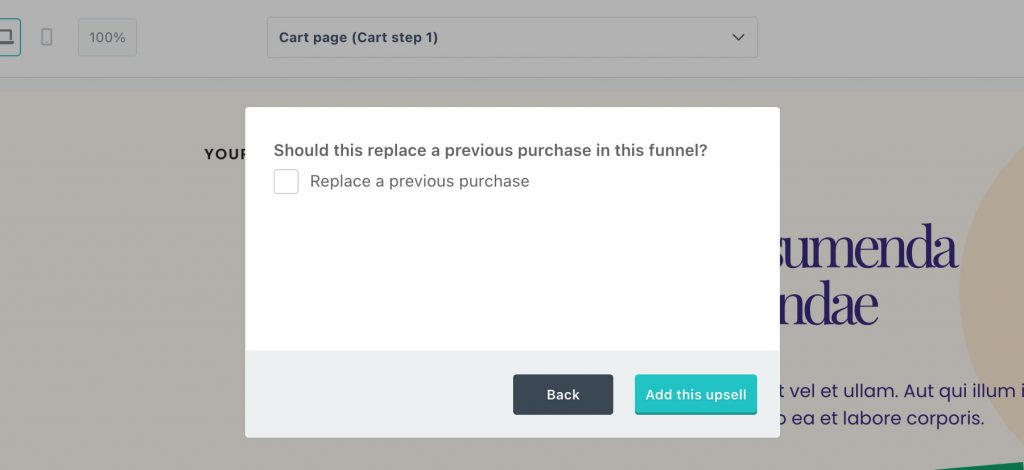
Next, you can select if you want the upsell to replace the main product (note: this does not replace the charge, but will replace the fulfillment of the main product).
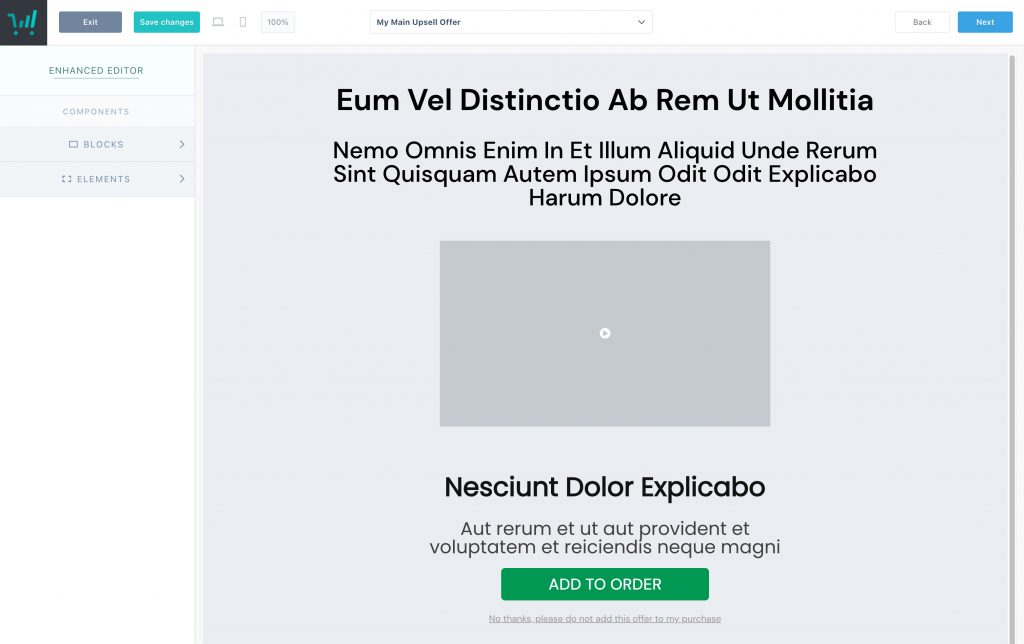
Finally, when clicking the ‘add this upsell’ button the platform will launch the editor with an upsell design based on the initial checkout template you chose for consistency in design.
You can then build out your upsell pages using the drag and drop page blocks and add further elements as needed.
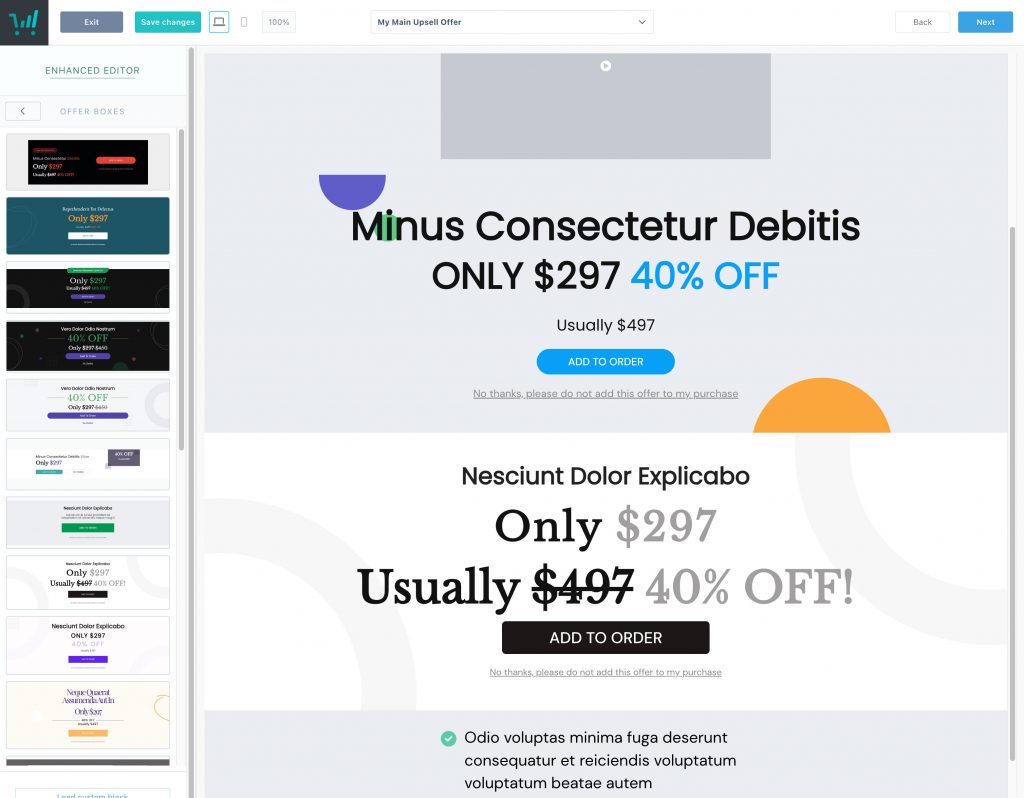
As part of our new blocks editor update, you can also add multiple accept/decline areas on your upsell pages for those longer sales page layouts. In the Blocks menu, these come under the Offer Blocks area and there are lots of pre-design options to choose from which can all be customized to match your brand.
Link a downsell
From the dropdown in the top of your editor, you’ll want to choose the “Add funnel item” option again, where you will have the option to choose between adding an upsell or a downsell.
Choose downsell, where you can then select the downsell you wish to connect.

You will then be given the option to select the upsell that your downsell relates to:

You’ll see this option regardless of whether you have one upsell or 5 linked in your funnel.
A downsell can be connected to a single upsell, and only a single downsell can be connected to an upsell.
When customers opt to not purchase the upsell that your downsell is linked to, they will then see this downsell offer.
You can then choose whether to design your downsell in ThriveCart, or set a custom downsell page.
Similar to upsell setup, the next screen will allow you to enter your downsells fulfillment – to either enter the product URL or add customers to a course, depending on the fulfillment method set on your main product.
Classic Template Funnel Builder
If you’ve chosen a Classic or Legacy template style for your checkout design, then you will not be editing your upsells/downsells within the same checkout builder.
To add upsells/downsells to your Classic checkout, you’ll want to click the “create funnel” button from the product overview page like so:

For products with active funnels, this button text would be adjusted to “Edit funnel”.
This will open the Classic funnel builder, where you can enable the funnel and set which upsells/downsells are connected to this product, and then customize each of those pages individually using the “edit upsell/downsell page” buttons

Notifications on Funnel Fulfillment
If a customer doesn’t complete the funnel and quits on an upsell page, or if they simply sit on the upsell page and don’t make a decision, orders will complete and then final invoice emails with fulfillment details sent out under the following behaviors:
- The customer reaches the end of your funnel (success page)
- If the customer quits your funnel on an upsell page, then ~15-minutes later the order completes and charges for anything they’ve agreed to buy will be processed (we have this small delay in case the customer accidentally closed the browser/went to another site and can come back to the upsell/checkout without the risk of paying twice)
- If the customer sits on an upsell page without making a decision, they have 60-minutes before the system will push them through to the success page and complete their order.
This 60-minute delay resets on each upsell page, so for example a customer could agree to buy your product, land on upsell 1 and spend 45 minutes going through your offer before making a decision, then on upsell 2 spend another 30 minutes making a decision.
Frequently Asked Questions
- Q: How do I use my own website pages for my upsells
- A: We have a helpdesk article here on how to set up your funnel to use your own custom upsell pages on your website
- Q: Where do I set the URLs for my upsell pages?
- A: We’ve seen some confusion where users set their main products success/fulfillment URL to that of an upsell page. This isn’t required as the platform will automatically take the customer to the next step in your funnel.
Your fulfillment URLs are for the fulfillment information, not an upsell page. If you’re using built-in upsell pages within ThriveCart, you do not need to set any upsell page URLs anywhere.
If you’re using a custom upsell page, then you will set that URL as part of publishing your funnel. See the helpdesk article on using custom upsell pages here.
- A: We’ve seen some confusion where users set their main products success/fulfillment URL to that of an upsell page. This isn’t required as the platform will automatically take the customer to the next step in your funnel.
- Q: How do I set the fulfillment of my upsells/downsells?
- A: The fulfillment of your upsells will match the fulfillment method of your main product and you’ll be setting the fulfillment of your upsells, such as individual fulfillment URLs or membership level support, in the main funnel settings (where you choose what upsells you’re adding to the product).
If you’re fulfilling a physical product as part of an upsell, then these fulfillment settings are handled as part of the shipping options in your upsell products settings.
- A: The fulfillment of your upsells will match the fulfillment method of your main product and you’ll be setting the fulfillment of your upsells, such as individual fulfillment URLs or membership level support, in the main funnel settings (where you choose what upsells you’re adding to the product).
- Q: Can upsells replace other products & charges in the funnel?
- A: Yes, you can!
With ThriveCart Pro+ and using Stripe Connect+ we offer the Subscriptions upgrades and downgrades feature which is covered in full here.
ThriveCart gives you the ability to have an upsell replace an earlier product and optionally, the charge as well. This gives you the power to easily have an upsell completely replace something like the front-end product and charge/subscription for complete funnel optimization with ThriveCart.
For example, you could have a monthly subscription sold on the front-end, but then have an upsell for a discounted yearly offer.
Where other platforms would charge the customer both the monthly and annual charges and require you to cancel the monthly subscription, ThriveCart will automatically handle that for you. The monthly charge wouldn’t be processed and no monthly subscription would be created – just the yearly charge would be processed and the yearly subscription created.
- A: Yes, you can!
- Q: Can I create conditional upsells/funnels?
- A: At this time, upsells are shown sequentially in your funnel. If you have 3 upsells added to your funnel, the customer will be taken through each of them before getting to your success page.
- Q: What happens if a customer doesn’t complete the funnel
- A: If a customer doesn’t complete the funnel and quits on an upsell page, or if they simply sit on the upsell page and don’t make a decision, orders will complete and then final invoice emails sent out based on a delay system detailed here.
- However, Pro+ accounts with Connect+ enabled on their product will ensure customers receive fulfillment emails at each stage of the funnel.