By automatically adding new buyers to your autoresponder, you can nurture them with tailored follow-ups, exclusive offers, and valuable content that keeps your brand top of mind.
With ThriveCart’s autoresponder integrations, you can set rules based on behaviour that will instantly connect your checkout to your preferred email platform — enabling behavior-based marketing automation and ensuring every customer enters the right list or sequence at the perfect moment for maximum engagement and retention. ThriveCart makes it simple to connect your email platform to checkout and trigger personalized workflows that convert more customers and build lasting loyalty.
Add customers to your email list
When your customer goes through your checkout, you’re very likely going to want to add these customers to an email list to follow-up with them either immediately or add them to lists to email them at a later date.
You can also set up different actions based on customer behavior such as abandoning the cart, having a refund, or making subscription payments.
With ThriveCart, creating these automated actions is simple. Everything can be set up directly in your product settings under the Automation tab.
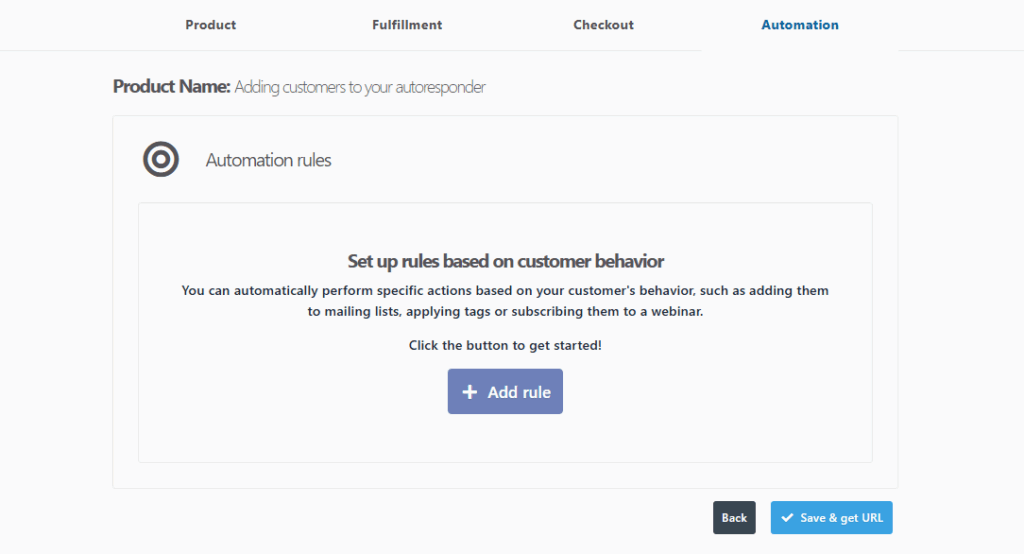
On this screen is where we will create a trigger and action for behavior-based marketing automation.
Set when the rule triggers:
To get started you’re going to click the Add rule button.
This will then add a new rule which you can go through and customize.
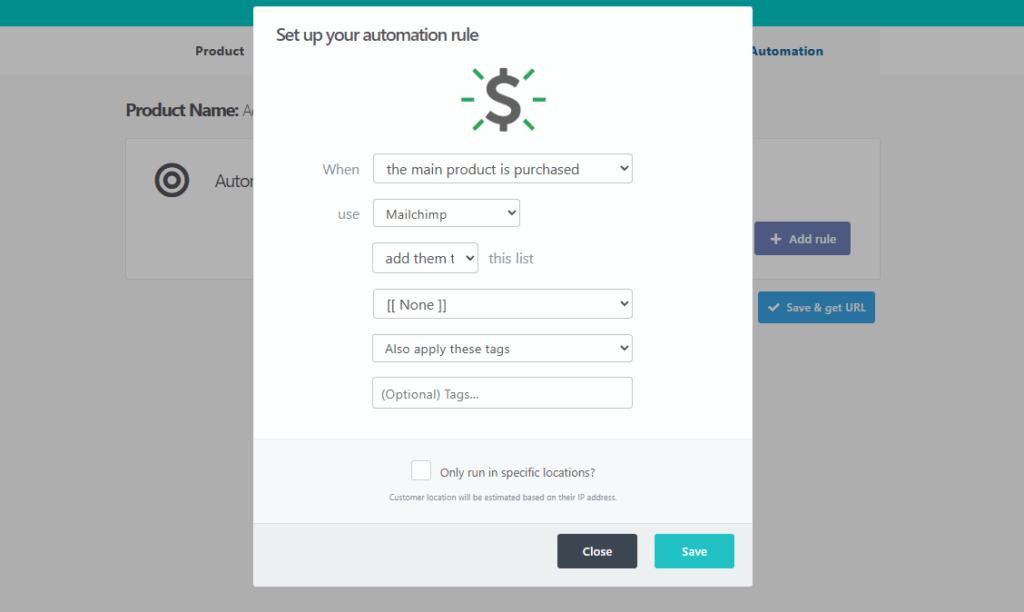
The first option is choosing when the rule triggers. This is when your customer does X and allows you to connect your email platform to checkout actions. These options are dynamic and change based on your product’s settings. They will include things like:
- Purchases the main product
- Refunds the main product
- Abandons the cart
- Payment is declined
- Purchases the bump
- Refunds the bump
- Makes recurring payments
- Refunds a recurring payment
- Recurring payment fails
- Subscription cancelled
- **New!** Subscription paused
- **New!** Subscription resumed
Wanting rules to trigger only if a customer opts in to marketing on your checkout? This checkbox can be enabled in your checkout editor, but you can see more on that in this guide: GDPR Marketing Consent Checkbox.
If your product has multiple payment options, you can then choose to have different rules set specifically for the different payment options. Giving you a tonne of control and flexibility!
Set the service & action:
Next, you can choose the service you want the rule to trigger. If you have multiple autoresponder systems connected, Google Sheets, or Slack integrated, you’d select this from the first drop down.
We also have a Custom HTML option for users wanting to use an autoresponder that we don’t currently have a direct integration with (this is a form field to an autoresponder only, other custom HTML is not supported).
This is where you can add customers to an email list. Depending on what the integrated autoresponder supports, you can look at adding/removing users to tags, lists, automation, sequences, etc. These options will dynamically populate based on what your autoresponder supports.
You can go ahead and create multiple rules, and even have multiple rules for the same trigger.
Frequently Asked Questions (FAQs)
- Q: What are the supported ThriveCart autoresponder integrations?
- A: We have direct integrations with a number of autoresponders, you can see the full list and how to get connected in our help article: Connecting an autoresponder
- A: We have direct integrations with a number of autoresponders, you can see the full list and how to get connected in our help article: Connecting an autoresponder
- Q: I’m not seeing any autoresponders when I go to add a rule, why not?
- A: You’ll want to first make sure to connect your autoresponder of choice following the Connecting an autoresponder guide.
- A: You’ll want to first make sure to connect your autoresponder of choice following the Connecting an autoresponder guide.
- Q: I’m trying to save my rule, but it won’t save or it shows [[none]]?
- A: If all of the required fields are not added, then your rule may only partially save with the [[none]] field. You’ll want to make sure you’re setting everything available within your autoresponder in order for the rule to save.
- A: If all of the required fields are not added, then your rule may only partially save with the [[none]] field. You’ll want to make sure you’re setting everything available within your autoresponder in order for the rule to save.
- Q: How can I force double-opt in?
- A: Double opt-in is not something that can be set on the ThriveCart side, but is a setting that some autoresponders and email marketing tools provide. You’ll want to make sure to enable the opt-in checkbox in your checkout editor and confirm settings within your email tool to push their double opt-in emails.
- A: Double opt-in is not something that can be set on the ThriveCart side, but is a setting that some autoresponders and email marketing tools provide. You’ll want to make sure to enable the opt-in checkbox in your checkout editor and confirm settings within your email tool to push their double opt-in emails.
- Q: I’ve connected my autoresponder and run through tests, but I’m not seeing the customer added, what do I do?
- A: Check the setup article for your specific autoresponder for troubleshooting, but you’ll want to make sure that the automation rule is saved as expected in your ThriveCart dashboard, and make sure there are no rules blocking this in your autoresponder’s setup. The rules set in Automation rules are what connect the email platform to checkout.
If, after checking all settings it’s still not clear, you can reach out to support by sharing example customer emails/invoice ID’s that were not added and support can review those transactions and your product setup with you.
- A: Check the setup article for your specific autoresponder for troubleshooting, but you’ll want to make sure that the automation rule is saved as expected in your ThriveCart dashboard, and make sure there are no rules blocking this in your autoresponder’s setup. The rules set in Automation rules are what connect the email platform to checkout.