Stripe Connect+ is your gateway to ThriveCart Pro+ power. From faster payments to advanced automations, this upgraded integration unlocks the tools that help you sell smarter and scale faster, all while ensuring global payment compliance. Connecting takes just a few minutes, but the impact lasts for every sale.
To unlock the full power of ThriveCart Pro+ features, including advanced automation, multiple order bumps, recurring revenue upgrades, and enhanced analytics, you’ll need ThriveCart Stripe Connect+ set up as your payment processor. Upgrade to Stripe Connect+ for faster processing, increased payment reliability, and access to the newest ThriveCart features—all while maintaining full compliance with international payment standards (US, UK, EU, Canada, Australia, and beyond).
Why Upgrade to Stripe Connect+
ThriveCart’s Stripe Connect+ integration is designed for modern online businesses. It offers:
- Seamless access to Pro+ features like multiple order bumps, advanced subscriptions, and A/B testing.
- Optimized performance with faster payment reconciliation and payout tracking.
- Expanded global compliance, including KYC updates and regional verification.
- Improved customer checkout experience with support for Apple Pay, Google Pay, and other local payment methods.
Upgrading to Thrivecart Pro+ opens you to new sales and reporting tools to scale up your business faster, but Stripe Connect+ is our default Stripe connection moving forward for all account levels, as a payment processor for the fastest, most globally expansive, and secure payment solution.
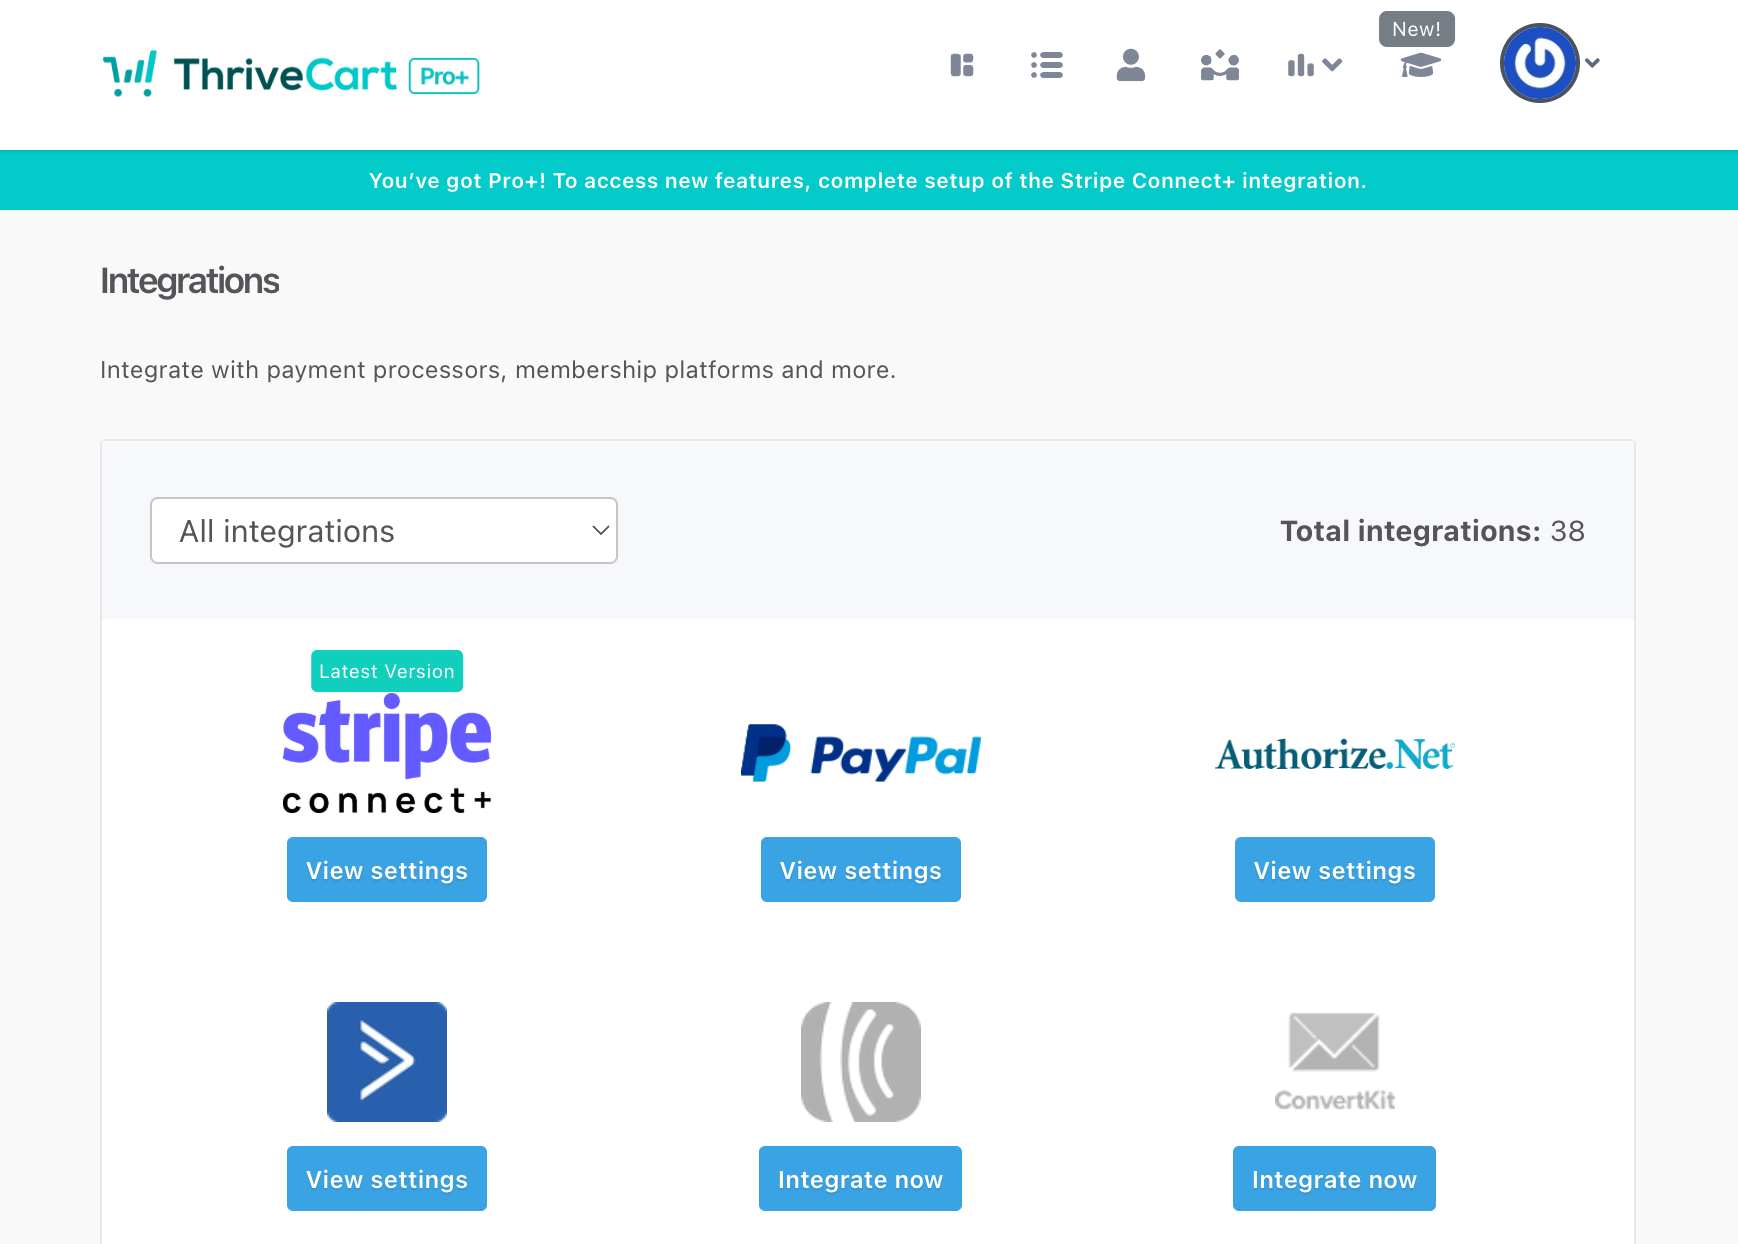
How to Set Up Stripe Connect+
- Click your profile icon in the top-right corner
- In the dropdown menu, click Integrations > Stripe Connect+ > View settings
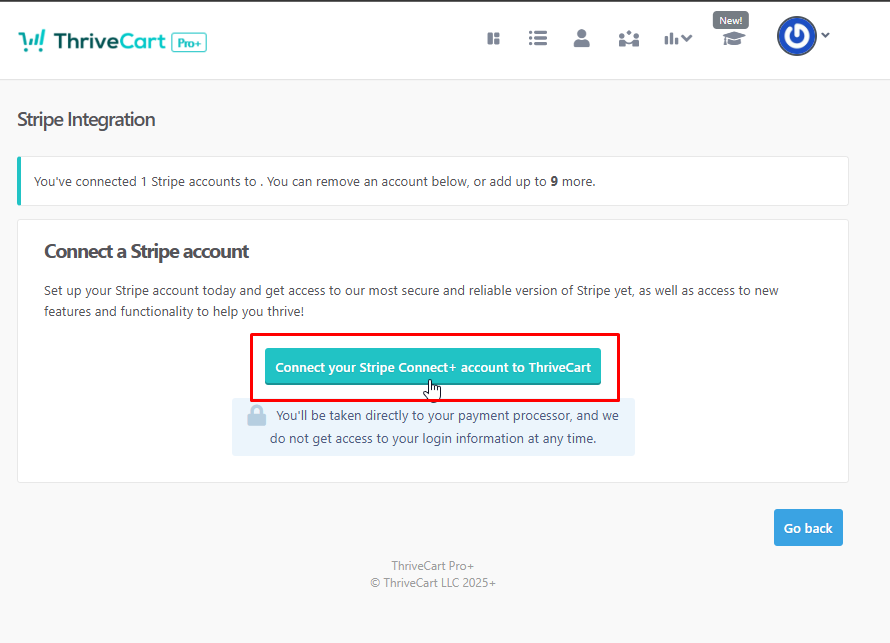
- Click “Connect your Stripe Connect+ account to ThriveCart” and wait for the Stripe interface to load
- Verify Your Stripe Account
- Use the email address associated with your existing Stripe account
- Click “Submit,” enter your password, and input the verification code sent by Stripe
- Verify your identity as prompted
- What happens if Stripe doesn’t recognize my old account when creating a Stripe Connect+ account?
- Check if your email is tied to your existing Stripe account
- In limited cases, Stripe will require you to verify and enter your company information again
- In other cases you will be asked to provide updated information for Stripe KYC verification
- Select Your Business
- Choose your existing business account (no need to create a new one)
- Skip Unrelated Features
- Stripe may present additional features unrelated to the integration. Skip these by selecting “No thanks” or “Not right now”
- Complete and Confirm
- Review the information entered, click “Agree and Submit”
- Your Stripe account is now connected to the new version
- Enable Stripe Connect+ on Individual Products
- After setting up the latest version of Stripe, enable it for individual products:
- Go to Products
- For each product, click Edit, then navigate to Processors
- Deactivate Stripe Enhanced and activate Stripe Connect+
- Click Save
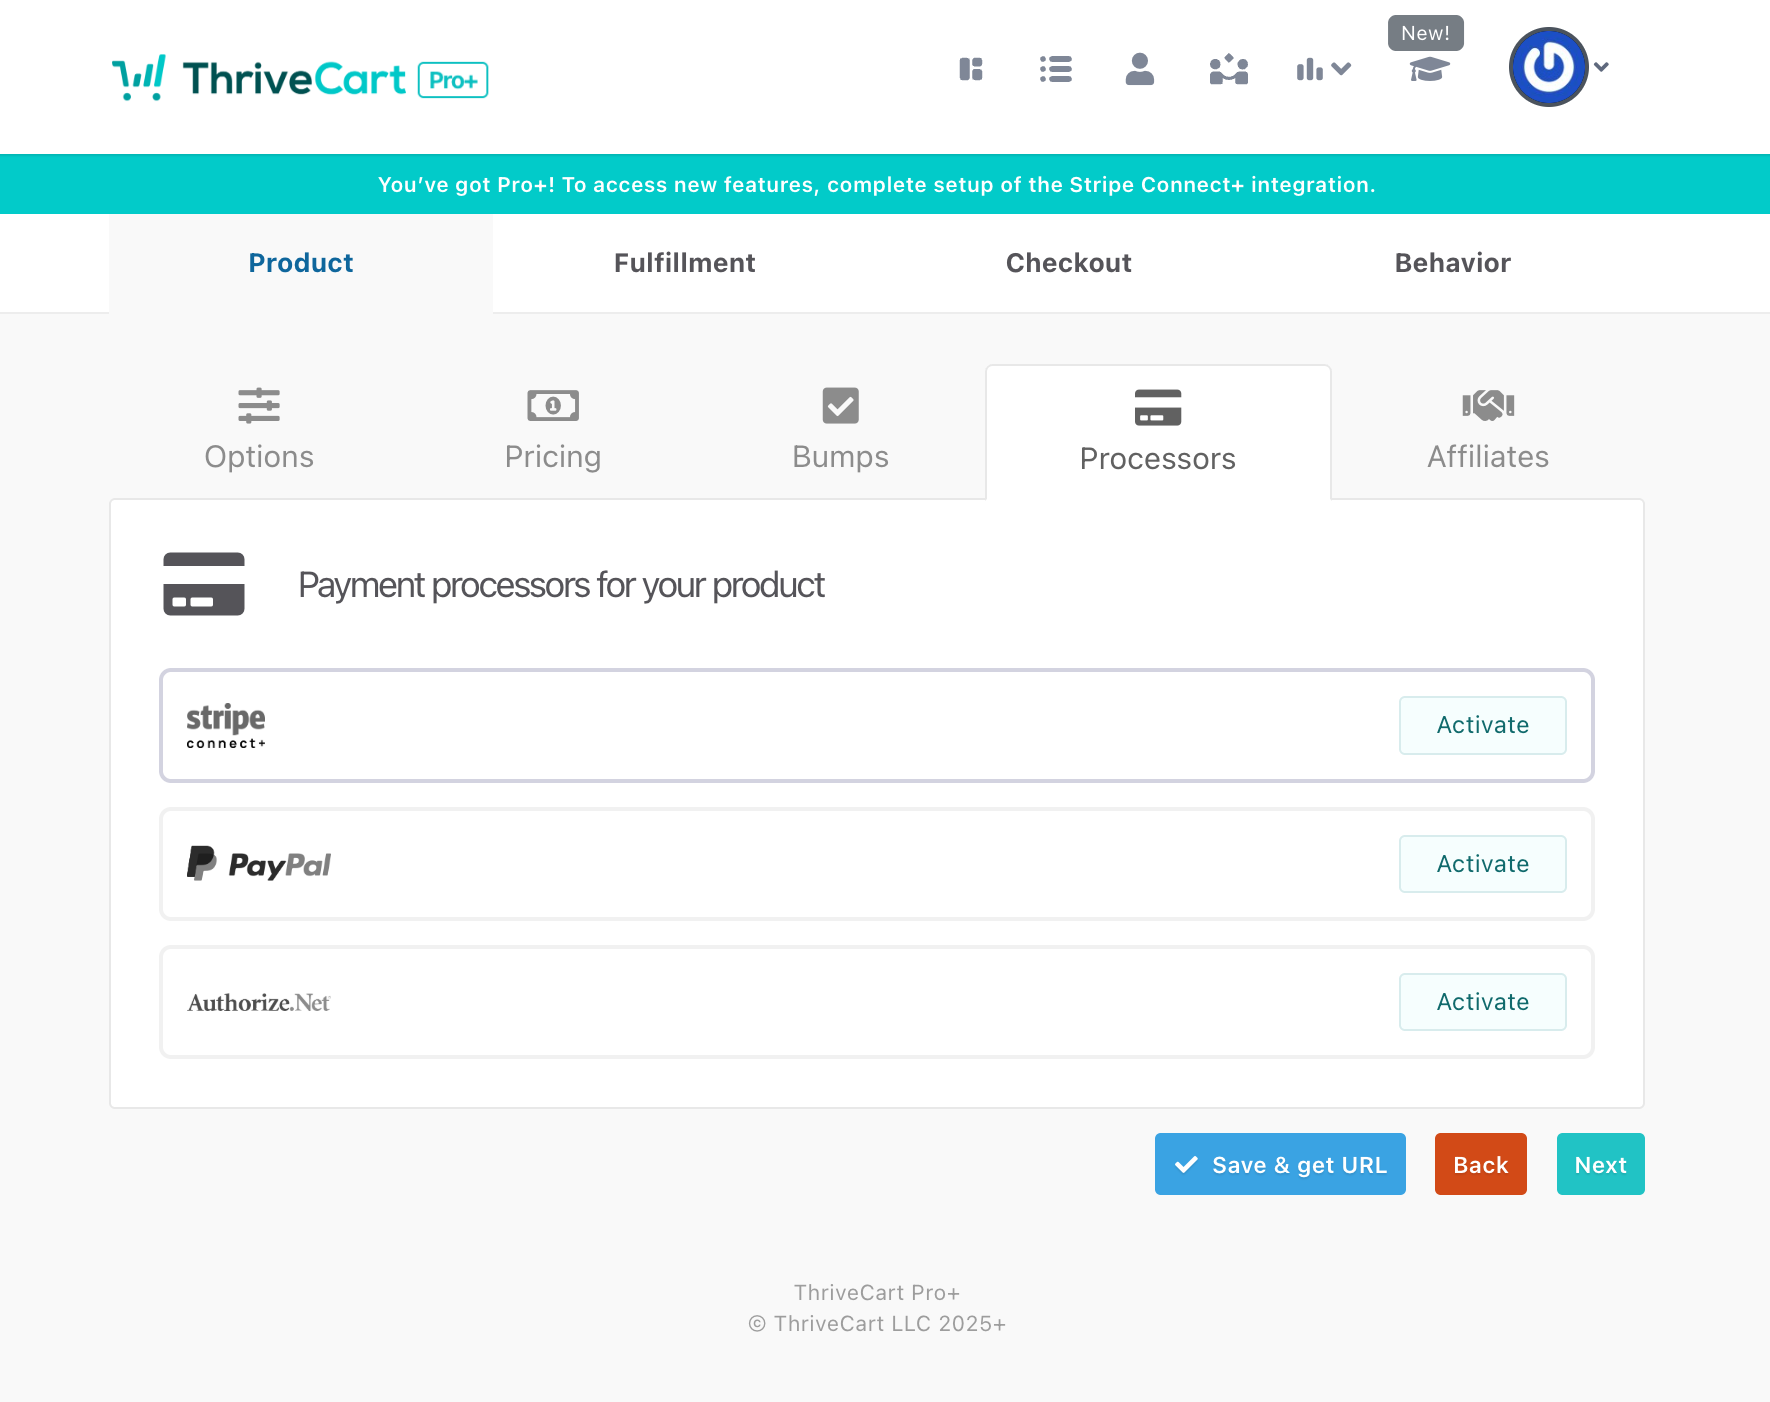
- At this point, all new transactions for these products will be processed via Stripe Connect+. Any ThriveCart Pro+ specific features (e.g., multiple order bumps) will be available for those products. Note that some ThriveCart Pro+ features are global, while others are product-specific and will only apply to products where Stripe Connect+ has been enabled.
- After setting up the latest version of Stripe, enable it for individual products:
When you’re ready to unlock the Pro+ features on all of your products, you can enable Connect+ on all products at the push of a button.
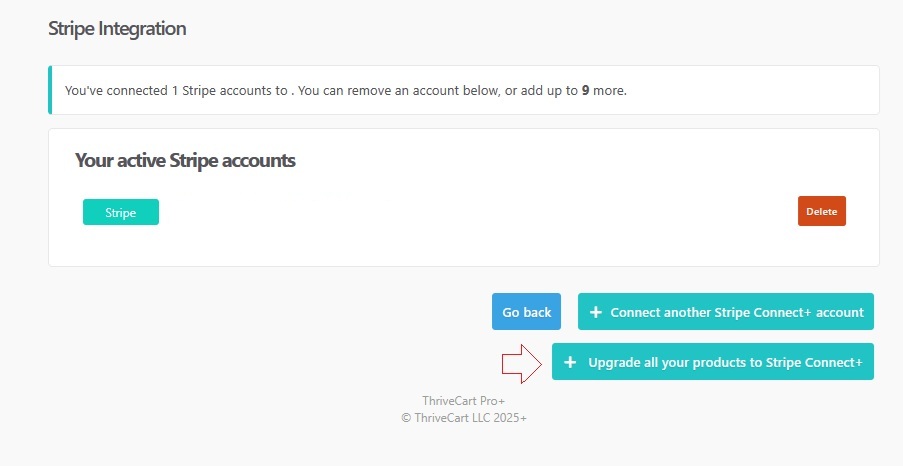
Enable Pro+ features on All Products
- Navigate to Settings > View Integrations, and then click on View Settings for the Stripe Connect+ integrations. There you’ll see a teal button labeled Upgrade all your products to Stripe Connect+
- Select this button and follow the prompts to enable Stripe Connect+ across all your products, unlocking Pro+ functionality
Troubleshooting
| Problem | Solution |
|---|---|
| Why is it creating a new account? | Our easy connect process speeds up the connection process by allowing you to port over your business details, but your original Stripe account cannot be used for Connect+ because Connect+ is built on newer technology, and so a sub-account is created. If your existing account is not showing up during the connection process, then you will need to enter your business details in order to continue through this process to create your new sub-account. |
| I was able to set up my account and link Stripe Connect+ on my products, but my checkouts aren’t showing any payment information | Most customers won’t need to re-enter any details during this process, but some customers may be required to provide more information by Stripe (this is known as a KYC or Know Your Client verification process). Since the sub-account creation is a Stripe requirement, they may require some additional personal or business verification from you. You’ll want to regularly review your Stripe account to see if they require documentation to ensure that charges can be processed as expected through your new Connect+ account. |
How Stripe Connect+ Payouts work
As a reminder, ThriveCart does not hold any of your funds at any time, and payouts would be deposited from Stripe to the bank account linked within your Stripe account.
We have been working closely with Stripe to ensure a smooth transition to Stripe Connect+. As part of these improvements, all new account hold periods (previously up to 7 days) have been removed for those transitioning to Stripe Connect+.
New accounts will follow the same payout schedule as existing Legacy or Enhanced Stripe accounts.
Buy Now Pay Later & Additional Payment Methods
Stripe offers a range of different payment methods which you can enable or disable under your Stripe account settings > payment methods area (most are enabled by default). The payment methods shown on your checkout page is largely based on things like the currency you’re selling in matching the currency of your Stripe account and what currency the customer is paying in.
For example, if your Stripe account is registered in the US, you’re selling in USD, but your customer is located in Australia – BNPL wouldn’t be available as the Australian’s local currency is AUD. However, if your customer was located in the US, then BNPL would be an option on your checkout page.
Core Payment Methods
- Credit/Debit Cards (Visa, Mastercard, American Express, Discover, etc.)
- Apple Pay
- Google Pay
- Link (Stripe’s payment method)
Regional/Local Payment Methods
- CashApp (US)
- SEPA (Europe)
- iDEAL (Netherlands)
- Bancontact (Belgium)
- EPS (Austria)
- Przelewy24 (Poland)
- BLIK (Poland)
- Alipay (China)
- WeChat Pay (China)
- OXXO (Mexico)
- Pix (Brazil)
- GrabPay (Singapore & Malaysia)
- FPX (Malaysia)
- PayNow (Singapore)
- PromptPay (Thailand)
Buy Now, Pay Later (BNPL) – More details here
- Klarna
- Afterpay/Clearpay
- Affirm
Note: BNPL options are not available for subscriptions – only one-time purchases
If you’re unsure if specific payment options should be available on your checkout page, you can confirm with Stripe Support directly – letting them know the currency your product is in, your Stripe account location, and the location of the customer trying to purchase.
Frequently Asked Questions (FAQs)
- Q: Why do I have transactions with a pending status?
- A: Non-instant payments are supported in both our older Stripe Enhanced as well as this newer Connect+ integrations. For example, some regions offer bank transfer and direct debit payments. Due to this, there are some tweaks to how things are reported in your dashboard.
Pending transactions – there is now a pending transaction state for orders using these payment methods. The payments will not reflect in your NET or Gross revenue when in a pending state. Commissions will not be queued up for affiliates. Once the payment clears, stats will update to reflect the payment and commissions will be queued up. Product fulfilment is provided when the order initially completes.
- A: Non-instant payments are supported in both our older Stripe Enhanced as well as this newer Connect+ integrations. For example, some regions offer bank transfer and direct debit payments. Due to this, there are some tweaks to how things are reported in your dashboard.
- Q: Can I disable payment methods on a product-level?
- A: Currently you can only set the available payment methods (i.e. BNPL) on an overall Stripe account-level. To offer different payment methods across your products, you would need to create an additional Stripe Connect+ sub-account, where you can set different payment method options, and you can then choose which account to enable on a product.
- Q: How can I customize how Stripe is displayed on my checkout?
- A: When there are multiple payment methods available on your checkout page for Stripe, you can choose between two visual layout options, the default is their ‘accordion’ layout, where the card payment method is the default option. Alternatively, you can change this to a ‘tab’ layout where the different options show as an icon button above the card field. Simply click on the payment field element within the checkout editor and change the options in the left-hand menu.
You can choose the language for these Stripe fields by setting the “Stripe Element Language” in your editor directly.
BNPL previews can also be enabled within the checkout editor when using both Enhanced or Classic templates.