ThriveCart’s checkout configuration puts revenue optimization directly in the hands of sellers—customize field layouts, add one-click order bumps, design ready-to-convert funnel pages, and apply targeted coupons to increase average order value without rebuilding your funnel. Whether you’re processing your first sale or managing high-volume operations, checkout configuration, bump offers, and flexible coupon rules work together to maximize every transaction while maintaining a frictionless customer experience.
Quick Setup: Add a Bump, Enable Coupons, Configure Checkout, and set a Success Page in just a few quick steps
- Create your product, setting the pricing and fulfillment details.
- Enable the bump offer and configure details.
- Create a coupon and make sure it’s applied to your product/bump as desired.
- Within the checkout editor, drag & drop a Checkout element onto the canvas, open the Properties Panel to adjust the required customer information fields.
- In the Checkout’s Properties Panel, scroll to Bump. The bump offers set on your product are automatically added to the checkout element, and details of the offer are pulled from your bump settings. Configure the bump design and write a compelling headline and description for your bump offer.
- Add any additional visual elements to your page such as a headline, images, and some text describing your offer.
- Make sure to add a Success Page with an Order Details element.
Your checkout is now configured with an optimized layout, a revenue-boosting bump offer, coupon support, and a success page delivering your offer.
Page Types
The default pages in your funnel include:
- A checkout page
- A success page
Additional pages that you can add include:
- Upsell page (Add up to 5 upsell pages)
- Downsell page (downsells will be linked to a single upsell. Only one downsell can be added to an upsell).
Configuring the Checkout Element
The Checkout element connects your page to your ThriveCart product. Once placed on the canvas, it pulls product information—pricing, currency, and payment options—directly from your product. Your product setup is the source of truth for price and fulfillment; the editor just reflects what’s configured there. See more on setting up your first product here.
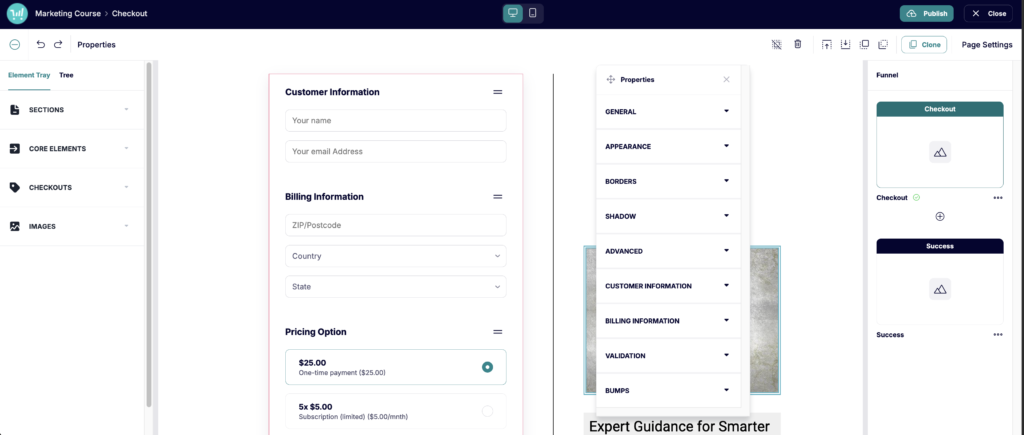
Checkout Components
The checkout form element is built from individual components—each representing a distinct section of the form. You can reorder them by dragging them around within the checkout element itself.
Standard components include:
- Customer information (name, email, phone)
- Billing address (required for tax calculations)
- Shipping address (appears automatically for physical products)
- Pricing options (displays if multiple pricing tiers are configured in Product Setup)
- Payment fields (credit card, PayPal, ThrivePay—determined by your connected processor)
- Order summary (itemized total with tax, shipping, and discounts)
- Coupon field (if a coupon has already been created and assigned to the product)
- Bump Offers (if bump offers were enabled within the product)
- Buy button (submit button—customizable label and styling)
Reordering components is as simple as dragging them up or down in the list. Most sellers keep the buy button and payment fields near the bottom, with any bump offers positioned just above payment for maximum visibility at the decision moment.
Payment Processors
The payment methods available in checkout are determined by which processors you have connected in your ThriveCart account settings. These are not configured in the editor. Stripe, PayPal, Auth.net, and ThrivePay Installments are supported. If multiple processors are enabled, customers will see a payment method selector on the front-end.
Bump Offers
What is a Bump Offer?
A bump offer (order bump) is an additional product customers can add to their order with a single checkbox click—directly on the checkout page, before payment is submitted. Because the customer is already in purchase mode with their payment information in hand, bumps convert at significantly higher rates than standalone offers. Typical bump conversion rates range from 20–40%, making them one of the highest-leverage revenue tools available.
Bump offers differ from upsells in one key way: bumps happen before payment on the main checkout page, while upsells happen after payment on an additional page. Use both for maximum order value—bump on checkout, then upsell after purchase.
Adjust Your Bump Offer Settings
Before adjusting a bump in the editor, create the bump within your product’s main settings and configure its fulfillment. See more on creating a single bump here, and more information on configuring multiple bumps here if you’re on Pro+.
Once that’s done:
- Select your Checkout element on the canvas
- The Properties Panel should automatically open (or you can click “Properties” in the top left)
- Scroll to Bump Offers to access bump-specific properties – such as whether to show/hide the bump entirely, upload an image, show a banner over the image, and whether to disable headlines and/or bullets
- Write a bump headline and bump description directly within the canvas
- Choose the default pre-ticked state: yes (opted-in by default) or no (customer must opt in)
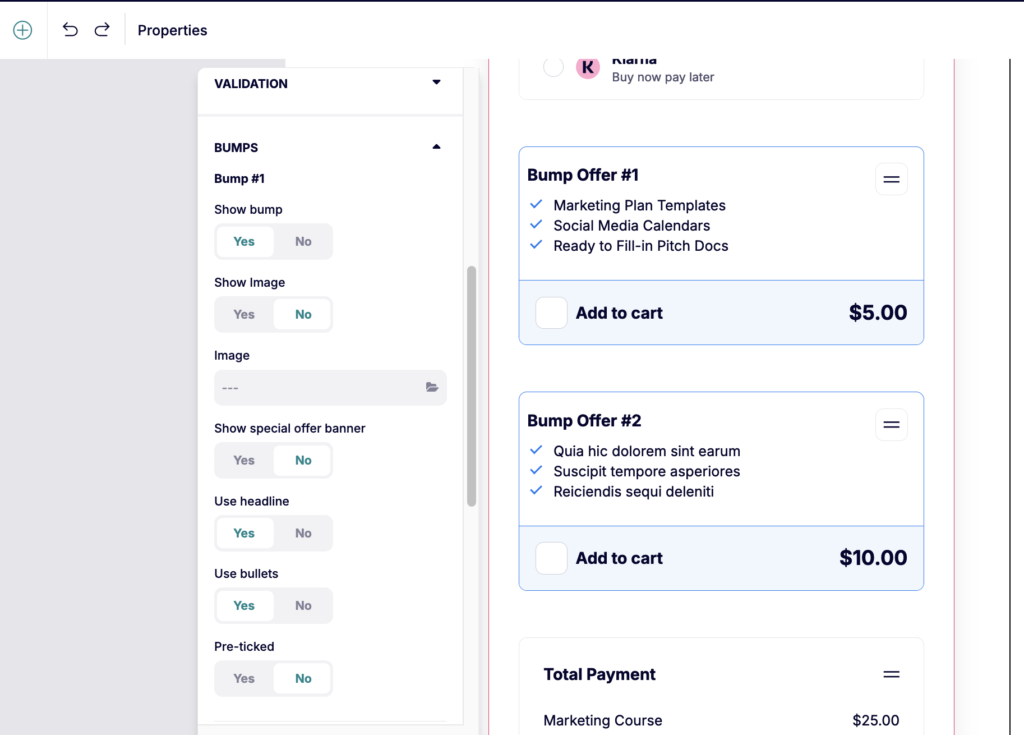
The bump offer appears inside your checkout element automatically, but you’re welcome to move the bump around within that checkout element. You can add up to 5 bump offers per checkout.
Configuring Bump Copy
The headline and description are where bump offers succeed or fail. The headline should lead with the benefit and include the price. Effective formulas:
- “Yes! Add [Product Name] for just $X”
- “Add [Benefit] — Today Only: $X”
- “Special One-Time Offer: [Benefit] ($X)”
The description should answer three questions quickly: What do they get? Why do they need it alongside what they’re buying? How much are they saving? Keep it to 3–5 sentences or bullet points. Quantify specifics where possible (“10 done-for-you templates,” “6 bonus modules”) and reference the main product to reinforce the “complete solution” angle. End with a reminder of the guarantee—”Covered by the same 30-day guarantee as your main purchase.”
Coupons
Coupons are created and managed in Product Setup → Coupons, not in the editor. Editor 2.0 pages reflect coupon functionality by displaying a coupon entry field, accepting both manual entry and auto-apply via coupon URLs, and updating pricing in real time when a valid coupon is applied. While coupon display settings can be adjusted within the editor, all coupon validation and discount calculation is handled server-side.
For more information on creating coupons, see our guides: Creating a coupon and Automatically applying a coupon to a checkout
How the Checkout Appears to Customers
From the customer’s perspective, the checkout page shows a clean form matching the layout you configured. If a bump offer is present, it appears as a styled box with a checkbox inside the form—customers check it to add the product to their order, and the order summary total updates instantly. If the bump is unchecked by default, customers can ignore it entirely without friction.
When a coupon is applied (either manually or via auto-apply URL), the order summary updates in real time: the original price is displayed with a strikethrough, the discount amount is shown, and the new total is clearly visible before the customer submits payment. This transparency reduces hesitation and builds trust.
On mobile, bump offers stack vertically within the checkout form and the checkbox is sized appropriately for touch interaction. Multi-step checkout on mobile shows one step at a time, reducing cognitive load on smaller screens.
Success Page
Your success page is a default page in your funnel and cannot be deleted. You can add details to this page, such as text, images, etc. to act as a thank you page or order confirmation.
At minimum, we recommend adding order details and product fulfillment information via the Order Details element.
The Funnel Viewer
To view, add, and adjust pages within your funnel, you’ll want to navigate to the right-hand side Funnel panel.
This gives you a quick-access outline to all of the pages in your funnel, and is where you will be able to navigate between pages, add your upsells/downsells, drag-and-drop to rearrange, and delete pages.
Funnel Pages
Before attempting to add an upsell to your checkout, you will first need to create that upsell within your ThriveCart dashboard by heading to Products > Upsells. Similarly, downsells can be created under Products > Downsells.
You can see our full article on creating your upsells/downsells in our full funnel-building guide here, but essentially you will want to create an upsell and set it’s pricing option.
Once your offers are created, within the editor click into the “Funnel” view in the top-right properties panel.
Click the ‘+’ button underneath your Checkout page, set your upsell name, and select the product you just created from the dropdown.
You can then design your upsell page using any of the available elements, but don’t forget to add the Purchase element to this page so that customers can opt in/out of purchasing your upsell!
Frequently Asked Questions
- Q: Why is there an error showing instead of a success page?
- A: Make sure to add at least the Order Details element to your success page, as well as a custom thank you message to prevent this.
- Q: Can I add more than one bump offer to a single checkout page?
- A: Yes, up to 5 bump offers can be added to a single checkout element if you’re on the Pro+ plan and have Stripe Connect+ enabled on your product. Add them in order of priority—the most important bump should appear first (typically closest to the payment button). Avoid adding too many; more than two bumps can create decision fatigue and reduce overall conversion.
- Q: Does a coupon applied at checkout also discount upsells after purchase?
- A: Yes, but only if the coupon’s Applies to setting is configured as Entire funnel in that coupon’s Setup. By default, newly created coupons apply to full funnel, but this can be adjusted on percentage-based coupons to only apply to the main product, main product +bump, or bumps only. Fixed price coupons will only apply to the main product purchase.
- Q: What happens if a customer tries to use an invalid coupon code?
- A: The checkout displays an error message and the order total remains unchanged. The customer can try a different code or proceed without a discount. Invalid coupon attempts do not block the checkout or prevent the order from being placed without a coupon.