Thrive Academy doesn’t just add a community tab to your course platform. It flips the model entirely: your Community is the product, and everything else lives inside it. Courses, discussions, peer support, resource libraries, student wins, and leaderboards all exist in one branded destination your students can get excited to return to.
This guide covers everything a creator needs to build and manage that destination — from launching your Community in under three minutes to configuring Spaces, managing member roles, publishing announcements, and keeping your community healthy with the built-in moderation tools.
Quick Setup
Step 1 — Launch the Community Creation Wizard
From your ThriveAcademy Dashboard, click Create New. You can also access this from the ThriveCart Main Dashboard via the Communities menu, or directly from an existing course via Add Community in course settings.
The wizard takes under 3 minutes and walks you through five screens: Step 1: Community Type + branding upload; Step 2: Name and URL; Step 3: Access Model; Step 4: Branding colors; Step 5: Review, before your Community is created.
Step 2 — Complete the Setup Checklist
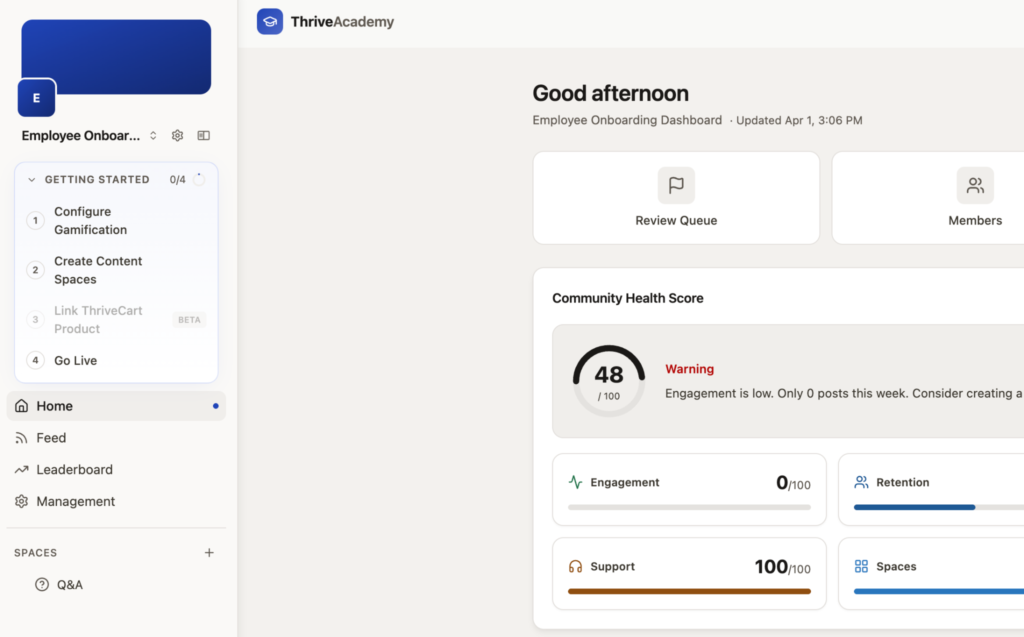
Once your Community is created you’ll land directly inside it, with a Setup Checklist visible in the sidebar. It contains four additional tasks:
- Configure Gamification — choose how you reward student engagement
- Set Up Content Spaces — determine what your students will see: Q&A, announcements, course discussions, a resource hub, or a casual lounge
- Link a ThriveCart Product — required for paid communities
- Go Live — publish your Community when you’re ready
Tasks can be completed in any order. None of them block you from accessing or editing your Community.
Step 3 — Preview and Go Live
Use the Preview Community option in the checklist to view your Community exactly as a student would see it. When you’re ready, click Go Live. Your Community enforces your chosen access model from that point forward.
Configuring Your Community
When creating a community, the creation wizard will launch walking you through setting up your core settings upfront across four screens:
Wizard Step #1: Set the Community Type and Access Model
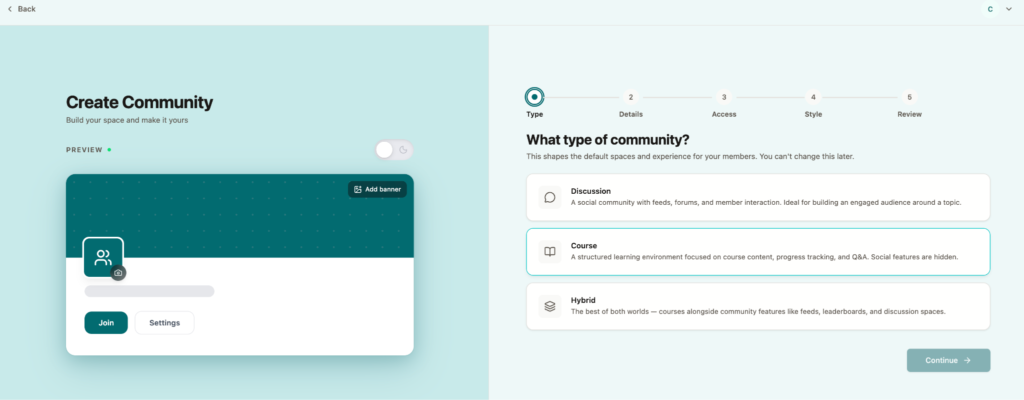
On the left-hand side of the wizard, you can set your banner image and a logo for the community:
- Upload a Logo (JPG/PNG/SVG, max 2MB) The community initials are used by default if no logo is uploaded
Then you can choose your community structure:
| Community Type | Best For |
| Discussion: Community Only | Masterminds, memberships, and support networks with no course requirement |
| Course: Course Only | Traditional course delivery with minimal community features |
| Hybrid: Course + Community (recommended) | Courses embedded inside community; students access courses from the sidebar |
Wizard Step #2: Set Your Name and URL
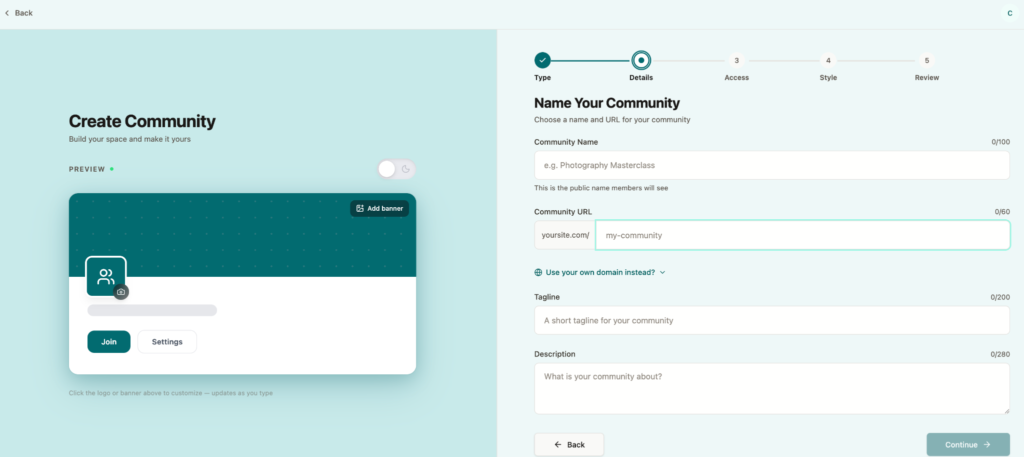
- Enter your Community Name. This is required and can be 3–100 characters
- Your URL slug is auto-generated from the name, but can be edited at this step
- Add an optional tagline (max 200 characters) and Description (max 280 characters)
Wizard Step #3: Choose your Access Model
| Access Model | How It Works |
| Public | Anyone can discover and join freely [Marketplace for discovering communities TBD] |
| Private | Requires purchase of a linked ThriveCart product |
Wizard Step #4: Set your Community Branding

- Choose your Sign-in Page Layout from 4 different styles, all built to inherit your brand colors
- A live preview updates on the left as you make changes
Wizard Step #5: Review and Confirm
- Review your Community name, type, access model, and branding
- Click Preview My Community to see a mock-up before creation
- Click Create My Community — your Community is provisioned and ready within 3 seconds
After the wizard, finish your community setup using the “Getting Started” Checklist in the left-hand sidebar.
Configure Gamification
Choose a preset or build your own:
- Light Touch — minimal points, subtle engagement signals
- Engagement Booster — moderate points for course and discussion activity
- Gamified Mastery — full point system, badges, leaderboards, and community roles
For more information on Gamification setup and management in your community, see Gamification Settings in ThriveAcademy.
Set Up Content Spaces
Every Community is made up of Spaces. Think of them as dedicated rooms inside your community, each with a clear purpose, its own discussion feed, and its own role in keeping students engaged, progressing, and coming back. Unlike bolt-on forum tools or external Facebook Groups, Spaces are woven directly into the learning experience — students never leave the community to get support, access resources, or celebrate wins.
Add and configure the Spaces your community will use. For Course + Community type communities, you can assign specific courses to dedicated Spaces here so course discussions stay in context.
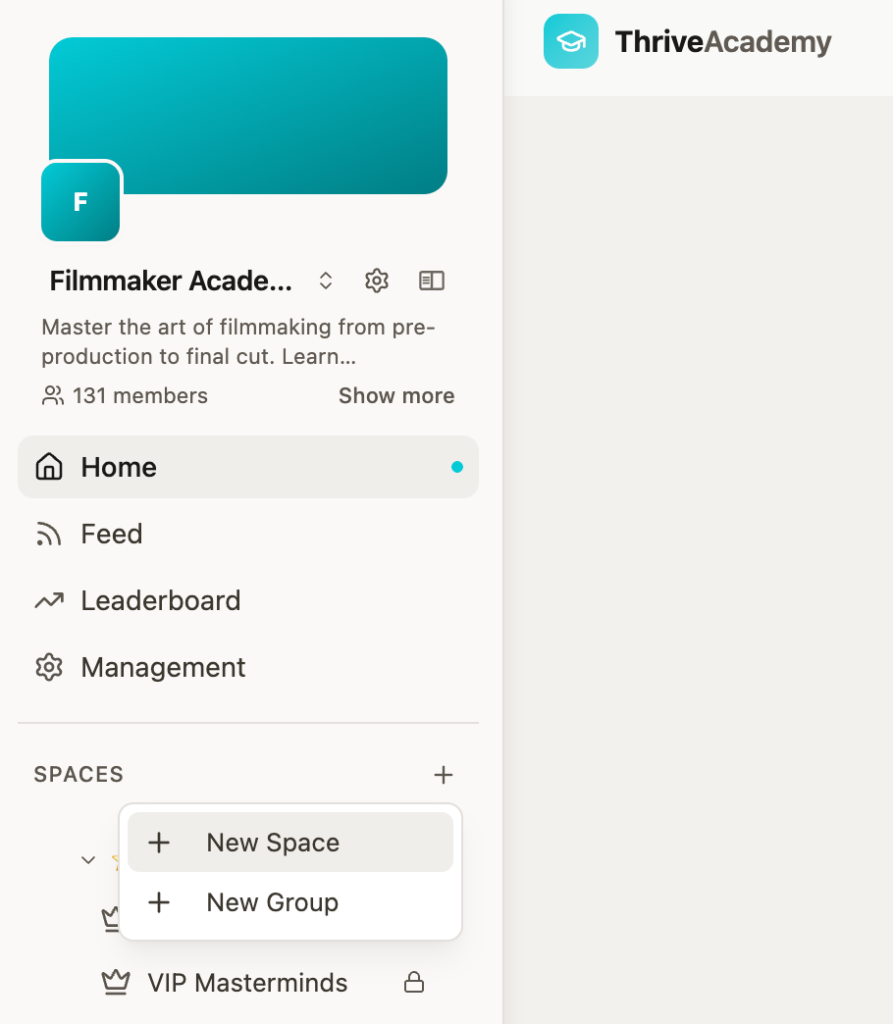
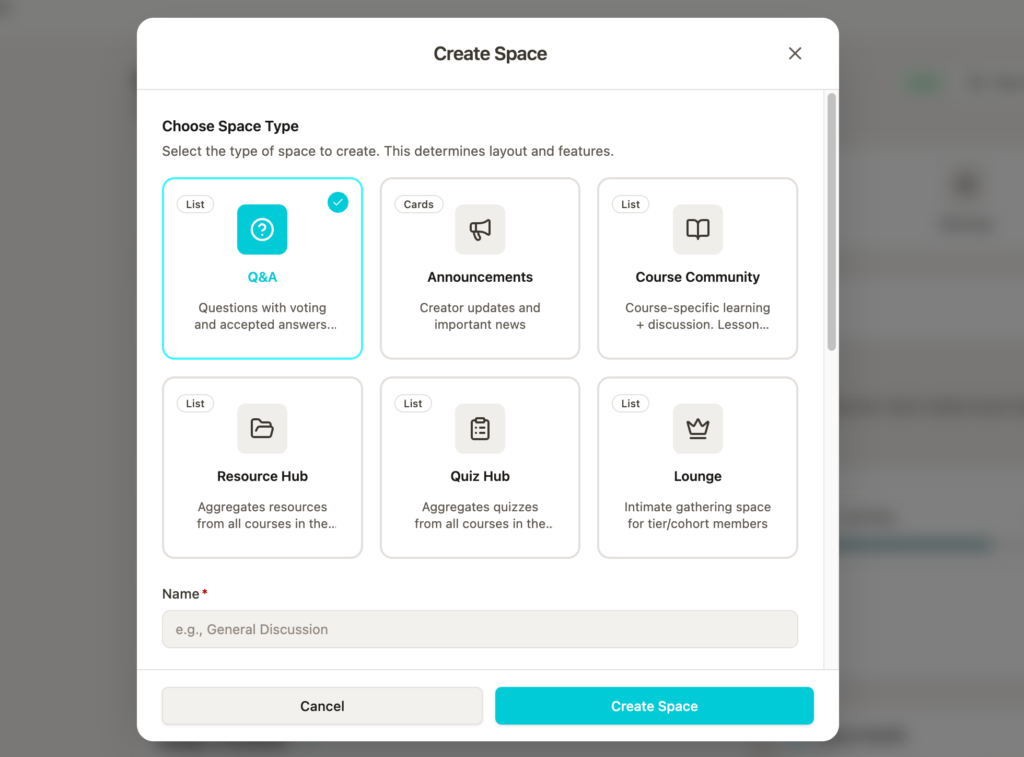
Creating a New Space will open a modal to choose the space type and enter that Spaces details. Add a Name, customize the URL slug, and set your course description.
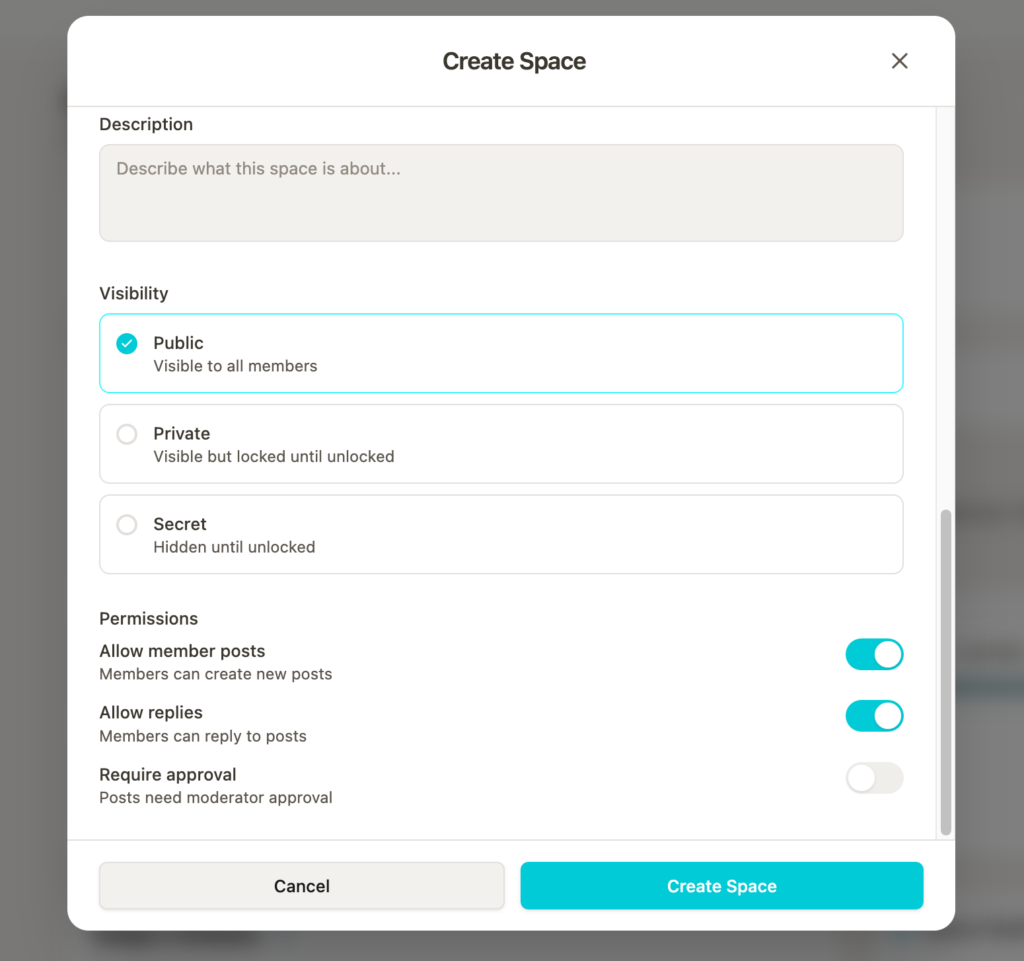
You’ll be able to set up privacy settings as well as who gets access, whether members can post, reply to posts, and if their posts will require moderator approval before going live in that space.
Space Types
Spaces are the heartbeat of a healthy community. Each Space has its own focused feed, so conversations stay organised and relevant rather than piling up in a single overwhelming thread.
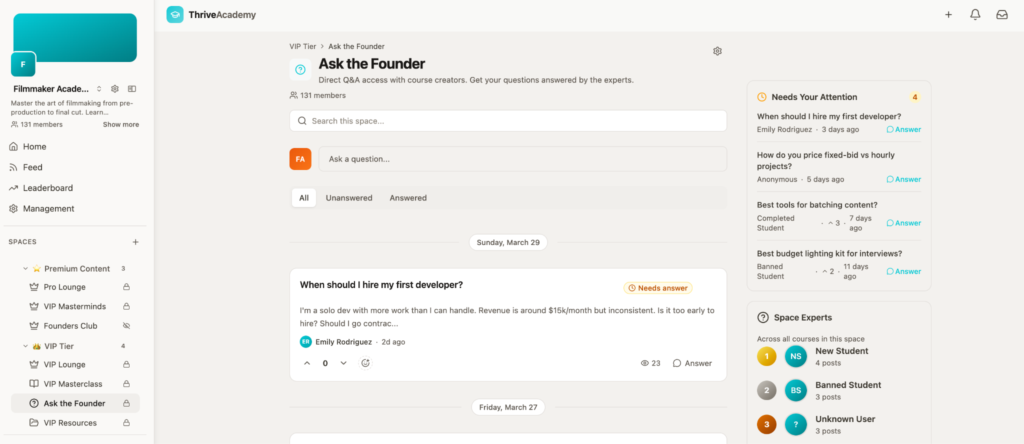
Six Space types come built-in and are available the moment your Community goes live:
Q&A: Structured peer support at scale. Students post questions, peers and your team answer, and the best answer gets pinned to the top of each thread. Questions are tied to your content, so support stays in context rather than getting buried in your inbox or a generic Facebook Group. The more active your community becomes, the more Q&A runs itself.
Announcements: Your broadcast channel. Only you and your team can post here, but students can react and comment. Use it for new content drops, live session reminders, community updates, and anything time-sensitive. High-priority announcements pin to the top of every student’s feed automatically — you’ll never need to chase engagement with an email again.
Course Community: Every course comes with its own discussion board to keep course conversations together. Students can post questions related to course content, and course-specific announcements can be made here.
Resource Hub: A searchable library for everything you want to share outside of lesson content — worksheets, templates, checklists, swipe files, external links, and supplementary material can all be uploaded here. Supported file types include images, videos (mp4, webm, mov), and documents (pdf, docx, zip, etc.).
Resources are always one click away in the sidebar, so students never dig through old lesson pages trying to find that file you mentioned in Module 3.
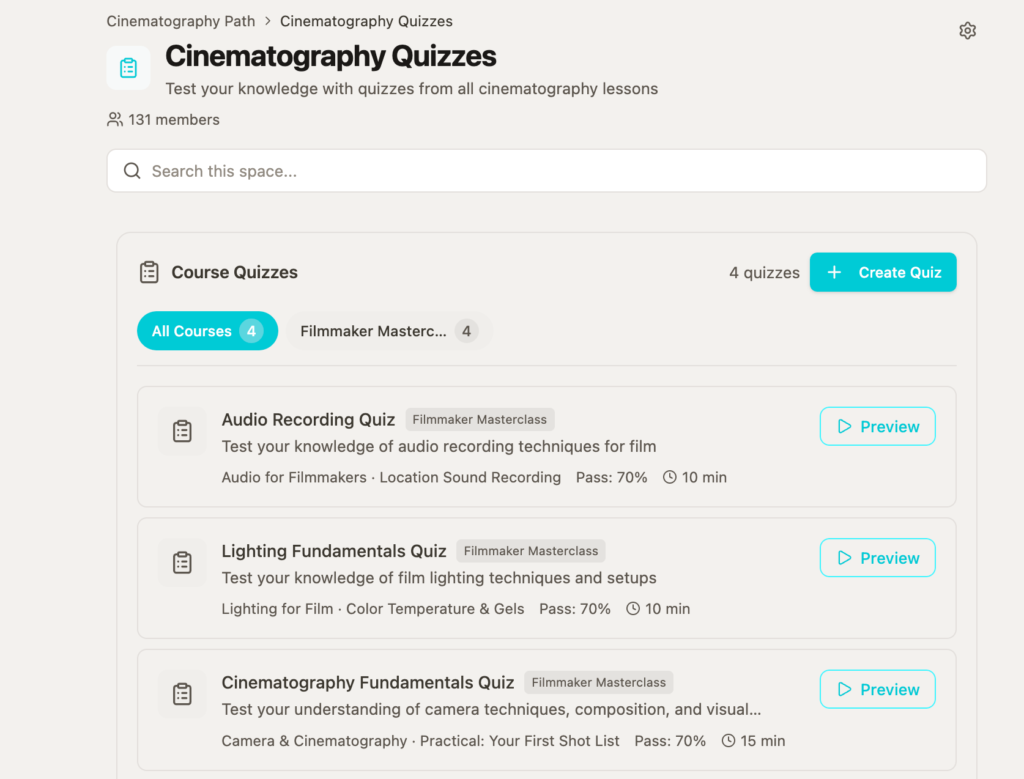
Quiz Hub: All quizzes that exist within the communities courses can be found here so that students never miss taking quizzes and can access completed quizzes to be used as a final assessment study guide.
Lounge: VIP area for tiered student access for a more intimate Q&A and/or general discussion setting.
Notes on Course Spaces
Courses in ThriveAcademy live inside your Community alongside everything else. When a student clicks into a course, the Community sidebar stays with them the entire time: their navigation, their discussions, their leaderboard position, all visible while they learn.
Lesson-specific discussions appear directly below every piece of content, so students can ask questions in context and get support without ever breaking their flow.
Every course completion, lesson milestone, and quiz pass can generate a post in the community feed — turning individual progress into shared momentum that keeps the whole group moving forward together.
Hot Tips:
- One community can hold multiple courses. You can create separate Course Spaces per course inside a single community rather than building multiple communities
Unlock Rules for Private and Hidden Spaces
When a space is set to private or hidden, you’ll see an additional setting for Unlock Rules, as well as the ability to set Teaser Messages or Images for private but visible spaces.
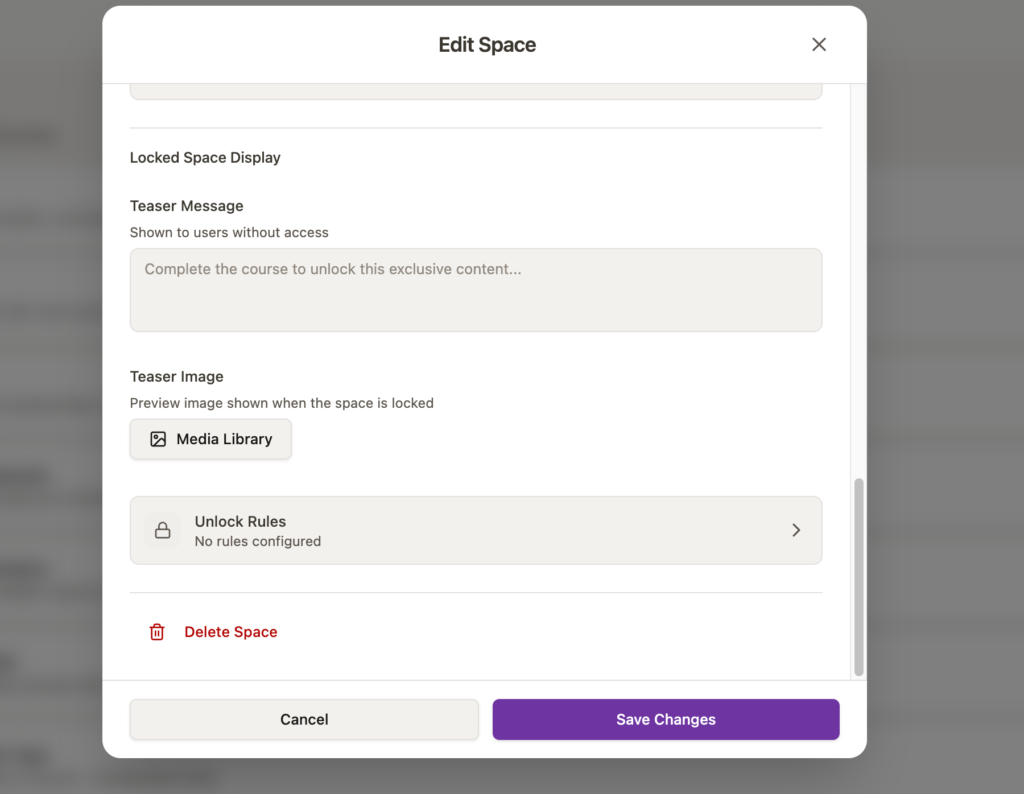
Clicking into “Unlock Rules”, you’ll be able to add a rule to determine how community members get access to this space.
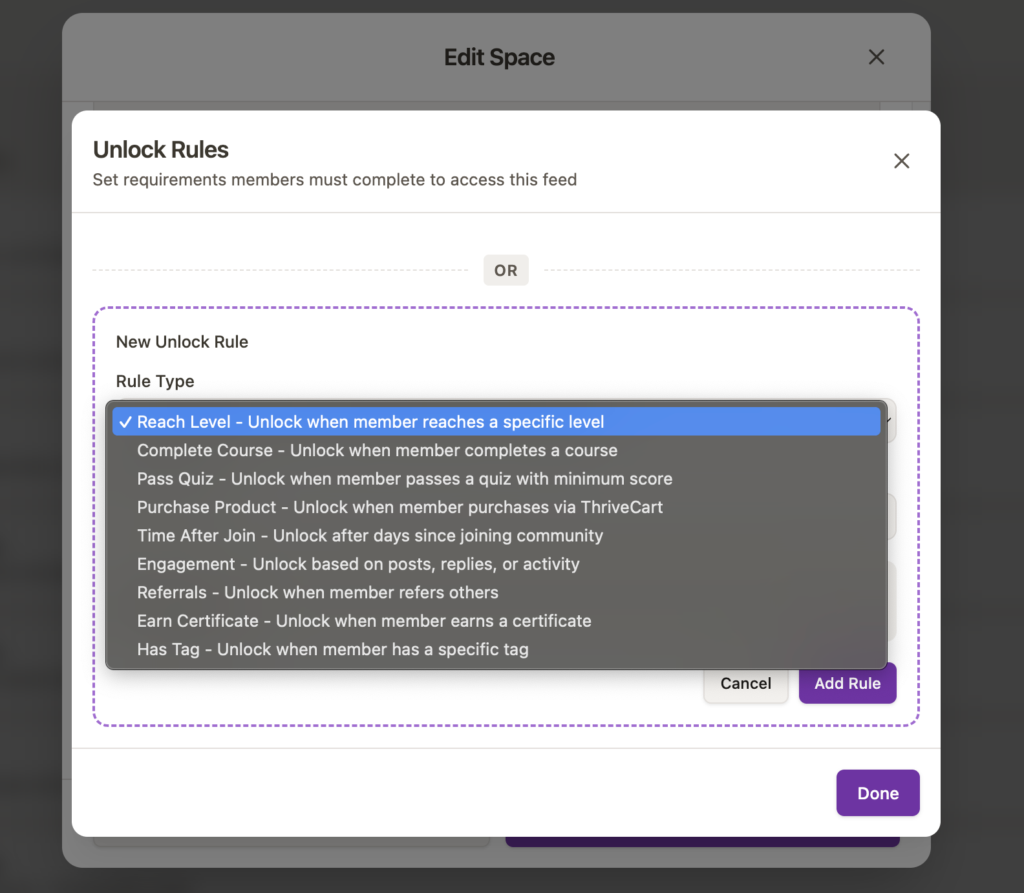
These rules can be based on XP levels, course completion, passing a quiz, product purchase, X amount of time after joining community, engagement, referrals, certificates earned, or if a student has a specific tag.
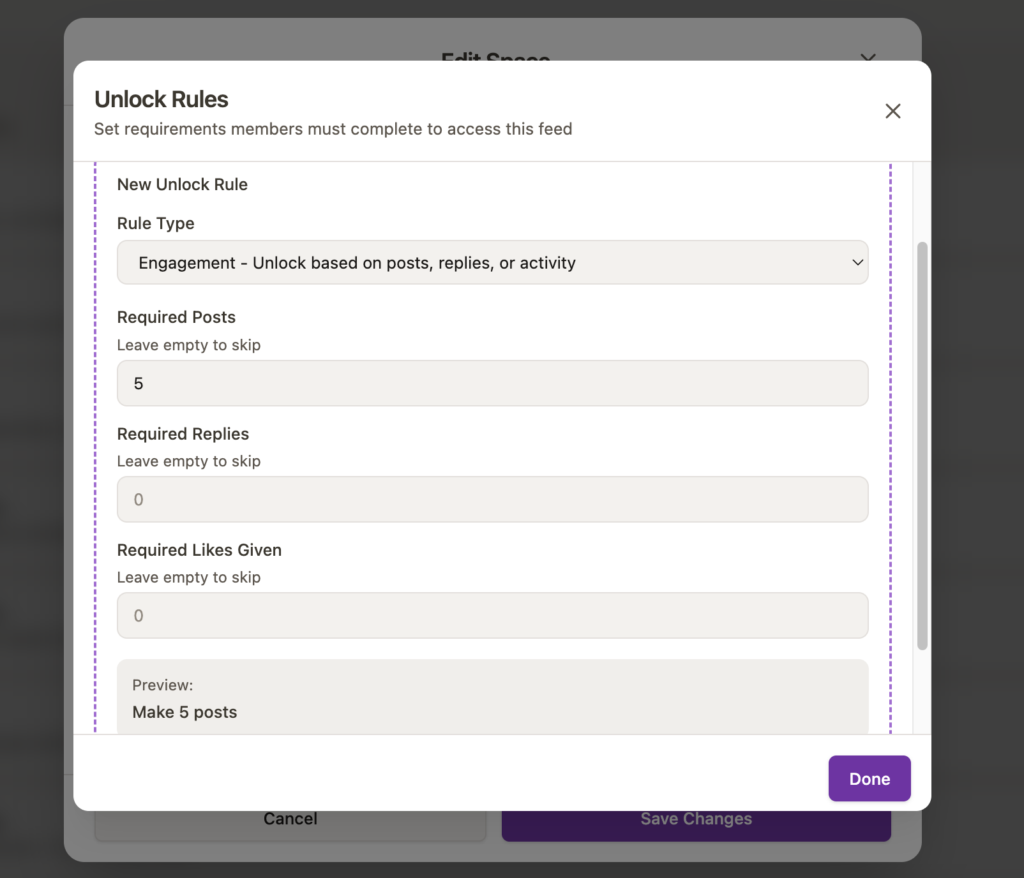
The specifics of the rule will update based on your selection, but for example, you can reward highly engaged members with additional content or discussion pages. If Engagement is the chosen unlock rule, then your space will unlock for only engaged community members after they have made a certain number of posts, replies, and/or liked a certain amount of comments/posts.
Link a ThriveCart Product (Required for Paid communities)
Linking to your community can be done in two places within ThriveAcademy, as long as you have first connected your overall ThriveCart integration.
1. Connecting to ThriveCart via overall account settings
In your overall account settings, you can integrate your ThriveCart account to ThriveAcademy and set Product Access Mapping rules.
To link ThriveCart, head to Settings > Integrations:
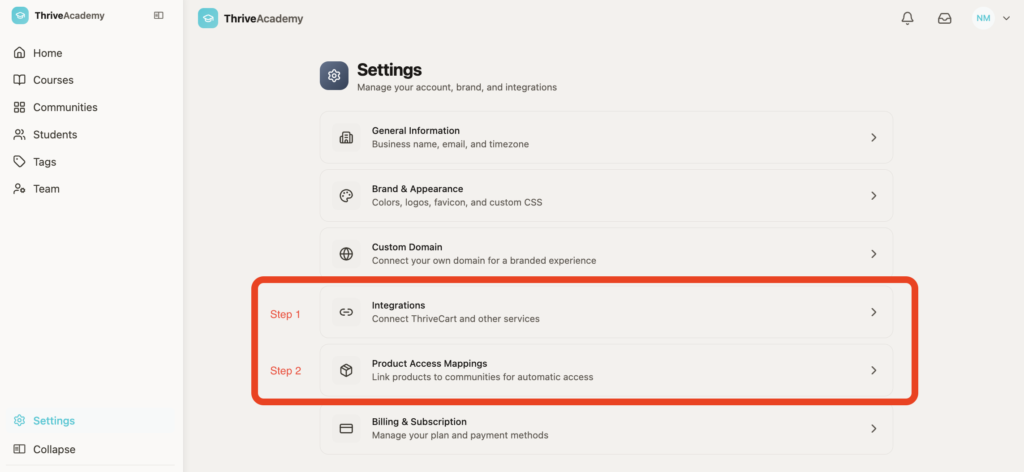
In Step 1, you’ll be directed to link your ThriveCart account to ThriveAcademy by logging into your ThriveCart account (if not already logged in) to authorize the connection.
In Step 2 you can choose a specific community or space and then select “+ Create Mapping”
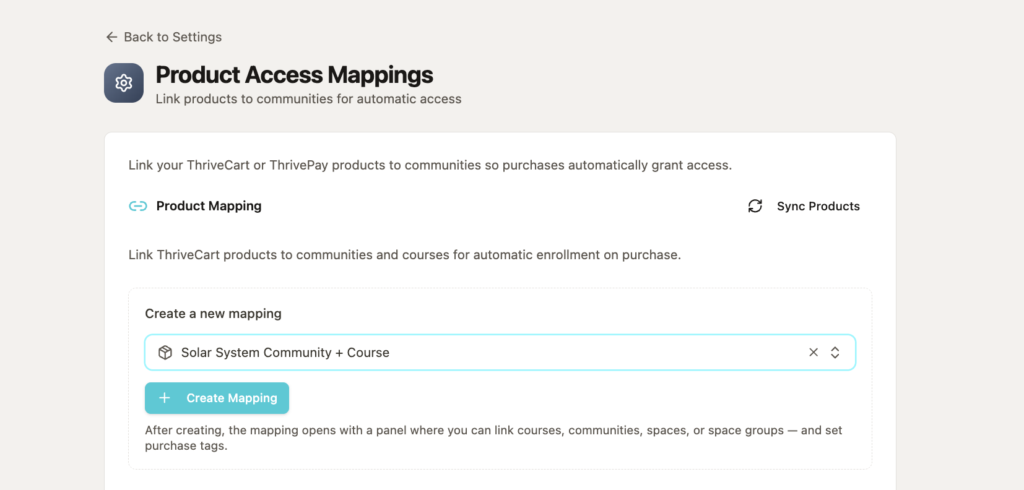
From the modal that opens, select “+ Add target”, where you can then choose whether that product unlocks specific courses, communities, spaces, or space categories.

You can choose multiple targets (i.e. specific communities, spaces, and/or space groups) for a specific product, so configuration is up to you.
Once you’ve selected your community, or space(s) that your product grants access to, you’ll see them listed below your product name.
Under the “Tags” tab, you can also then choose whether anyone purchasing this product receives a specific tag that can be used in additional access settings throughout your course and/or community setup.
2. Enabling within Community Settings
Within the “Access” tab, you’ll want to set your community to Private and Paid if it requires a purchase. From here, you can also click the “Link Product” tab to choose which of your ThriveCart products grants access to this community.
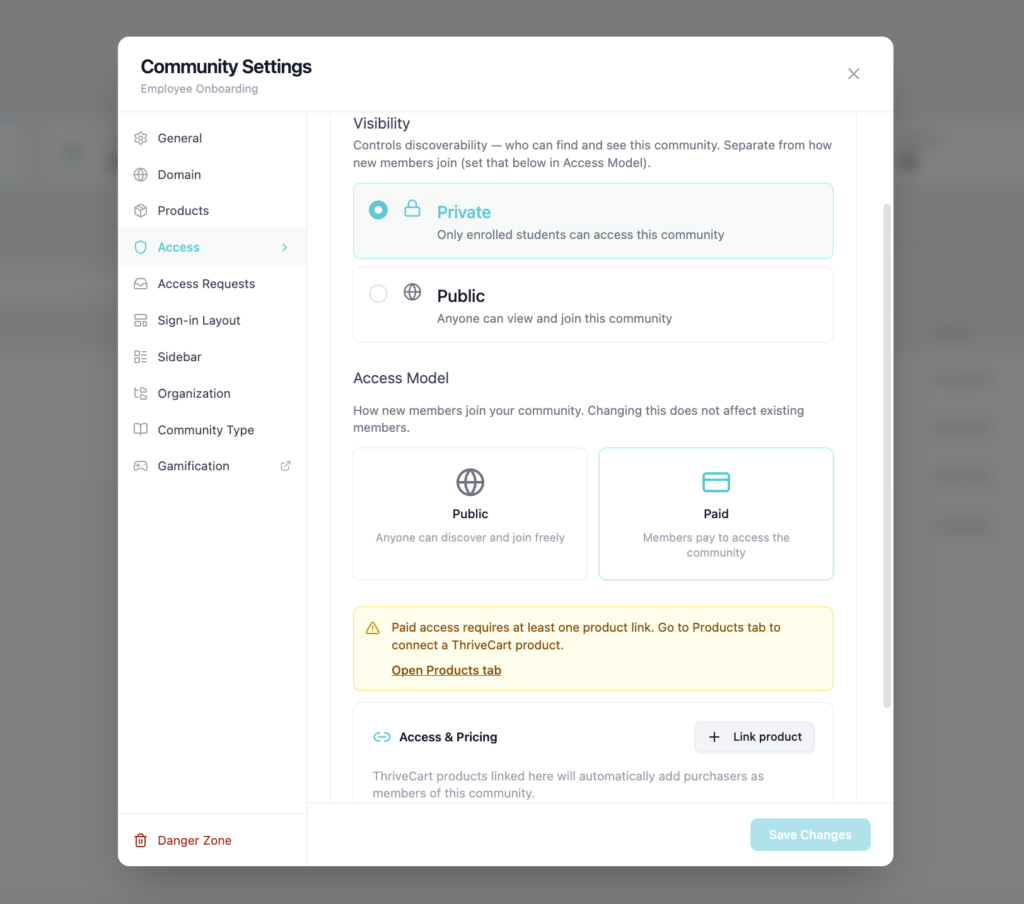
Within the Products tab of your community settings, you can also review any already assigned products and/or specify if a space requires specific product access.
Some notes on Space access:
- If your space is set to Public, they will get access to the space when getting access to the overall community.
- If your space is set to Private but locked, you will need to specify a product that grants access to that space.
- If your space is set to Unlocked, students will only get access once meeting your specific unlock rules.
Community Settings
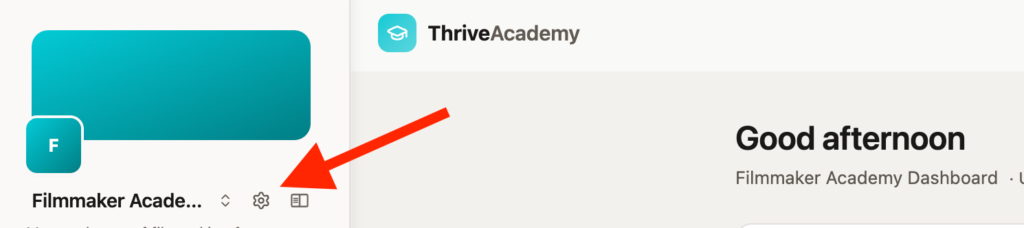
While the Community Setup Wizard will walk you through most of the setup required to launch your community, advanced configuration can be found within your Community Settings.
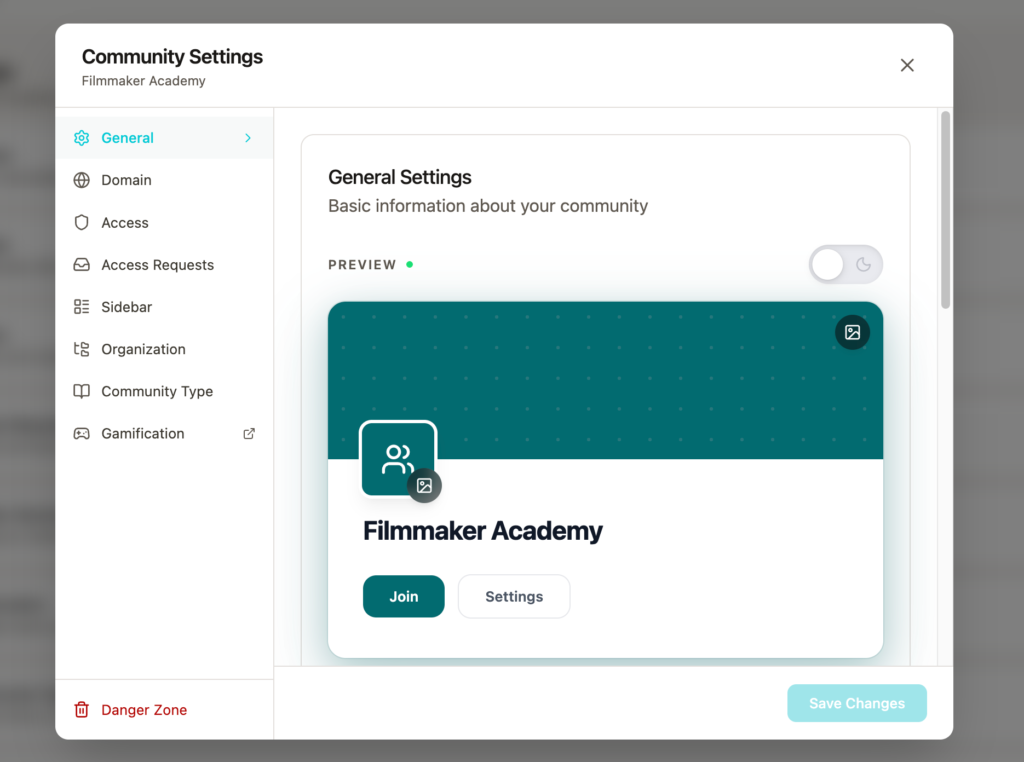
General
Set your communities brand name, description, colors, logos, community banner, as well as a header image. Click the image icons to upload a logo or banner image, and preview your community in both light and dark mode.
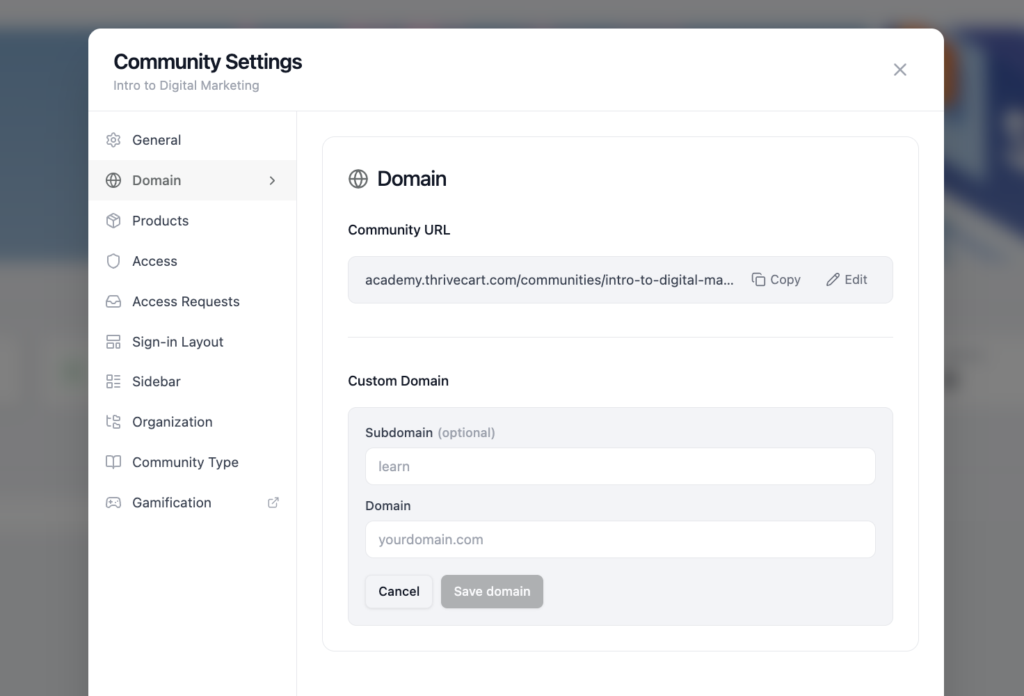
Domain
To set a custom subdomain for your Community, such as `learn.yourdomain.com` you’ll want to make sure that this subdomain has first been added to your domain host as a CName.
Within your host, you’ll want to set it up as follows:
Name: Your desired subdomain (i.e. “learn”)
CName (or “value”): This should always be set to alias.academy.thrivecart.com explicitly – nothing else will work to propagate your custom domain.
TTL: You can set as Automatic, or anywhere between 300-3600
Within ThriveAcademy, you can then add your subdomain. Remember that any DNS changes can take 24-48 hours to propagate fully.
Access
Where you can view and adjust your access model that was set during Community setup (Step #2).
Note that if changing access to Paid, this could remove any members who are currently enrolled, so change to a paid access model with caution.
Products
Where you can review the link to your ThriveCart product and grant specific access to spaces if desired.
Access Requests
Pending membership requests for public communities will live here for your approval.
Sidebar
Arrange the sections that appear as quick links in your students’ sidebar when they are viewing your community. Choose to hide any of your created spaces and rearrange the order of those spaces.
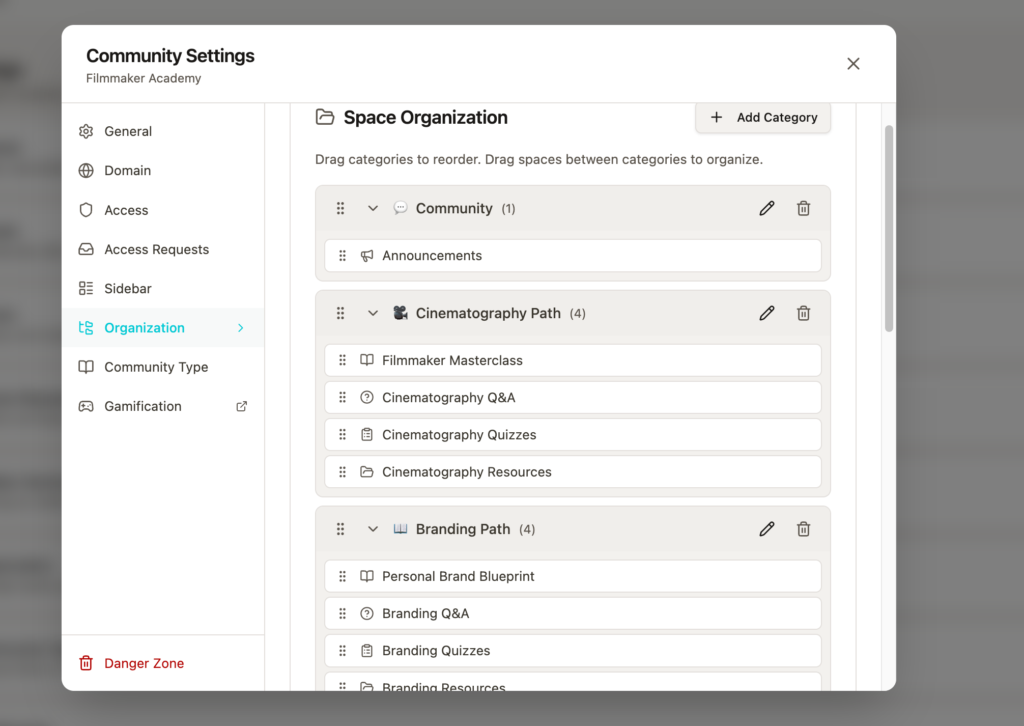
Organization
More granular organization for the Categories that exist within your Spaces. This allows you to see an overall view of every Space throughout your overall Community and move Spaces between categories.
Add a Space Category to create multi-level Space Categories for easy navigation within your community.
An example of a complex Community with multiple Space Categories can be seen below, where an initial space is labeled the “Community” category, and then Cinematography Path and the Branding Path Space Categories each include their own courses, Q&A, Quiz, and Resource Hub Spaces.
Community Type
Change the Community Type set in Step #2 of Setup, where you can choose from Course + Community or Course Only.
Gamification
Where you can set how points are granted when using gamification in your community. This links out to your overall gamification settings for your community.
Quick Setup offers three pre-configured presets so that you can quickly and easily get started with gamification that suits your needs.
More in-depth configuration can be set if you prefer to set specific point rules, levels, leaderboard resets, and custom badges. See more on full gamification configuration in our guide here.
Frequently Asked Questions (FAQs):
- Q: Why is “Go Live” not appearing as an option in my setup checklist?
- A: For Paid communities, the Go Live task requires a linked ThriveCart product before it becomes available. Confirm the Link ThriveCart Product task is complete and the product is published in ThriveCart.
- Q: Why is my Community URL slug showing as unavailable?
- A: Slugs must be unique across the platform. Edit the slug field on Screen 1 of the creation wizard before completing setup. Once a Community is created, the slug cannot be changed.
- Q: Can I change my community type after it’s been created?
- A: Yes. Community type (Course + Community, Community Only, Course Only) can be adjusted in Community Settings after creation. Changes to your access model (such as switching from Free to Paid) may affect existing members and should be reviewed carefully before saving.
- Q: Can I have more than one Community on my account?
- A: Yes. There is no limit to the number of Communities you can create. All of them are managed from the Communities section of your ThriveAcademy Dashboard, and each has its own independent settings, Spaces, members, and Health Score.
- Q: Why aren’t my branding color changes displaying correctly after going live?
- Q: Do Moderators and Admins count toward my student numbers?
- A: Only members enrolled in a course count toward your enrolled student stats. Moderators and Admins who are not also enrolled in a course appear in your team management view but are not counted as students.
- Q: How do I create course bundles?
- A: Bundles in Learn+ were set by linking courses together into a bundle, however in ThriveAcademy you can simply set one product as the link to unlock multiple products by adding multiple course spaces to a single community and sell access to that overall community OR Specific Spaces within a community OR have one product unlock multiple courses.
- Overall Community bundle: create a course space for each course you’re wanting to include in the bundle. Link a product to grant access to the entire community.
- Space w/in a community bundle: Set unlock rules for each locked space and course to be based on a specific product purchase.
- Standalone Courses bundle: On each course, choose the specific product purchase that unlocks that course.
- A: Bundles in Learn+ were set by linking courses together into a bundle, however in ThriveAcademy you can simply set one product as the link to unlock multiple products by adding multiple course spaces to a single community and sell access to that overall community OR Specific Spaces within a community OR have one product unlock multiple courses.
- Q: Can I disable comments in ThriveAcademy?
- A: Absolutely! You can disable new posts/replies in each of your Spaces settings. Under Permissions you can choose to allow new posts, allow people to comment on existing posts, or set all new posts to require moderator approval.