It’s important to understand that ThriveCart and WooCommerce are designed for different types of selling experiences.
WooCommerce is built around a traditional eCommerce “add-to-cart” model, which works well for multi-product stores where customers browse and add items to a cart before checking out.
ThriveCart, on the other hand, is built as a conversion-focused, funnel-based checkout system. It’s designed for sending targeted traffic to specific offers and using tools like bump offers and upsells to increase average order value. Because of this structure, ThriveCart functions differently from an “add-to-cart” style platform and is better suited for streamlined, single-offer or funnel-driven sales processes.
So how do ThriveCart and WooCommerce integrate?
In short, they don’t directly integrate – however you can set up your WooCommerce product to point to your ThriveCart checkout page. This allows you to keep your product pages and setup on your website.
You can also use a third-party platform like Zapier to create a workflow that adds customers to your WooCommerce dashboard after completing their purchase in ThriveCart.
1. Setting up WooCommerce to send users to your ThriveCart checkout page
WordPress powers a lot of websites on the internet, and it’s not uncommon for ThriveCart users to have previously had a WooCommerce set up on their site where they have a number of products set up within their chosen WordPress theme.
By its nature, those products add items to a cart in WooCommerce, and whilst that’s not a function of ThriveCart, what you can do is adjust your products in WooCommerce so that the dedicated product pages can link to your dedicated ThriveCart checkout page for that product instead.
When creating or editing a product, WooCommerce will have it set to a Simple product under the product data section.
You’ll want to change this to External/Affiliate product (WooCommerce Help Doc here):
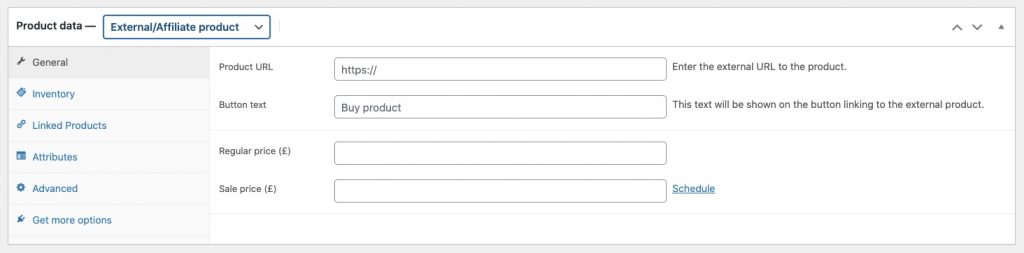
Using this option changes the behaviour of WooCommerce and instead of having an “add to cart” button, it gives the product a call to action button which when clicked can take your site visitor to another URL.
- Product URL – this is where you’d enter the URL to the ThriveCart checkout page you’ve set up for that product
- Button text – this is your call to action, so something like ‘Buy now’, or ‘Secure your order’, etc.
- Regular/Sale price – these fields set how the pricing on your website look. However this isn’t linked to the price you’ve set up in your ThriveCart account, so if you change it in ThriveCart, you’ll want to update the product setting in WooCommerce as well.
Once you’ve saved your product in WooCommerce, users on your website will now get sent to your dedicated ThriveCart checkout page and funnel for that product.
2. Adding ThriveCart customers to WooCommerce post-purchase
Using a service like Zapier, you can have your customers from ThriveCart added to your WooCommerce site. This might be helpful if you have some kind of fulfillment linked to your products there.
You would look to use the ThriveCart Zapier app to set up the trigger.
You can also find our helpdesk article on getting started with Zapier here.
You’d also need WooCommerce’s Paid Zapier app. Please note that we have no affiliation with this and cannot provide support for their WordPress plugin/Zapier app.
Essentially, the flow would be that when your customer purchases your product, this triggers Zapier to take their information and then pass the data through to your WooCommerce site to create their order for your product there.
Related Articles